background image

P2

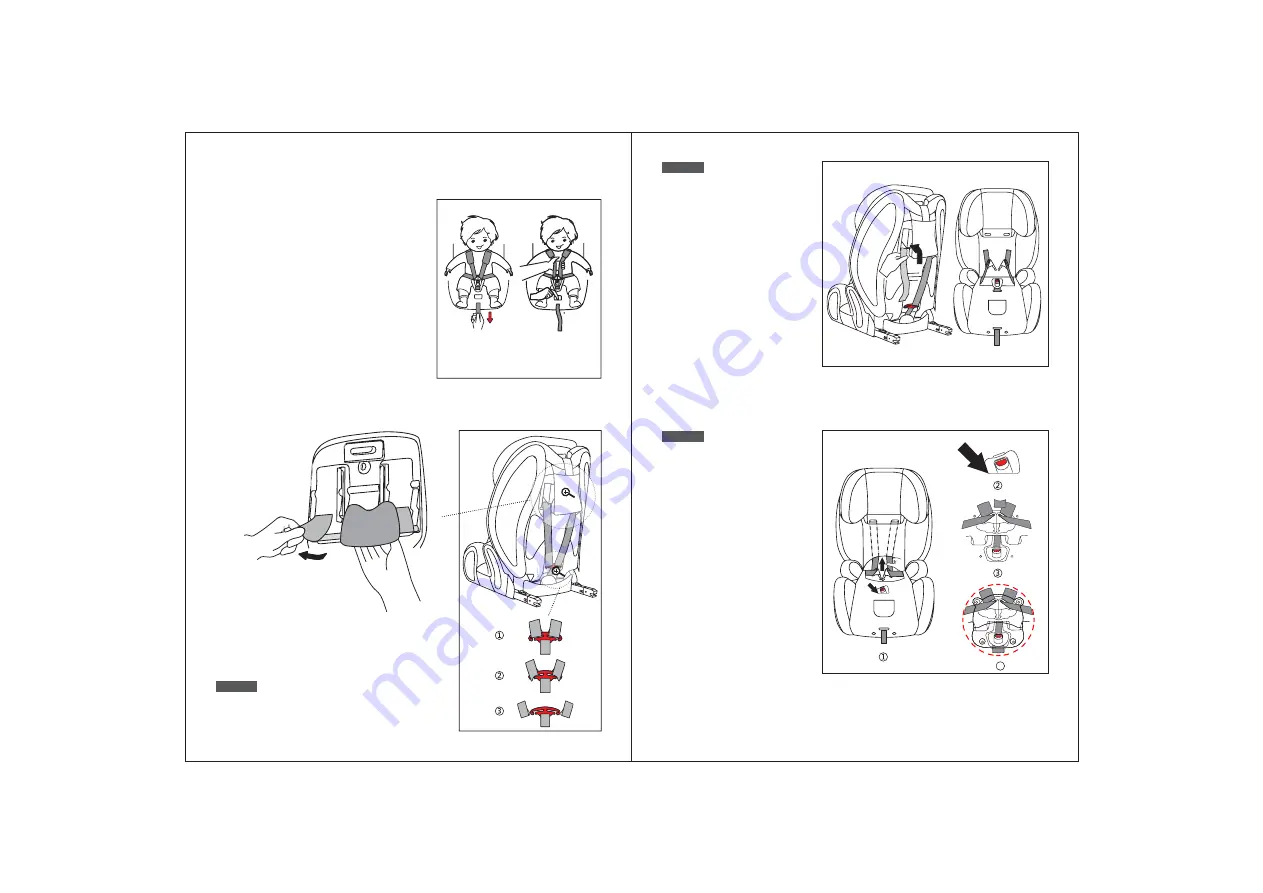
Loosen the shoulder harness turn the child seat to 

the back. Slide the chest straps and shoulder straps 

off the harness connectors.

P1

4.4 Adjust and use the harness

4.5 Remove the chest pad, cushion, crotch pad 

and hide the harness, buckle

Loosen the harness    

The harness is slackened by pressing the adjuster 

(under the seat cover) on the front of the seat. Press 

down the adjuster as you grip the two shoulder 

straps with your another hand. Pull the shoulder 

straps towards you to loosen the harness.

Tighten the harness

Pull the shoulder straps upwards to remove the 

slack from the lap sections of the harness then pull 

the adjuster strap until the harness is fully tightened. 

The harness should be adjusted as tightly as 

possible without causing discomfort to your child. A 

loose harness can be dangerous. Check the 

harness adjuster and tighten each time the child is 

placed in the seat.

Loosen the harness

Tighten the harness

Step1

5

6

4

Step2

Step3

Pull the straps through the shoulder 

strap slots from the front of the child 

seat. Now you can remove the 

shoulder straps and chest pad.

Hide the harness and buckle  

Hide straps and buckle.1.Lift 

backrest and the cover at base 

junction, thread the straps between 

cover and backrest

(①)

, straps 

still connect to the harness 

connector which behind the 

backrest. 2.Remove the cover 

plate, pull the bottom of buckle 

through the cover

(②)

 and put it 

in the corresponding slot. Combine 

the upper half of buckle and put it 

in the corresponding slot of the 

backrest

(③)

.3.Cover 

upper&bottom of the buckle with 

cover plate, fixed with plastic 

button. Tidying up the cover.

Summary of Contents for Oyster lite2 LB-526

Page 1: ...ight 9 36 KG www babystyleuk com cn www babystyle co uk Asia Sole Distributor Allied Champ Group Holdings Limited Hong Kong China Mainland Sole Distributor Group I II III LEO FIX LB 526 INSTRUCTIONS M...

Page 2: ...m 2 2 Feature 3 2 Safety Warning 8 16 Packing list 9 17 Warranty 6 15 Maintenance and cleaning 7 16 The main technical parameters 4 3 Usage Install position of the child seat in vehicle Checking the s...

Page 3: ...ccident For the reason of safety the child seat must be fixed inside the vehicle using ISOFIX anchorage for group 1 and using 3 point belts for group 2 3 even if you do not put your child inside the c...

Page 4: ...height for your child The child s shoulders should always be thread through the slots in the cover and seat shell that are closest to the top of your child s shoulders 4 Usage 4 2 Checking the should...

Page 5: ...e adjusted as tightly as possible without causing discomfort to your child A loose harness can be dangerous Check the harness adjuster and tighten each time the child is placed in the seat Loosen the...

Page 6: ...22 36KG approximately 6 12 years old 4 7 Pop up and retract the ISOFIX attachment Step 1 As the following picture shows pull back the cover plate when headrest at the highest position of Group 1 meanw...

Page 7: ...ure the ISOFIX attachment has popped up As the picture shows the top tether and bag should be turned to the upper of the backrest in order not to be clipped between child seat and the car Put the chil...

Page 8: ...he cushion chest pad and crotch pad Also the five point belt and buckle can be hided See 4 5 11 12 Step2 Step3 Step4 Ensure the attachment has popped up As the picture shows the top tether and bag sho...

Page 9: ...3 Forward facing installation with 3 point belt harness system Group 2 15 25KG approximately 3 6 years old Group 3 22 36KG approximately 6 12 years old Retract the ISOFIX system push the child seat t...

Page 10: ...6 3 Remove and assemble the fabric cover Attention Never use any solvant chemical detergent or lubricant on any part of your child seat Remove the cushion chest pads crotch pad see page 4 5 Undo buck...

Page 11: ...tailer to claim on the warranty The warranty excludes any fault caused by misuse damage or neglect It is the user s responsibility to undertake routine inspection and maintenance of the carseat in ord...

Page 12: ...FIX GB27887 2011 ECE R44 04 ISOFIX ISOFIX ISOFIX 1 2 3 9 36kg ISOFIX B 1 1 5 9 2 2 3 2 8 16 9 17 6 15 7 16 4 3 ISOFIX ISOFIX 1 ISOFIX 2 3 1 PRODUCT OVERVIEW ISOFIX ISOFIX ISOFIX 1 ISOFIX ISOFIX CONTEN...

Page 13: ...2 3 ISOFIX 9 18kg 1 9 4 15 36kg 2 3 6 3 6 12 ISOFIX 1 ISOFIX 36kg 1 4 2 4 1 GB14166 GB14167 ISOFIX 2 1 ISOFIX 2 3 ISOFIX 1 2 2 3 4 ISOFIX ISOFIX ISOFIX ISOFIX ISOFIX...

Page 14: ...4 5 4 3 2 1 4 4 4 5 1 2 2...

Page 15: ...6 7 4 1 2 3 4 6 4 6 1 1 1 9 18KG 9 4 1 1...

Page 16: ...8 9 4 6 2 2 3 2 15 25KG 3 6 3 22 36KG 6 12 4 7 ISOFIX 1 2 3 2 3 1 2 ISOFIX ISOFIX ISOFIX ISOFIX 5 1 ISOFIX 1 9 18KG 9 4 ISOFIX 8 4 7 2 ISOFIX ISOFIX 2 ISOFIX ISOFIX ISOFIX ISOFIX 5...

Page 17: ...10 11 4 2 4 3 4 4 5 2 ISOFIX 2 15 25KG 3 6 3 22 36KG 6 12 2 3 4 6 2 2 3 4 5...

Page 18: ...12 13 ISOFIX ISOFIX 2 ISOFIX ISOFIX 4 6 A 2 ISOFIX ISOFIX ISOFIX 4 7...

Page 19: ...14 15 5 3 2 15 25KG 3 6 3 22 36KG 6 12 ISOFIX ISOFIX 4 7 4 6 2 3 ISOFIX 4 5 A 6 2 6 1 6...

Page 20: ...8 7 16 6 2 6 3 4 5 17 9 30 480mm 440mm 640mm 11kg Babystyle UK Ltd 12 Babystyle UK Ltd 1 1 1 1...

Reviews: