

2
Copyright © 2022, Baby Trend Inc., All Rights Reserved. Todos los derechos reservados.
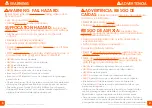
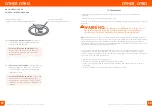
ADVERTENCIA
1
Copyright © 2022, Baby Trend Inc., All Rights Reserved. Todos los derechos reservados.
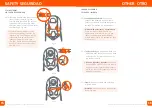
WARNING
WARNING: FALL HAZARD:
Babies have suffered skull fractures falling while in and
from bouncers.
• Use bouncer ONLY on floor.
• NEVER lift or carry baby in bouncer.
SUFFOCATION HAZARD:
Babies have
suffocated when bouncers tipped over on soft surfaces.
• NEVER use on a bed, sofa, cushion, or other soft
surfaces.
• NEVER leave baby unattended.
To prevent FALLS and SUFFOCATION:
• ALWAYS use restraints. Adjust to fit snugly, even if baby
falls asleep.
• STOP using bouncer when baby starts trying to sit up or
has reached 20 lb (9 kg), whichever comes first.
•
NEVER
Use toy bar as a handle.
•
NEVER
move bouncer with the child inside.
•
NEVER
substitute parts.
•
NEVER
use on any elevated surface.
•
NEVER
allow your bouncer to be used as a toy.
• Bouncer is
NOT
intended for use as a carrier.
• Bouncer is
NOT
intended for use as a sleeper or for prolonged
periods of use.
• Check your product for loose screws, worn parts, torn material or
stitching on a regular basis. Replace or repair parts as needed.
• Discontinue use of product should it malfunction or become
damaged. Please contact our customer service department to
arrange for repair or obtain replacement parts.
ADVERTENCIA:
RIESGO DE
CAÍDAS:
Bebés han sufrido fracturas de cráneo de
cayendo y en rebotador.
• SIEMPRE úselo sobre el suelo.
• NUNCA levante o transporte rebotador con niño.
RIESGO DE ASFIXIA:
Los bebés han
sofocado cuando los rebotador volcar hacia delante
sobre superficies blandas.
• NUNCA lo utilice sobre cama, sofá, almohada, o
superficie blanda.
• NUNCA deje al niño sin supervisión.
Para evitar CAÍDAS y ASFIXIA:
• SIEMPRE use sistemas de sujeción. Ajústelo para que
quede ceñido, incluso cuando el bebé se duerma.
• DEJE
de usar la silla mecedora cuando el bebé
comience a intentar sentarse o haya alcanzado las
20 lb (9 kg), lo que ocurra primero.
•
NEVER
use la barra de juguetes como un manubrio.
•
NEVER
mueva la silla mecedora con el niño adentro.
•
NEVER
reemplace piezas.
•
NUNCA
coloque rebotador en supercies elevadas.
•
NUNCA
permita el uso de su rebotador como un juguete.
• El rebotador
NO
debe ser usado como un transporte.
• El rebotador
NO
debe ser usado para dormir al niño ni por
períodos prolongados.
• Verifique con frecuencia que su producto no tenga tornillos
sueltos, piezas gastadas, materiales o costuras rasgados.
Reemplace o repare las piezas conforme sea necesario.
• Deje de usar el producto si presenta fallas o daños. Por favor,
comuníquese con nuestro departamento de servicio al cliente
para gestionar la reparación u obtención de piezas de reemplazo.
ADVERTENCIA


