


14
Copyright © 2022, Baby Trend Inc., All Rights Reserved. Todos los derechos reservados.
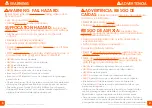
SAFETY SEGURIDAD
13
Copyright © 2022, Baby Trend Inc., All Rights Reserved. Todos los derechos reservados.
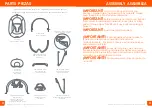
ASSEMBLY ASAMBLEA
ASSEMBLY ASAMBLEA
11)
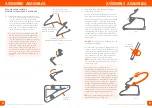
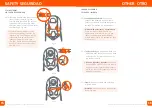
• Secure the seat pad to the frame by
buckling the straps on the back of the
pad (Fig. 11). Place the bouncer back
in the upright position.
• Sujete la almohadilla del asiento al
armazón abrochando las correas de la
parte trasera de la almohadilla (Fig. 11).
Coloque la parte trasera del rebotador en
la posición erguida.
TOY BAR INSTALLATION
INSTALACIÓN DE LA BARRA DE JUGUETES
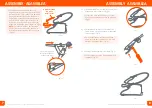
12)
• Position the toy bar above the bouncer as
shown (Fig. 12a). Insert the ends of the
toy bar through the corresponding holes in
the seat pad and into corresponding holes
on the frame. Push in until both sides click
into place. To remove, press the release
clips and pull up (Fig. 12b).
• Coloque la barra de juguetes por encima
del rebotador como se indica (Fig. 12a).
Introduzca los extremos de la barra de
juguetes en los agujeros correspondientes
de la almohadilla del asiento y en los
agujeros correspondientes del armazón.
Empuje hasta que ambos lados hagan clic
al llegar a su lugar. Para quitarlo presione
los ganchos de sujeción y tire hacia arriba
(Fig. 12b).
Fig. 12b
Fig. 12a
Fig. 11
HEADREST
APOYACABEZA
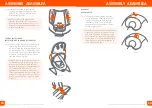
13)
• To hook the Headrest to the Bouncer,
use the adjustable hook and loop strap.
Thread it from front to back through
the headrest hoop. To adjust detach
and attach the hook and place it at your
desired height (Fig. 13).
• Para fijar el apoyacabeza al rebotador, use
el gancho ajustable y la correa en forma
de argolla. Enhébrelo de adelante hacia
atrás pasando en medio de la argolla del
apoyacabeza. Para ajustarlo debe quitar y
volver a poner el gancho y colocarlo a la
altura deseada (Fig. 13).
Fig. 13


