16
ASSEMBLY
Copyright © 2022, Baby Trend Inc., All Rights Reserved. Todos los derechos reservados.
WARNING
15
Copyright © 2022, Baby Trend Inc., All Rights Reserved. Todos los derechos reservados.
15
ACCESSORIES
Changing Table:
WARNING:
Do not use this accessory if you
cannot exactly follow the instructions that come with
it. Failure to follow these warnings and the instructions
could result in serious injury or death.
WARNING FALL HAZARD:
Children have
suffered serious injuries after falling from changing tables.
Falls can happen quickly.
• STAY in arm's reach of your child.
• ALWAYS secure the changing table to the playard
frame. See instructions, see page 16 to 19 for details.
SUFFOCATION HAZARD:
Babies have
suffocated while sleeping on changing tables.
Changing tables are not designed for safe sleep.
• NEVER allow baby to sleep on changing table.
• NEVER leave the changing table in place when the child
is in the Full-Size Bassinet or the playard. Always flip the
changing table down while not in use. To prevent your
child from falls and other injuries, always use the safety
belt when children are on the changing table.
• Discontinue use of the Full-Size Bassinet and the
changing table when child begins to push up on hands
and knees or has reached the height of 25 in. (635 mm),
weight of 15 lb. (6.8 kg) or 3 months old, whichever
comes first.
• Do not use changing table if it is damaged or broken.
• ALWAYS use the restraint system. Adjust belt as needed
to get a snug fit.
FALL HAZARD:
Check this accessory regularly
before using it, and do not use it if any part is loose or
missing or if there are any signs of damage. Do not
substitute parts. Contact Baby Trend® Customer Service
at 1-800-328-7363 if replacement parts or additional
instructions are needed.
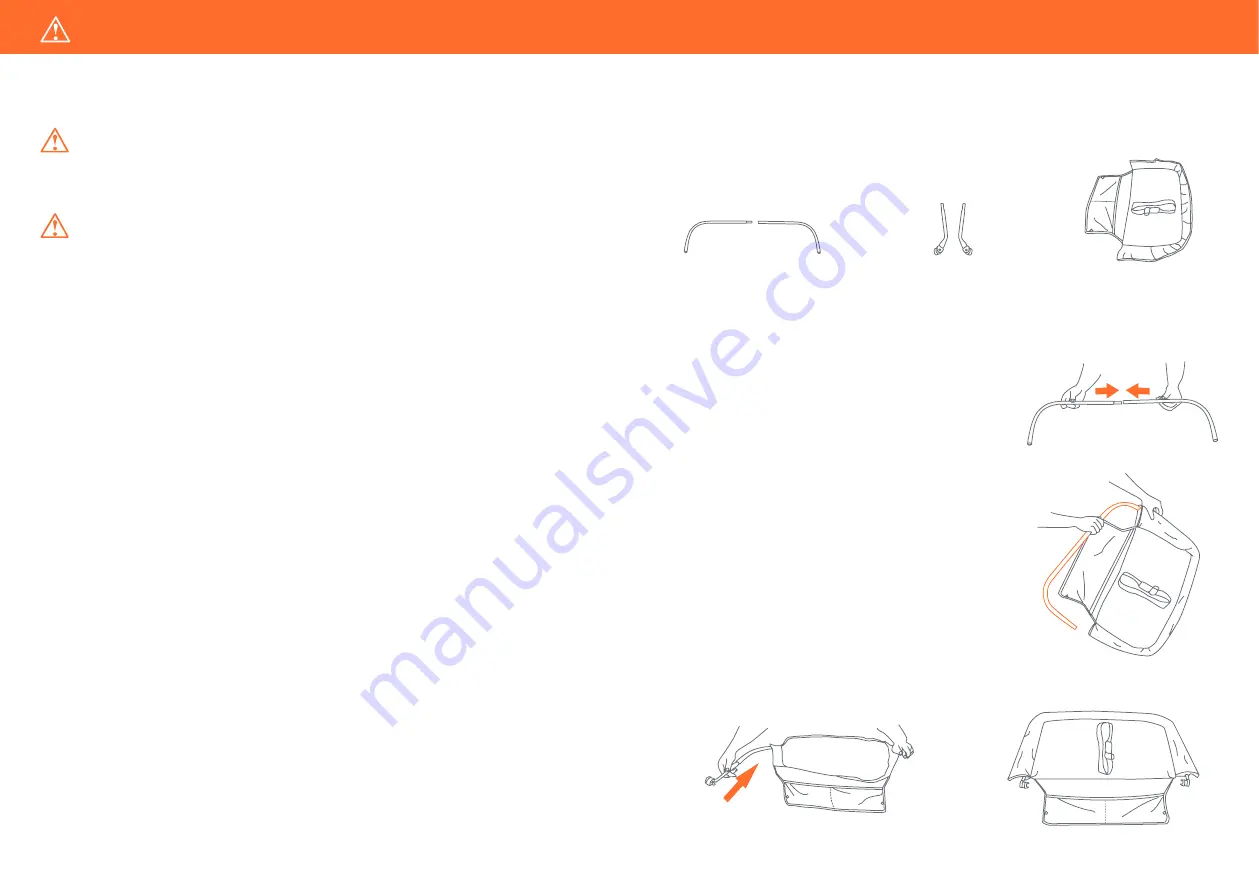
TO ASSEMBLE CHANGING TABLE
ATTENTION:
Playard and Full-size bassinet
must be fully assembled and securely locked
before installing or using the changing table feature (See To Assemble Playard and Full-size
bassinet sections).
Fig. 14a
Fig. 14b
14)
• Connect the two (2) Long Curved Bars
together (Fig. 14a).
• Insert the assembled curved bars into
the Changing Table fabric (Fig. 14b).
Slide the Curved Bars around inside
sleeve of the Changing Table.
• Connect the two (2) Short Bars to each
end of the Long Curved Bar (Fig. 14c).
Make sure that the knobs are both
facing down and the same direction on
each end (Fig. 14d).
Fig. 14c
Fig. 14d
2 Long Curved Bars
2 Short Bar with Connector Knobs
1 Changing Table


