background image

 Copyright © 2022, Baby Trend Inc., All Rights Reserved. Todos los derechos reservados. 

 WARNING

16

ASSEMBLY  MONTAJE

15

Copyright © 2022, Baby Trend Inc., All Rights Reserved. Todos los derechos reservados.

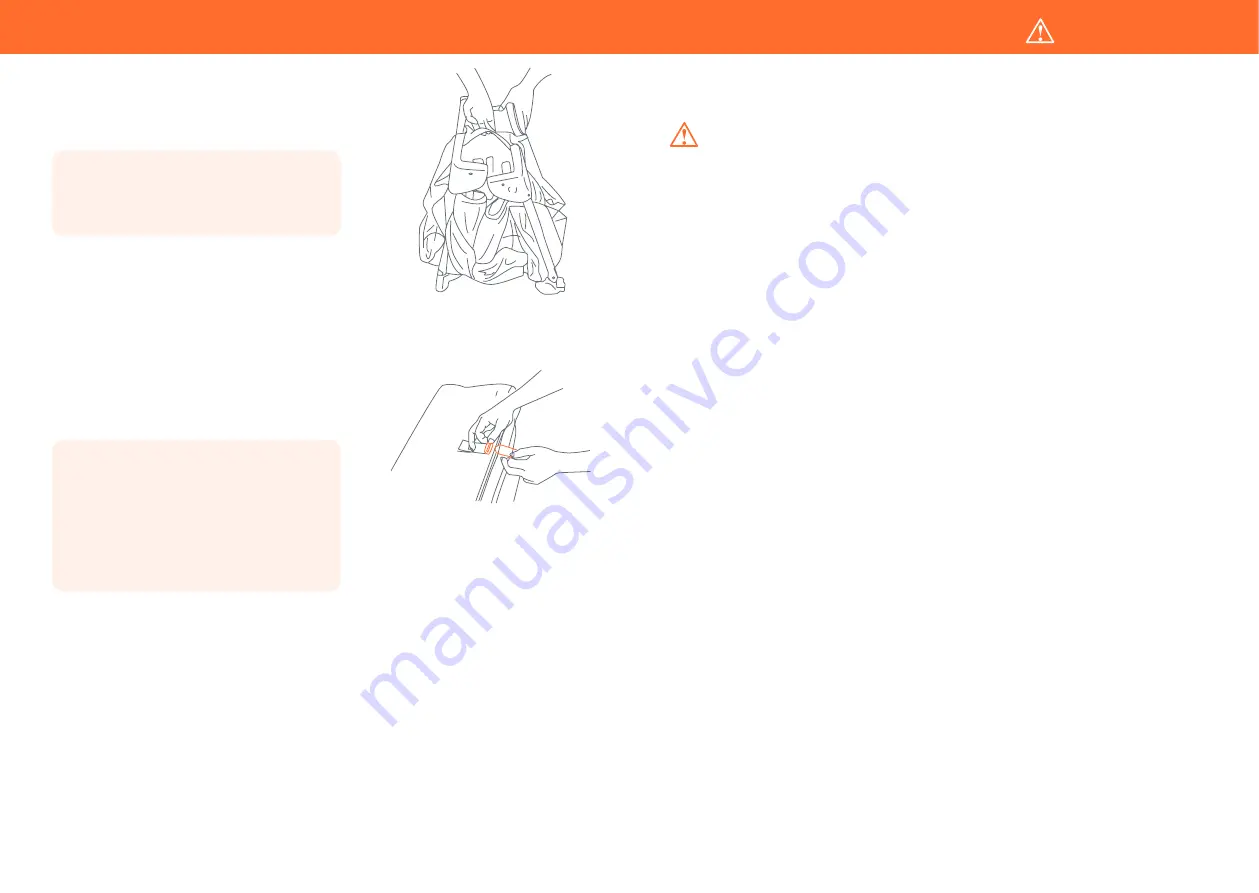
9)

  • Gather four (4) corners and center all 

together tightly (Fig. 9). Wrap Mattress 
around Playard frame with padded side 
facing inward. 

• Junte las cuatro (4) esquinas y el centro 

con firmeza (Fig. 9). Envuelva el colchón 
alrededor de la estructura del corralito de 
juegos con el lado acolchado hacia adentro.


10)

 • Secure the hooks and loop straps by 

feeding them through the loops on the 
end of the Mattress and folding them back 
onto themselves (Fig. 10).

• Place folded Playard into carry bag so that 

the handle comes through the opening 
between each side of the zipper.

• Asegure las cintas de velcro pasándolas por 

las presillas en el extremo del colchón y 
plegándolas sobre sí (Fig. 10).

• Coloque el corralito plegado en la bolsa 

de transporte de modo tal que la manija 
sobresalga de la abertura entre cada lado 
de la cremallera.

Fig. 9

Fig. 10

ACCESSORIES

Full-Size Bassinet & Cradles Warnings:


WARNING:


Failure to follow these warnings and

the instructions could result in serious injury or death. 

WARNING-FALL HAZARD:


To help prevent falls, do

not use this product when the infant begins to push up on 

hands and knees or has reached the height of 25 in.

(635 mm), weight of 15 lbs. (6.8 kgs) or 3 months old,

whichever comes first. 


•  ALWAYS check that the bassinet is securely locked on 

the base/stand by pulling upwards on the bassinet bed.

SUFFOCATION HAZARD


Infants have suffocated:

• In gaps between extra padding and side of the 

bassinet/cradle, and

• On soft bedding 

Use only the pad provided by Baby Trend®. NEVER add 

a pillow, comforter, or another mattress for padding.

• Strings can cause strangulation! DO NOT place items 

with a string around a child's neck such as hood strings 

or pacifier cords. DO NOT suspend strings over the 

bassinet or attach strings to toys.

•  NEVER use plastic shipping bags or other plastic film as 

mattress covers not sold and intended for that purpose. 

They can cause suffocation.

•  Use bassinet with only one child at a time.

•  NEVER place a child under the bassinet.

•  The bassinet must be fully assembled and installed 

before using.

•  The playard, including side rails, must be fully erected 

prior to use. Make sure each latch is secure.

•  NEVER leave the bassinet in place when child is in 

playard.

Summary of Contents for Nursery Center 8274BCC

Page 1: ...d USE of product KEEP INSTRUCTIONS FOR FUTURE USE Lea todas las instrucciones ANTES de armar y USAR el producto CONSERVE LAS INSTRUCCIONES PARA USO FUTURO Nursery Center 1 800 328 7363 8 00 a m 4 30 p...

Page 2: ...ty details GARANTIA NO DEVUELVA SU PRODUCTO A LA TIENDA POR FAVOR CONTACTE A BABY TREND PARA PIEZAS DE REPUESTO SERVICIO Y REPARACION La garant a de Baby Trend cubre defectos de f brica por 1 a o desp...

Page 3: ...ocation Strings can cause strangulation NEVER place items with a string around a child s neck such as hood strings or pacifier cords NEVER suspend strings over playard or attach strings to toys NEVER...

Page 4: ...do adicional y el lado de la cuna y En colchones blandos Utilice S LO la almohadilla suministrada de Baby Trend NUNCA agregue colchones almohadas edredones ni rellenos El colch n corralito almohadilla...

Page 5: ...gadas Revise antes de armar y en forma peri dica durante el uso Si necesita repuestos reparaci n o instrucciones llame al servicio de atenci n al cliente de Baby Trend al 1 800 328 7363 NUNCA reemplac...

Page 6: ...issing parts or sharp edges NEVER use if any parts are missing or broken missing or broken IMPORTANT IMPORTANT Adult assembly is required Adult assembly is required IMPORTANTE IMPORTANTE Para asegurar...

Page 7: ...ORTANTE El centro debe estar elevado mientras se aseguran las barandillas Si una barandillaqueda asegurada pero la otra no destrabe la barandilla presionando el mecanismo de liberaci n ubicado en el c...

Page 8: ...ado hacia arriba Fig 4 5 Insert the straps located on the underside of the Mattress through the slots in the floor of each end of the Playard Fig 5a Fasten the hook and loop straps to the underside of...

Page 9: ...l 90 grados en sentido antihorario y levante el centro a la altura de las barandillas superiores Fig 7 Junte las patas y las ruedas hacia el centro tan cerca como sea posible de manera que pr cticamen...

Page 10: ...llow these warnings and the instructions could result in serious injury or death WARNING FALL HAZARD To help prevent falls do not use this product when the infant begins to push up on hands and knees...

Page 11: ...confine child in playard ACCESSORIOS Advertencias de mois s y la cuna de tama o completo ADVERTENCIA La inobservancia de las advertencias e instrucciones podr a causar lesiones graves o la muerte ADV...

Page 12: ...se a la dimensi n del colch n Proporcione siempre la supervisi n necesaria para la seguridad continua de su ni o Cuando se use para jugar NUNCA deje al ni o solo El ni o puede quedar atrapado y morir...

Page 13: ...R LA CUNA DE TAMA O COMPLETO Remove Mattress from Bassinet Remove Canopy Unsnap all clips and lift Bassinet Quite el colch n de la Cuna Quite el dosel Suelte todos los ganchos y levante la cuna or o 1...

Page 14: ...ndo firmemente los ganchos de la Cubierta en el centro de las barandas superiores lo m s cerca posible del centro Fig 15a Sujete el otro extremo de la Cubierta al Corralito Utilice los 4 cierres de ga...

Page 15: ...use changing table if it is damaged or broken ALWAYS use the restraint system Adjust belt as needed to get a snug fit ACCESSORIOS El Cambiador ADVERTENCIA PELIGRO DE CA DA Los ni os han sufrido lesio...

Page 16: ...sure that the knobs are both facing down and the same direction on each end Fig 16d Conecte las dos 2 Barras curvadas largas juntas Fig 16a Introduzca las barras curvadas montadas en la tela del Camb...

Page 17: ...as de las correas de gancho en la parte de abajo de la mesa cambiadora a los rieles de lado del armazon del corrallito Fig 20 IMPORTANTE Par cuando la mesa cambiadora esta echada hacia arriba debe est...

Page 18: ...en el sentido de las agujas del reloj para destrabarlo Fig 22a Retire el Cambiador del Corralito Fig 22b y desconecte las Barras cortas de la Barra curvada oprimiendo los botones a presi n y desmont n...

Page 19: ...ito Fig 23b NOTA Cuando utilice la cuna de tama o completo recorte los ganchos del organizador para padres portapa ales directamente en los ganchos grandes de la cuna de tama o completo Fig 23c Fig 23...

Page 20: ...imulaci n visual y no a ser alcanzado por el ni o MOBILE ASSEMBLY ARMADO DEL M VIL 1 Wind Up Mobile 1 M vil Mec nico 1 Mobile Tri shaped Arm 1 Brazo triple de m vil Toys may vary Los juguetes pueden v...

Page 21: ...Alkaline standard carbon zinc and rechargeable batteries should not be mixed Remove batteries before storing music center for a long period of time ADVERTENCIA Mantenga las pilas fuera del alcance de...

Page 22: ...EP MUSIC SONIDOS DE LA DORMIR To listen to SLEEP music press the SLEEP button Press the button to change the song Para escuchar sonidos de la DORMIR oprima el bot n SLEEP DORMIR Puede usar el bot n pa...

Page 23: ...he dealer or an experienced radio TV technician for help DECLARACI N DE LA FCC Este dispositivo cumple con las normas de la Parte 15 de la Comisi n Federal de Comunicaciones FCC El funcionamiento est...

Page 24: ...vo no puede producir interferencias perjudiciales y 2 este dispositivo debe aceptar cualquier interferencia que reciba incluyendo las que puedan provocar un funcionamiento no deseado MAINTENANCE AND C...

Reviews: