ASSEMBLY ASAMBLEA ASSEMBLEE
ASSEMBLY ASAMBLEA ASSEMBLEE
31
32
14)
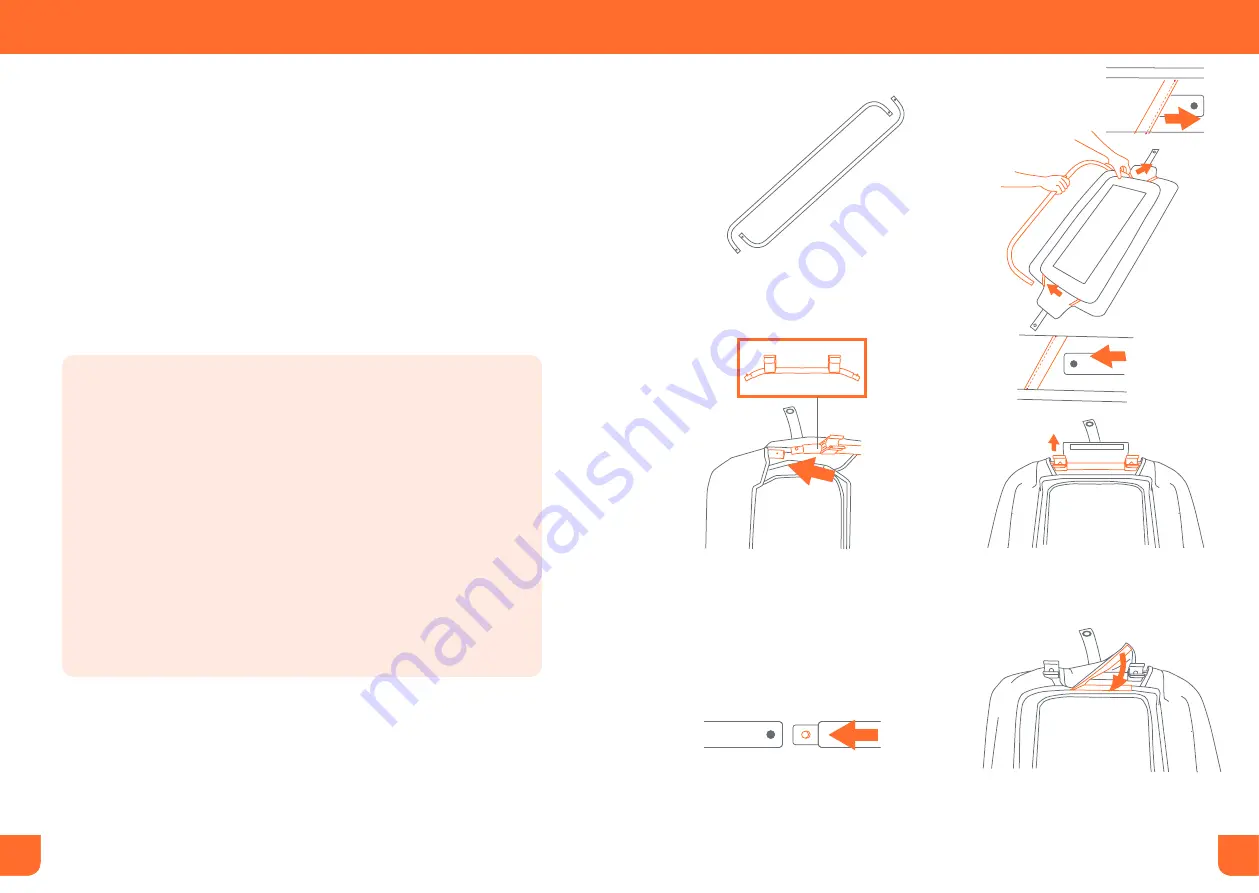
• Lay the changing table cover on a flat surface with the back side
facing up. Locate the 2 Curved Connector Bars (Fig. 14a). Insert
the Curved Connector Bars into the backside of the Changing
Table covering (Fig. 14b).
• Attach the Short Bars with the 2 Connectors to the Curved
Connector Bars (Fig. 14c). Be sure the clips are faced up during
this preparation on the backside of the changing table covering
(Fig. 14d). Insert both ends with the push pins into the Curved
Connector Bars. Ensure all pins click into postion on all 4
connection points (Fig. 14e).
• Close the covering by using the hook and loop fasteners on the
flap. Flip the flaps over the bars and fasten together (Fig.14f).
• Coloque el cambiador sobre una superficie plana con la parte
posterior hacia arriba. Ubique las 2 barras conectoras curvadas
(Fig. 14a). Introduzca las barras conectoras curvadas en la parte
posterior de la cubierta del Cambiador (Fig. 14b).
• Sujete las barras cortas con los dos conectores a las barras
conectoras curvadas (Fig. 14c). Asegúrese de que los ganchos
estén orientados hacia arriba durante esta preparación en la
parte posterior de la cubierta de la camita (Fig. 14d). Inserte
ambos extremos con los pernos de ajuste en las barras
conectoras curvadas. Asegúrese de que todos los pernos se
traben en los 4 puntos de conexión (Fig. 14e).
• Cierre la cubierta usando los ganchos de la solapa. Pase
las solapas por encima de las barras para engancharlas y
abrocharlas (Fig. 14f).
Fig. 14a
Fig. 14b
Fig. 14c
Fig. 14d
Fig. 14e
Fig. 14f
ASSEMBLY ENSAMBLAR
ASSEMBLY ENSAMBLAR
Copyright © 2022, Baby Trend Inc., All Rights Reserved. Todos los derechos reservados. .
Copyright © 2022, Baby Trend Inc., All Rights Reserved. Todos los derechos reservados. .
31
32


