


12
INFORMATION
Copyright © 2023, Baby Trend Inc., All Rights Reserved. Todos los derechos reservados.
MAINTENANCE
11
Copyright © 2023, Baby Trend Inc., All Rights Reserved. Todos los derechos reservados.
PLACING CHILD IN THE WALKER
WARNING:
To reduce chance of child slipping out
of the seat, check that both feet of the child touch the
floor. Never carry walker with the child in it, as the child
may get hurt or slip out.
• Always check the walker prior to each use to ensure that the seat is snapped in
place and that the walker has no loose or broken parts. Do Not use the walker if it is
damaged or broken or missing parts.
• Before placing your child in the walker, please determine that your child is
developmentally ready for this type of product. Generally, your child must be able
to sit upright unassisted and have adequate neck strength to exhibit very good
control of his or her head. Typically, a child should be at least 6 months of age to use
this product. Infants develop at different rates and you should discuss the use of a
walker with your pediatrician to ensure that your infant is ready.
• Adjust the seat height of the walker to the lowest setting. Place your child in the
walker and check that both feet touch the floor. The child should have only part
of their weight on their feet when their legs are straight. Adjust the walker height
as needed as your child grows. Do not adjust height with child in the walker.
Discontinue using the walker if your child attempts to climb out, reaches 30 pounds
in weight or 32 inches in height, or when your child is able to walk unassisted.
• The baby walker can be used for 3 different heights. To adjust height, remove baby
from walker. Adjustment instructions can be referenced in step 1. Adjust to desired
height.
• When the position has been selected, check that the safety button turned through
90 degrees to prevent the accidental release of the mechanism. Always follow this
procedure. Never use the baby walker if the button is not in the sideways position.
Important: Never change the height when the baby is in the walker.
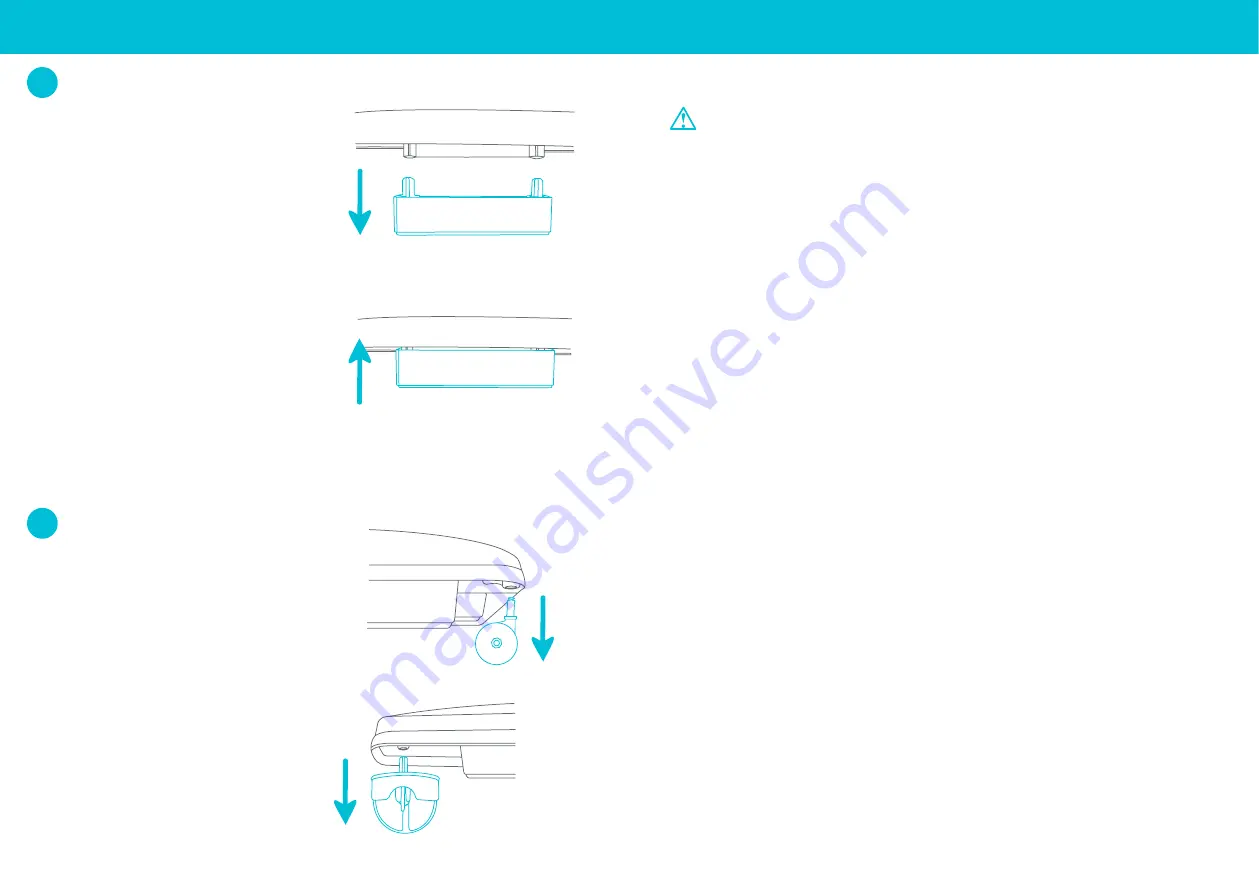
For replacement, if lost or
damaged
ONLY.
The Stoppers are there for
Stair Safety reasons, do NOT
remove the stoppers unless
for replacement purposes.
REMOVAL:
To remove, pull
out the stopper (Fig. 7a).
REATTACH:
Push the
stopper into the housing
completely (Fig. 7b). Ensure
to apply enough pressure
when inserting the stoppers.
For replacement, if lost or
damaged
ONLY.
REMOVAL:
Pull the front and
rear wheels out from the
base (Fig. 8).
Refer to Step 3 to reattach.
Fig. 7b
Fig. 8
Stopper Replacement
Wheel Replacement
7
8
Fig. 7a
Front Wheels
Rear Wheels


