11
Copyright © 2022, Baby Trend Inc., All Rights Reserved. Todos los derechos reservados.
Copyright © 2022, Baby Trend Inc., All Rights Reserved. Todos los derechos reservados.
ASSEMBLY ASAMBLEA
ASSEMBLY ASAMBLEA
11
12
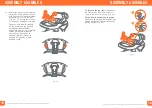
Fig. 6c
Fig. 6b
Fig. 6a
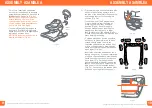
TOY TRAY ASSEMBLY
MONTAJE DE BANDEJA
PARA JUGUETES
6)
• Ensure the strap is tucked
underneath the music unit.
Insert the music unit into the
center of the toy tray until it
snaps in securely (Fig. 6a).
NOTE:
To install or replace
batteries, refer to page 12.
• (1) Insert the toy bar on the
front of the tray. (2) Then place
the two connectors onto the toy
tray and twist until it snaps in
securely (Fig. 6b).
• Align the rattle and butterfly toys
to their corresponding slots on
each connector (Fig. 6c).
• Asegúrese de que la correa
esté metida debajo de la unidad
de música. Inserte la unidad
de música en el centro de la
bandeja para juguetes hasta
que encaje de forma segura
(Fig. 6a).
NOTA:
Para instalar o
reemplazar las baterías,
consulte la página 12.
• (1) Inserte la barra para
juguetes en la parte delantera
de la bandeja. (2) Luego, colo
que los dos conectores en la
bandeja para juguetes y gírelos
hasta que encajen con firmeza
(Fig. 6b).
• Alinee el sonajero y la mariposa
de juguete con sus ranuras
correspondientes en cada
conector (Fig. 6c).
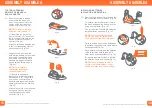
INSTALLING BATTERIES
INSTALACIÓN DE BATERÍAS
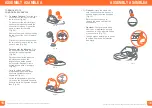
7)
•
Remove the music unit by pressing the
tab, then slide it out to remove (Fig. 7a).
• To install or replace batteries, remove
the strap and open the battery door by
using a screw driver (Fig. 7b).
• The toy requires 2 double AA batteries.
Install batteries as shown (Fig. 7c).
NOTE:
Close the battery door and
secure it by using the screw driver.
Then place the strap back into place.
• Quite la unidad de música presionando
la pestaña, luego deslícela hacia afuera
para separarla (Fig. 7a).
• Para instalar o reemplazar las baterías,
retire la correa y abra la tapa de la
batería con un destornillador (Fig. 7b).
• El juguete requiere 2 pilas AA. Instale
las baterías como se muestra (Fig. 7c).
NOTA:
Cierre la tapa de la batería
y fíjela con el destornillador. Luego,
vuelva a colocar la correa en su lugar.
Fig. 7a
Fig. 7c
Fig. 7b


