background image

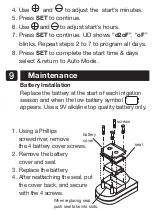
Battery Installation

Replace the battery at the start of each irrigation

season and when the low battery symbol

appears. Use a 9V alkaline top quality battery only

.

1. Using a Phillips

    scr

ewdriver

, r

emove

    the 4 battery cover scr

ews.

2. Remove the battery

    cover and seal.

3. Replace the battery

.

4. After r

eattaching the seal, put 

    the cover back, and secur

e

    with the 4 scr

ews.

scr
ews

seal

battery 

cover

When r

eplacing seal,

push seal tabs into slots.

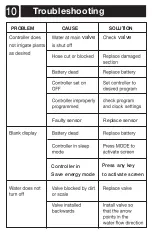
 T

roubleshooting

PROBLEM

CAUSE

SOLUTION

 Service Information

Baccara

 pr

oducts ar

e guaranteed to be fr

ee fr

om 

defects in material and workmanship for a period of 

one year fr

om the date of delivery

.

This guarantee does not apply wher

e equipment is 

not used and installed strictly in accor

dance with 

Baccara

 specifications and Users Guide. Neither 

does it apply to failur

es cause by lightning strikes or 

damage due to fr

eezing temperatur

es or mechanical 

causes (e.g. lawn mowers). 

Baccara 

is not liable for

indir

ect, incidental or consequential damage in 

connection with the use of equipment.

To r

eceive guarantee benefits, customers should


retur
n defective units along with the r

eceipt of 

pur
chase to the near

est 
Baccara

 distributor

.

Baccara

 reserves the right to alter

, modify or r

edesign 

its pr

oducts, pricing and warranty at all times without 

cr

eating any liability for the obsolescence of customer 

inventory of such parts or pr

oducts.

This manufactur

er guarantee policy may apply 

dif

fer

ently in dif

fer

ent countries. 

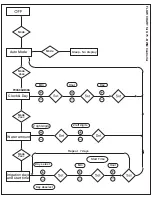
FLOW CHART for G75 - BWM Controller

8

4257200301 (

6

/

20

)

G75 -BWM

B

accara

 W
ater
 M
eter

Contr

oller

Baccara Geva Ltd. Kvutzat Geva, 1891500, Israel

T. +972 4 6535 960 | F

. +972 4 6531 445

info@baccara-geva.com | www

.baccara-geva.com  

10

11

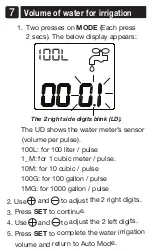
The UD shows the water meter’

s sensor 

(volume per pulse).

100L: for 100 liter / pulse

1_M: for 1 cubic meter / pulse.

10M: for 10 cubic / pulse

100G: for 100 gallon / pulse

1MG: for 1000 gallon / pulse 

Volume of water for irrigation


1.  T

wo pr

esses on 

MODE

 (Each pr

ess

     2 secs). The below display appears: 

The 2 right side digits blink (LD).

7

2. Use      and      to adjust the 2 right digits.

3. Pr

ess 

SET

 to continue.

4. Use      and      to adjust the 2 left digits.

5. Pr

ess 

SET

 to complete the water irrigation 

    volume and r

etur

n to Auto Mode.

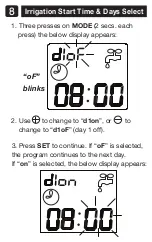
 Irrigation Start Time & Days Select

1. Thr

ee pr

esses on 

MODE

 (2 secs. each 

pr

ess) the below display appears:

2. Use      to change to “

d1on

”, or       to

    change to “

d1oF

” (day 1 of

f).

“oF” 

blinks

3. Pr

ess 

SET

 to continue. If “

oF
” is selected, 

the pr

ogram continues to the next day

.

If “
on
” is selected, the below display appears:

4. Use        and       to adjust the  start’

s minutes.

5. Pr

ess 

SET

 to continue.

6. Use      and      to adjust start’

s hours.

7. Pr

ess 

SET

 to continue. UD shows “

d2oF

”, “
oF

    blinks. Repeat steps 2 to 7 to pr

ogram all days.

8. Pr

ess 

SET

 to complete the start time & days

    select & r

etur

n to Auto Mode.

Users Guide

 Maintenance

9

Faulty sensor

Replace sensor

Controller in

Save energy mode

Press any key

to activate screen

Mode

Mode

Mode

Auto Mode

Sleep - No display

2sec

Clock & Day

Min

Hour

Mode

Water amount

Mode

Irrigation days

and start time

PROGRAMMING

2sec

2sec

Day select

Hour

Min

Day deselect

Start Time

2 right digits

2 left digits

Day

Repeat   7 days

valve

valve

®

Summary of Contents for G75-BWM

Page 1: ...4257200301 6 20 G75 BWM Baccara Water Meter Controller Baccara Geva Ltd Kvutzat Geva 1891500 Israel T 972 4 6535 960 F 972 4 6531 445 info baccara geva com www baccara geva com Users Guide ...

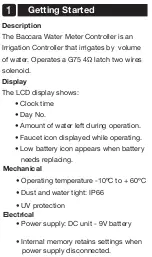
Page 2: ...Display The LCD display shows Clock time Day No Amount of water left during operation Faucet icon displayed while operating Low battery icon appears when battery needs replacing Mechanical Operating temperature 10ºC to 60ºC Dust and water tight IP66 UV protection Electrical Power supply DC unit 9V battery Internal memory retains settings when power supply disconnected 1 ...

Page 3: ...Parts Identification 2 Controller display Upper digits UD Lower digits LD ...

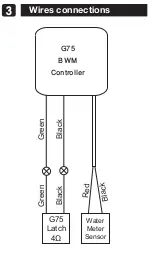
Page 4: ...G75 BWM Controller Green Green Black Black B l a c k R e d G75 Latch 4Ω Water Meter Sensor Wires connections 3 ...

Page 5: ... not pre twist Place stripped wires with ends even lead stranded wires slightly 4 Twist connector onto wires pushing firmly until hand tight DO NOT over torque 5 Swipe excess sealant in and around conductors DO NOT REUSE Operating Modes Auto Off Manual UD Upper Digits LD Lower Digits 4 ...

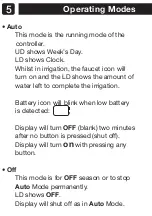
Page 6: ...nd the LD shows the amount of water left to complete the irrigation Battery icon will blink when low battery is detected Display will turn OFF blank two minutes after no button is pressed shut off Display will turn on with pressing any button Off This mode is for OFF season or to stop Auto Mode permanently LD shows OFF Display will shut off as in Auto Mode ...

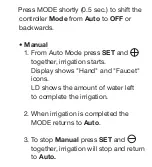
Page 7: ...l 1 From Auto Mode press SET and together irrigation starts Display shows Hand and Faucet icons LD shows the amount of water left to complete the irrigation 2 When irrigation is completed the MODE returns to Auto 3 To stop Manual press SET and together irrigation will stop and return to Auto ...

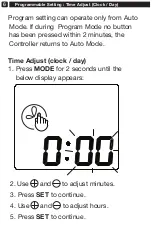
Page 8: ...and to adjust hours 5 Press SET to continue Day 1 blinks 6 Below display appears 7 Select the desired day by using 8 Press SET to complete time adjust and return to Auto Mode 6 Programmable Setting Time Program setting can operate only from Auto Mode If during Program Mode no button has been pressed within 2 minutes the Controller returns to Auto Mode Time Adjust clock day 1 Press MODE for 2 secon...

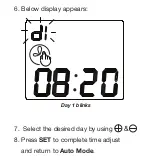
Page 9: ...Day 1 blinks 6 Below display appears 7 Select the desired day by using 8 Press SET to complete time adjust and return to Auto Mode ...

Page 10: ...allon pulse 1MG for 1000 gallon pulse Volume of water for irrigation 1 Two presses on MODE Each press 2 secs The below display appears The 2 right side digits blink LD 7 2 Use and to adjust the 2 right digits 3 Press SET to continue 4 Use and to adjust the 2 left digits 5 Press SET to complete the water irrigation volume and return to Auto Mode ...

Page 11: ...resses on MODE 2 secs each press the below display appears 2 Use to change to d1on or to change to d1oF day 1 off oF blinks 3 Press SET to continue If oF is selected the program continues to the next day If on is selected the below display appears ...

Page 12: ...er and seal 3 Replace the battery 4 After reattaching the seal put the cover back and secure with the 4 screws screws seal battery cover When replacing seal push seal tabs into slots 4 Use and to adjust the start s minutes 5 Press SET to continue 6 Use and to adjust start s hours 7 Press SET to continue UD shows d2oF oF blinks Repeat steps 2 to 7 to program all days 8 Press SET to complete the sta...

Page 13: ...Troubleshooting PROBLEM CAUSE SOLUTION 10 Faulty sensor Replace sensor Controller in Save energy mode Press any key to activate screen valve valve ...

Page 14: ...emperatures or mechanical causes e g lawn mowers Baccara is not liable for indirect incidental or consequential damage in connection with the use of equipment To receive guarantee benefits customers should return defective units along with the receipt of purchase to the nearest Baccara distributor Baccara reserves the right to alter modify or redesign its products pricing and warranty at all times ...

Page 15: ...r Mode Mode Mode Auto Mode Sleep No display 2sec Clock Day Min Hour Mode Water amount Mode Irrigation days and start time PROGRAMMING 2sec 2sec Day select Hour Min Day deselect Start Time 2 right digits 2 left digits Day Repeat 7 days ...

Reviews: