background image

BACHMANN EUROPE PLC

H0 1:87 


17

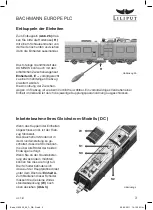
Installing a loud speaker

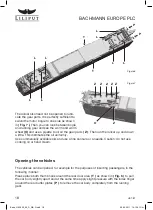
The railcar is already completely prepared 
for locomotive sound operation. You can 
plug in the sound decoder vertically on the 
1-pin interface. To do this, please follow 
the description under decoder Installation 
above. 
The loudspeaker 

( Fig. 5 )

 is intended to be 

installed in the roof area under the air-
conditioning cover 

( K ).

 This part is only 

clicked into place on the roof. The air-con-
ditioning unit is easy to remove from the 
roof and can be pulled off vertically. The 
loudspeaker (d = 16 mm) can be clipped 
into the mount 

( M ).

 You can connect the 

loudspeaker itself to two pins 

( V )

 soldered 

on the circuit board. 

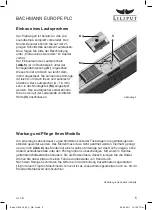
Looking after your model

In order to ensure that your model functions correctly over a long period the railcar should 
be maintained at regular intervals. The model need not be opened to do this. It is perfectly 
sufficient to turn the model over on a soft base as shown in 

Fig. 6.

 Be careful not to da-

mage the roof parts or the pantographs. Clean the wheel contacts using cotton wool tabs 
soaked in spirits and then clean the wheels. However, please do not turn the drive wheels 
by hand in any circumstances. After cleaning please use a drop of machine oil to lubricate 
the bearing points 

( L )

 shown in the figure. It is advisable to carry out maintenance work 

after approximately 0-0 hours of operation. 

Figure 5

V

Figure 6 see next page

Betra_L133940_59_D_GB_F.indd   17

09.03.2011   10:12:40 Uhr

Summary of Contents for Liliput L133940-59

Page 1: ...und anschliessend wieder aufgebaut Einzig die alten Zwischenwagen der Typen EW I und EW II tauschte die SBB mit 140 neuen Niederflurzwischenwagen Inova der Firma Bombardier aus Alle drei Komponen ten...

Page 2: ...en immer darauf dass sich zwei ungleiche Kupplungsteile mit und ohne Haltenase H nach Abb 2 gegen berstehen Schieben Sie nun vorsichtig die Einheiten bis zum Ber hren der Kupplungen zueinander Wir emp...

Page 3: ...Verband ist durch die jeweilige Kupplungspaaranordnung ausgeschlossen Inbetriebnahme Ihres Gleichstrom Modells DC Wenn das Kuppeln der Einheiten abgeschlossen ist ist der Trieb zug fahrbereit Das Gle...

Page 4: ...aus stehen Die Innenbeleuchtung wird hier mit dem Decoder ein bzw ausge schaltet Einbau eines DCC Decoders Das Modell des FLIRT hat eine 21 2 poli ge Decoderschnittstelle D Die eingebau te Schnittste...

Page 5: ...l teten Stifte V anschliessen Wartung und Pflege Ihres Modells Um eine lange Lebensdauer zu gew hrleisten sollte der Triebwagen in regelm ssigen Ab st nden gewartet werden Das Modell muss dazu nicht g...

Page 6: ...verteilt sich das l gleichm ssig Verwenden Sie handels b liche ler mit feiner Kan le oder einer Stecknadel Achtung kein Speise l oder Hautcreme verwenden ffnen der Fahrzeuge Das ffnen der Fahrzeuge z...

Page 7: ...in zwei Haltenasen Beim Demontieren dr cken Sie bitte den Haltearm S leicht mit einem kleinen Schraubendre her nach aussen Selbstverst ndlich wurde auch das Radprofil der Rads tze dem blicher weise ve...

Page 8: ...nahme oder Wartung und Pflege Ihres Modells nach Schaltpl ne F r alle die sich noch mehr vertiefen wollen haben wir hier im Anschluss die kompletten Schaltpl ne f r die Wageneinheiten und Stromsysteme...

Page 9: ...CON5 CONNE 10345 1 2 3 4 5 6 7 8 CON15 CONNE 10344 R Wheel 3 R Wheel 3 L Wheel 4 L Wheel 4 Track Right Track Left Front Light Interior light B Rear Light Motor Output Motor Output R Wheel 1 R Wheel 1...

Page 10: ...AN R Rear R Front Pad PANTOGRAPH D13 RGL34A D14 RGL34A D11 RGL34A D12 RGL34A DIA5X7 LED12 Y R12 2K C12 105 LD12 Big Light X 1 Q3 8550 Q4 8050 D7 RGL34A D9 RGL34A R20 100K R22 2K R21 4 7K D8 RGL34A D10...

Page 11: ...l 5 L Wheel 8 L Wheel 8 Left Front Wheels Right Front Wheels S2A 1 2 3 4 5 6 7 8 JP15 D3354 1 2 3 4 5 6 7 8 CON8 CONNE 10345 1 2 3 4 5 6 7 8 CON15 CONNE 10344 R Wheel 6 R Wheel 6 L Wheel 6 L Wheel 6 T...

Page 12: ...11 L Wheel 12 L Wheel 12 Interior light B LED22 Y R36 2K LED23 Y R37 2K C33 105 C32 105 FLED RLED L ALL B MOT MOT ILED R Rear Track Right Track Left Front Light Interior light B Rear Light Motor Outp...

Page 13: ...then reassembled The SBB only replaced the old intermediate cars of the types EW I and EW II wit 140 new Inova low floor intermediate cars from the Bombardier company All three components taken toget...

Page 14: ...when coupling two units that two different coupling parts with and without coupling hook H as per Fig 2 are facing each other Now carefully push the units towards each other until the couplings touch...

Page 15: ...nt prevents units being connected contrary to a real life situation Putting your DC model into operation Once the units have been cou pled the multiple unit is ready to run The DC model in its default...

Page 16: ...in the off position in digital operation The interior lighting is turned on and off here with the decoder Installation of a DCC Decoder The FLIRT model has a 21 2 pin decoder interface D The installe...

Page 17: ...s V soldered on the circuit board Looking after your model In order to ensure that your model functions correctly over a long period the railcar should be maintained at regular intervals The model nee...

Page 18: ...ly available oils and use a fine cannula or a needle Caution do not use cooking oil or hand cream Opening the vehicles The vehicles can be opened for example for the purposes of inserting passengers i...

Page 19: ...ply into two clip in lugs When taking apart please press the retention arm S slightly outwards using a small screwdriver Naturally the wheel profile of the wheel sets has also been adapted to the trac...

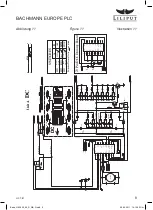
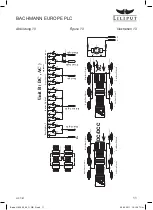
Page 20: ...pters on coupling the units put ting into operation or looking after your model Circuit diagram For all those desiring more information we have enclosed the complete circuit diagram for the car units...

Page 21: ...s VU I et VU II f rent remplac es par 140 nou velles voitures interm diaires plancher surbaiss du type Inova construites par Bombardier Les trois v hicules pr sent s forment les nouvelles rames Domino...

Page 22: ...t deux l ments ce que deux attelages diff rents avec et sans fixation d encliquetage H soient face face Ill 2 Glissez avec pr caution les l ments jusqu ce que les attelages se touchent Nous conseillon...

Page 23: ...en service de votre rame en courant continu Lorsque le montage de la rame est termin e la rame est pr te rouler Le mod le en courant continu est livr de telle fa on que toutes les roues de l automotri...

Page 24: ...ever le petit cache des r sistances W Installation d un d codeur DCC Le mod le est dot d une prise 21 2 p les D et d une platine avec la fonction Stop qui lors du montage d un d codeur est mise hors s...

Page 25: ...votre mod le il est n cessaire de l entretenir r guli rement Pour cela il n est pas n cessaire de s parer la caisse du ch ssis Il suffit de poser la rame sur le toit sur une surface souple en faisant...

Page 26: ...n avant et en arri re Utilisez que de l huile sp ciale avec une pipette ou une petite pointe Attention N utilisez jamais d huile comestible ou de la cr me pour la peau D montage de la caisse Afin de s...

Page 27: ...ur le fixer dans le bogie Pour d monter le patin poussez la fixation S avec un petit tournevis Naturellement les roues de la version alternative sont aux normes CA La version en courant alternatif dis...

Page 28: ...es points de commande sous connexions des l ments et entretien de votre mod le Sch ma lectrique Nous avons imprim les sch mas lectriques des l ments pour les diff rents syst mes Voyez pages 9 12 Ill 1...

Page 29: ...ies Bachmann Europe PLC Moat Way Barwell GB Leicestershire LE9 8EY Condition de garantie Ce mod le Liliput a une garantie de deux ans partir de la date d achat pi ces et main d uvre pour autant qu il...

Page 30: ...ibung zum sp teren Gebrauch auf Dieses Produkt wurde nach Vorschriften der europ ischen Spiel zeugrichtlinien CE hergestellt Important We recommend that you keep the original box It is the best place...

Reviews: