background image

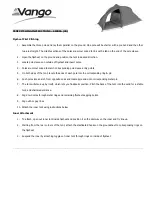
Made in China |  INS-21051

26

, 21051

57

, 2105423, 2105454

-A-1

4

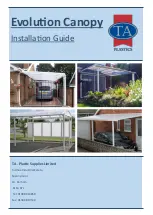
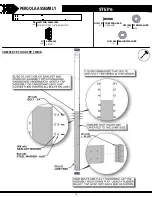
X10 MODERN PERGOLA-ENG 

8

-

16

-21

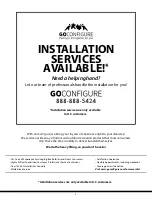
For the most up to date assembly manual,

to register your set, or to order replacement parts please visit

www.backyarddiscovery.com

SAVE THIS ASSEMBLY MANUAL FOR FUTURE REFERENCE IN THE EVENT THAT YOU NEED 

TO ORDER REPLACEMENT PARTS.
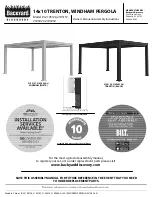
Model #'s 21051

26

, 21051

57

2105423, 2105454

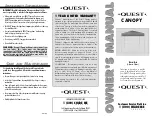
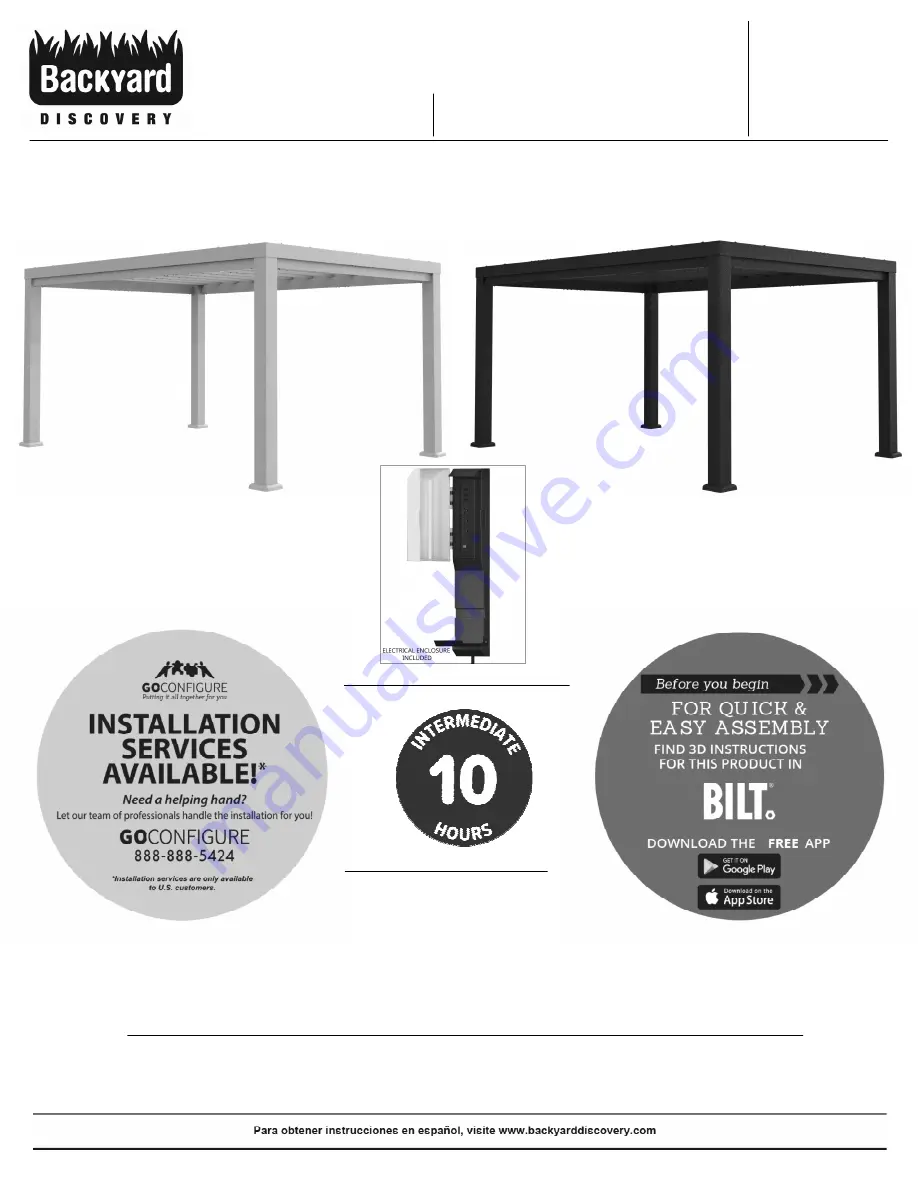
14x10 TRENTON, WINDHAM PERGOLA

Owner's Manual & Assembly Instructions

MANUFACTURED BY: 

Backyard Discovery 

3305 Airport Drive 

Pittsburg, KS 66762 

800-856-4445

average 3 person assembly time

assembly time may vary based on skill level

21051

57

, 21054

54

 AU


WINDHAM (WHITE)

21051

26

, 21054

23

 AU


TRENTON (BLACK)

Electrical enclosure available only in North America

Summary of Contents for TRENTON 2105126

Page 1: ...E REFERENCE IN THE EVENT THAT YOU NEED TO ORDER REPLACEMENT PARTS Model s 2105126 2105157 2105423 2105454 14x10 TRENTON WINDHAM PERGOLA Owner s Manual Assembly Instructions MANUFACTURED BY Backyard Discovery 3305 Airport Drive Pittsburg KS 66762 800 856 4445 average 3 person assembly time assembly time may vary based on skill level 2105157 2105454 AU WINDHAM WHITE 2105126 2105423 AU TRENTON BLACK ...

Page 2: ...m for more info Installation services are only available to U S customers With Go Con gure we bring you 18 years of experience right to your doorstep We service a wide array of indoor and outdoor recreation products that most consumers don t have the time or ability to deliver install themselves We do the heavy lifting so you don t have to Installation services are only available to U S customers ...

Page 3: ...r box 1 800 856 4445 Read entire assembly manual paying special attention to the important tips and safety information To ensure there are no missing pieces do a complete inventory by first separating and identifying all parts Make sure to check packing material for small parts that may have fallen out during shipment Structures are not intended for public use The Company does not warranty any of ...

Page 4: ...scovery Metal Patio Structure Backyard Discovery warrants this metal patio product to be free from defect in materials and workmanship for a period of five 5 years from the original date of purchase General Warranty Information This warranty applies to the original owner and registrant and is non transferable Regular maintenance is required to ensure maximum life and performance of this product Fa...

Page 5: ... is particularly important that this procedure be followed at the beginning of each season Oil all metallic moving parts monthly during the usage period Check all coverings for bolts and sharp edges twice monthly during usage season to be certain they are in place Replace when necessary It is especially important to do this at the beginning of each new season For rusted areas on metallic members s...

Page 6: ...step This will make finding the correct hardware easier BOLT 1 4 20x3 4 24 H101101 Tools Required A rubber mallet may be useful during the assembly process You will need to make sure that your assembly is square before fully tightening your bolts A tape measure may be needed to check overall dimensions to ensure structure is square Some steps in the assembly process will require a second set of ha...

Page 7: ... to permanently install your structure to a pre existing or new wood or concrete surface The hardware to attach the post mounts to the structure is included The hardware to mount the structure permanently to a concrete surface is NOT included The hardware to mount the structure permanently to a wood deck is NOT included and will need to be purchased separately You must ensure there is ample struct...

Page 8: ...4M01466 x24 1 3 8 X5 1 4 X53 3 4 36x134x1365 E1 JOIST END A4M01467 x2 D1 JOIST END A4M01464 1 3 8 X5 1 4 X59 7 8 36x134x1521 x2 8 B2 JOIST END A4M01459 1 3 8 X5 1 4 X55 7 8 36x134x1420 x2 C1 JOIST END A4M01461 1 3 8 X5 1 4 X49 3 4 36x134x1264 x2 B1 JOIST END A4M01458 1 3 8 X5 1 4 X55 7 8 36x134x1420 x2 C2 JOIST END A4M01462 1 3 8 X5 1 4 X49 3 4 36x134x1264 x2 C3 JOIST A4M01463 1 3 8 X5 1 4 X55 7 8...

Page 9: ...9 5 8 33x131x500 x4 SPLICE BRACKET A4M01438 1 1 2 X3 X15 3 4 37x77x400 H2 x12 SPLICE BRACKET A4M01440 1 1 4 X5 1 8 X11 33x130x280 H4 x4 P1 A4M01454 POST FOOT x4 Accessory Components Not to Scale ELECTRICAL ENCLOSURE x1 9205413 ANGLED ROD A4M01450 1 1 4 X1 1 2 X36 3 8 33x38x924 L x4 ANGLED ROD A4M01451 1 1 4 X1 1 2 X12 7 8 33x38x327 M x4 P2 A4M01455 POST FOOT COVER x4 N1 A6P00493 L PLUG x4 N2 A4M01...

Page 10: ...HER 6x20 404 H101053 SEALANT WASHER 404 H101054 TORX PAN HEAD 1 4 20x3 4 380 H101101 TORX PAN HEAD 1 4 20x4 24 H101102 TORX SOCKET SCREW 1 4 20 20 H101103 10 CONCRETE ANCHOR 1 4x2 16 H100120 FLAT WASHER BLK x H100630 TORX BIT T 30 2 H100147 TORX WRENCH T 30 2 H100114 ...

Page 11: ...101 STEEL WASHER 6x20 48 H101053 SEALANT WASHER 48 H101054 TORX PAN HEAD 1 4 20x3 4 COMPLETE THIS STEP TWELVE TIMES 1 5 8 X3 1 8 X58 1 2 41x81x1485 F JOIST END A4M01466 x12 SPLICE BRACKET A4M01438 1 1 2 X3 X15 3 4 37x77x400 H2 x12 11 ...

Page 12: ...RGOLA ASSEMBLY STEP 2 48 STEEL WASHER 6x20 48 H101053 SEALANT WASHER 48 H101054 COMPLETE THIS STEP TWELVE TIMES 1 5 8 X3 1 8 X58 1 2 41x81x1485 F JOIST END A4M01466 x12 12 H101101 TORX PAN HEAD 1 4 20x3 4 ...

Page 13: ...EL WASHER 6x20 12 H101053 SEALANT WASHER 12 H101054 COMPLETE THIS STEP TWICE 1 3 8 X5 1 4 X53 3 4 36x134x1365 E2 JOIST END A4M01468 x2 SPLICE BRACKET A4M01437 1 1 4 X5 1 8 X15 3 4 33x131x400 H1 x2 13 H101101 TORX PAN HEAD 1 4 20x3 4 ...

Page 14: ...PERGOLA ASSEMBLY STEP 4 12 STEEL WASHER 6x20 12 H101053 SEALANT WASHER 12 H101054 COMPLETE THIS STEP TWICE 1 3 8 X5 1 4 X53 3 4 36x134x1365 E1 JOIST END A4M01467 x2 14 H101101 TORX PAN HEAD 1 4 20x3 4 ...

Page 15: ...EL WASHER 6x20 12 H101053 SEALANT WASHER 12 H101054 COMPLETE THIS STEP TWICE D1 JOIST END A4M01464 1 3 8 X5 1 4 X59 7 8 36x134x1521 x2 SPLICE BRACKET A4M01437 1 1 4 X5 1 8 X15 3 4 33x131x400 H1 x2 15 H101101 TORX PAN HEAD 1 4 20x3 4 ...

Page 16: ...SEMBLY STEP 6 12 STEEL WASHER 6x20 12 H101053 SEALANT WASHER 12 H101054 COMPLETE THIS STEP TWICE D2 JOIST END A4M01465 1 3 8 X5 1 4 X59 7 8 36x134x1521 x2 N1 A6P00493 L PLUG x4 16 H101101 TORX PAN HEAD 1 4 20x3 4 ...

Page 17: ... STEEL WASHER 6x20 16 H101053 SEALANT WASHER 16 H101054 COMPLETE THIS STEP TWICE SPLICE BRACKET A4M01440 1 1 4 X5 1 8 X11 33x130x280 H4 x4 17 C3 JOIST A4M01463 1 3 8 X5 1 4 X55 7 8 36x134x1420 x2 H101101 TORX PAN HEAD 1 4 20x3 4 ...

Page 18: ...TEEL WASHER 6x20 16 H101053 SEALANT WASHER 16 H101054 COMPLETE THIS STEP TWICE 18 C1 JOIST END A4M01461 1 3 8 X5 1 4 X49 3 4 36x134x1264 x2 C2 JOIST END A4M01462 1 3 8 X5 1 4 X49 3 4 36x134x1264 x2 H101101 TORX PAN HEAD 1 4 20x3 4 ...

Page 19: ...TEEL WASHER 6x20 24 H101053 SEALANT WASHER 24 H101054 COMPLETE THIS STEP TWICE SPLICE BRACKET A4M01439 1 1 4 X5 1 8 X19 5 8 33x131x500 H3 x4 19 B3 JOIST A4M01460 1 3 8 X5 1 4 X55 7 8 36x134x1420 x2 H101101 TORX PAN HEAD 1 4 20x3 4 ...

Page 20: ...TEEL WASHER 6x20 24 H101053 SEALANT WASHER 24 H101054 COMPLETE THIS STEP TWICE 20 B2 JOIST END A4M01459 1 3 8 X5 1 4 X55 7 8 36x134x1420 x2 B1 JOIST END A4M01458 1 3 8 X5 1 4 X55 7 8 36x134x1420 x2 H101101 TORX PAN HEAD 1 4 20x3 4 ...

Page 21: ...11 16 STEEL WASHER 6x20 16 H101053 SEALANT WASHER 16 H101054 COMPLETE THIS STEP FOUR TIMES POST A4M01436 6 X6 X89 152x152x2261 A x4 P1 A4M01454 x4 POST FOOT P2 A4M01455 POST FOOT COVER x4 21 H101101 TORX PAN HEAD 1 4 20x3 4 ...

Page 22: ...BLY STEP 12 16 STEEL WASHER 6x20 16 H101053 SEALANT WASHER 16 H101054 COMPLETE THIS STEP FOUR TIMES 22 G1 BRACKET A4M01452 1 1 4 X4 1 8 X5 32x104x128 x8 4 POST ASSEMBLY FROM STEP 11 H101101 TORX PAN HEAD 1 4 20x3 4 ...

Page 23: ...PERGOLA ASSEMBLY STEP 13 16 STEEL WASHER 6x20 16 H101053 SEALANT WASHER 16 H101054 COMPLETE THIS STEP TWICE 2 INNER END JOIST ASSEMBLY FROM STEPS 3 4 23 H101101 TORX PAN HEAD 1 4 20x3 4 ...

Page 24: ...PERGOLA ASSEMBLY STEP 14 12 STEEL WASHER 6x20 12 H101053 SEALANT WASHER 12 H101054 2 INNER SIDE JOIST ASSEMBLY FROM STEPS 7 8 24 H101101 TORX PAN HEAD 1 4 20x3 4 ...

Page 25: ...PERGOLA ASSEMBLY STEP 15 16 STEEL WASHER 6x20 16 H101053 SEALANT WASHER 16 H101054 12 H101103 TORX SOCKET SCREW 1 4 20 2 OUTER SIDE JOIST ASSEMBLY FROM STEPS 9 10 25 H101101 TORX PAN HEAD 1 4 20x3 4 ...

Page 26: ...PERGOLA ASSEMBLY STEP 16 16 STEEL WASHER 6x20 16 H101053 SEALANT WASHER 16 H101054 8 2 OUTER END JOIST ASSEMBLY FROM STEPS 5 6 26 H101103 TORX SOCKET SCREW 1 4 20 H101101 TORX PAN HEAD 1 4 20x3 4 ...

Page 27: ...PERGOLA ASSEMBLY STEP 17 32 STEEL WASHER 6x20 32 H101053 SEALANT WASHER 32 H101054 W BRACKET A4M01453 3 X5 1 8 X9 1 8 78x130x233 G2 x4 27 H101101 TORX PAN HEAD 1 4 20x3 4 ...

Page 28: ...PERGOLA ASSEMBLY STEP 18 24 H101102 STEEL WASHER 6x20 24 H101053 SEALANT WASHER 24 H101054 TORX PAN HEAD 1 4 20x4 12 JOIST ASSEMBLY FROM STEPS 1 2 28 ...

Page 29: ...TEEL WASHER 6x20 32 H101053 SEALANT WASHER 32 H101054 COMPLETE THIS STEP FOUR TIMES L ANGLED ROD A4M01450 1 1 4 X1 1 2 X36 3 8 33x38x924 x4 ANGLED ROD A4M01451 1 1 4 X1 1 2 X12 7 8 33x38x327 M x4 29 H101101 TORX PAN HEAD 1 4 20x3 4 ...

Page 30: ...PERGOLA ASSEMBLY STEP 20 30 CONCRETE ANCHOR 1 4x2 16 H100120 FLAT WASHER BLK 8x19 16 H100630 ...

Page 31: ...PERGOLA ASSEMBLY STEP 21 N2 A4M01352 HOLE COVER 31 x20 ...

Page 32: ...CLOSURE INSTALLATION REFER TO ASSEMBLY INSTRUCTIONS THAT COMES PACKAGED WITH THE ELECTRICAL ENCLOSURE KIT INSTALL ON ANY POST THAT IS DESIRED FOLLOW DIRECTIONS FOR PROPER INSTALLATION 32 Electrical enclosure available only in North America ...

Page 33: ...205413 Wood Post Mounting Instructions 2 3 8 in 60 mm 20 1 8 in 512 mm 966 x4 SCREW 1 1 2 413 x1 ELECTRICAL ENCLOSURE SCREW RAISED HEAD 8x1 1 2 x4 H100966 ELECTRICAL ENCLOSURE x1 9205413 ENSURE THAT CORD END IS NOT WITH IN 6 152mm OF THE GROUND WHEN MOUNTING 2 3 8 in 60mm 20 1 8 in 512mm PRE DRILL 1 8 IN 3mm PILOT HOLES USING THE DIMENSIONS PROVIDED POST ...

Page 34: ...ckyard Discovery 3305 Airport Drive Pittsburg KS 66762 800 856 4445 SCREW TAPPING 10x1 1 4 x4 H100746 ELECTRICAL ENCLOSURE x1 9205413 MOUNTING BRACKET x2 A4M01292 PowerPort Model 9205413 Metal Post Mounting Instructions ...

Page 35: ...t to part 15 of the FCC Rules These limits are designed to provide reasonable protection against harmful interference in a residential installation This equipment generates uses and can radiate radio frequency energy and if not installed and used in accordance with the instructions may cause harmful interference to radio communications However there is no guarantee that interference will not occur...

Reviews: