19
2"
(5,1 cm)
Nails
2"
(5,1 cm)
Nails
2
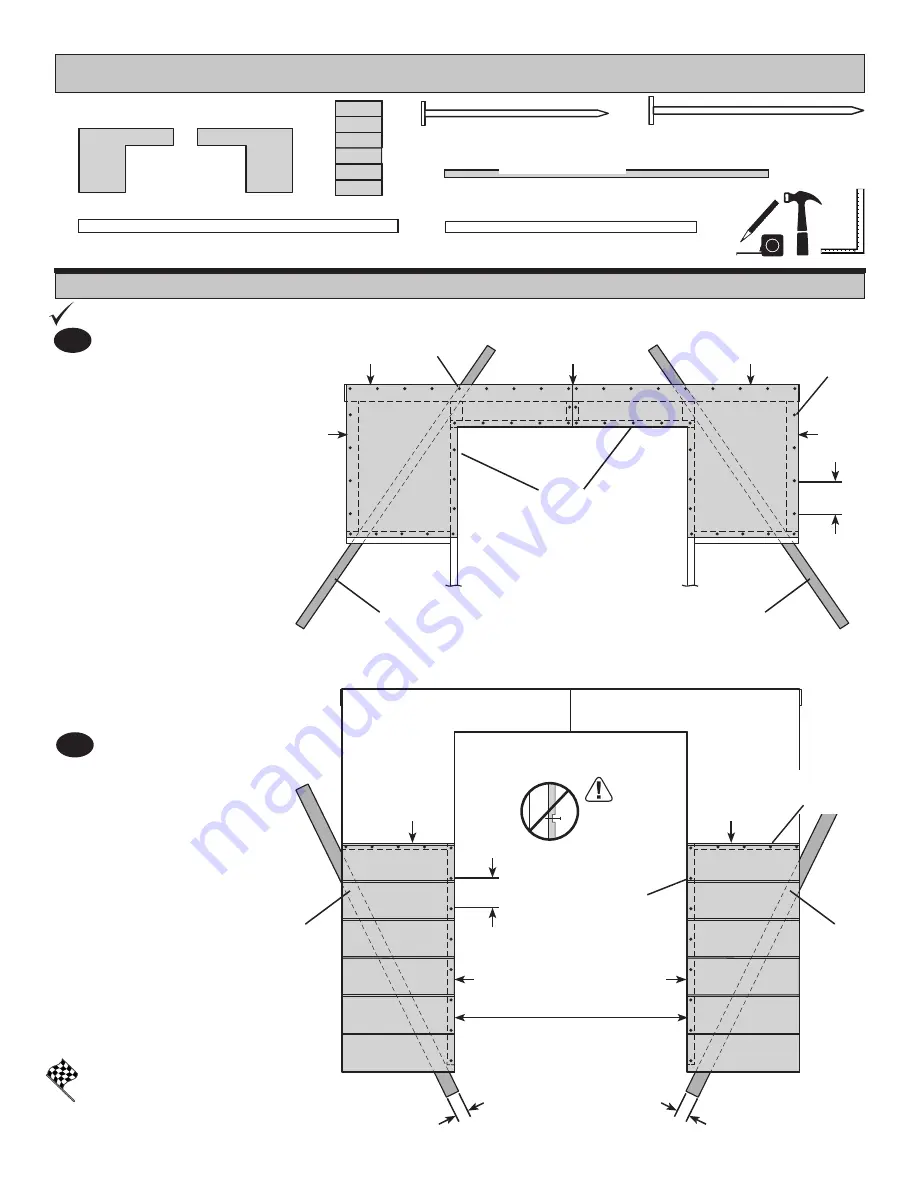
FRONT WALL PANELS
PARTS REQUIRED:
BEGIN
1
2" (5,1 cm)
x34
x2
x1
x1
OO
69" Door Stiffener (175,3 cm)
Temporary Support
x2
Place upper wall panels
over frame. Flush panels in
center, sides and top,
as shown.
HINT:
Support frame when
nailing using
JSA
and (x1)
3/8" thick trim board as a
temporary support.
Secure panels with 2"
nails into door frame only.
Secure with 1-1/2" nails
into all other 2x3 frame
parts.
Space nails 6" apart
along edges.
Install lower wall panels
flush to installed panels and
flush to the door frame.
Maintain the 48-7/8"
measurement in the door
opening.
Secure panels with 2"
nails into door frame and
with 1-1/2" nails into all
other 2x3 frame parts.
Space nails 6" apart
along edges.
Your front wall is now assembled.
FINISH
Flush
Flush
Flush
Flush
Flush
Flush
Flush
Flush
Flush
6"
(15,2 cm)
48-7/8"
(124,1 cm)
Do not nail
in grooves.
6"
(15,2 cm)
1-1/2" (3,8 cm)
x42
1-1/2"
(3,8 cm)
Nails
1-1/2"
(3,8 cm)
Nails
1-1/2"
(3,8 cm)
Nails
Install wall panels with the primed side facing out.
3/8" thick trim board
JSA
OO
OO
x1
3/8" x 1-1/2" x 54-9/16" (1,0 x 3,8 x 138,6 cm)
JSA
Temporary Support
x1
3/8" x 1-1/2" x 73-5/16" (1,0 x 3,8 x 192,4 cm)
Temporary Support
1-1/2"
(3,8 cm)
1-1/2"
(3,8 cm)


