background image

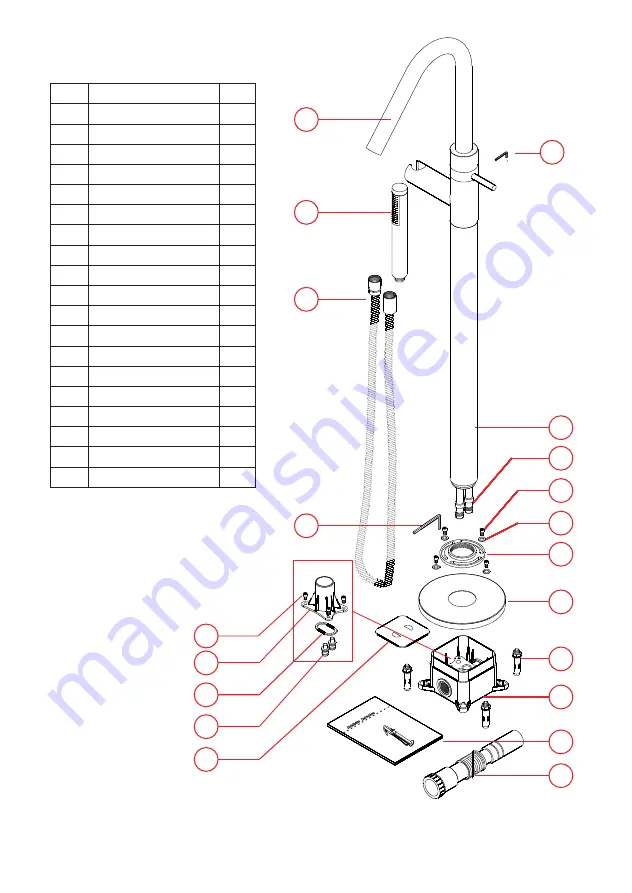
Name                  QTY.

spout

hand shower

hose

S2.5mm hex wrench

S4mm hex wrench

connecting pipe

water inlet pipe

M5x15 hex. bolt

M5 washer

water test base

rubber ring

rubber water stop

dustproof cover

fixing nut

rosette

expansion anchor bolts

plastic box

manual

water pipe

1

2

3

4

5

6

7

8

9

10

11

12

13

14

15

16

17

18

19

1

1

1

1

1

1

2

8

8

1

1

2

1

1

1

4

1

1

1

specifications:
water pipe thread:  G1/2
working pressure: 0.1Mpa~0.5Mpa
working temp.: 3°C ~ 85°C
working material: normal water
producing standard: GB 18148-2003

Checking List

19

7

6

9

18

5

4

10

17

16

8

15

14

13

12

11

8

3

2

1

SE

4009

29

.

3

Summary of Contents for AT-03

Page 1: ...Badeloft AT 03 Installation Instructions ...

Page 2: ...1 ...

Page 3: ...2 ...

Page 4: ...ixing nut rosette expansion anchor bolts plastic box manual water pipe 1 2 3 4 5 6 7 8 9 10 11 12 13 14 15 16 17 18 19 1 1 1 1 1 1 2 8 8 1 1 2 1 1 1 4 1 1 1 specifications water pipe thread G1 2 working pressure 0 1Mpa 0 5Mpa working temp 3 C 85 C working material normal water producing standard GB 18148 2003 Checking List 19 7 6 9 18 5 4 10 17 16 8 15 14 13 12 11 8 3 2 1 SE 40 09 29 3 ...

Page 5: ...disassemble and take out put the dustproof cover on 90 2 cold water hot water fix the position of the tap underground parts installation 4 ...

Page 6: ...ot connect water pipes fix the screw position fasten the bolts after adjusted the level highest underground level lowest underground level underground parts installation 150mm 150mm 50m m 40mm Ø10 depth 40 5 ...

Page 7: ...hot adjust again the level after fasten the bolts take off the cover install water test spareparts hot hot cold cold underground parts installation 6 ...

Page 8: ... 0 8Mpa keep for 30min to be sure no water leak turn off the water take off the testing spare parts off off off off Caution please decompress the water before unfasten the screw install pipe cleaning spare parts underground parts installation 7 ...

Page 9: ...turn on the valve to let water flush to clean the water pipes on on off off turn off the valve take out the pipe cleaning spare parts put on the cover hot cold underground parts installation 8 ...

Page 10: ...paving tiles use silicon to close the gaps after everything dried cut off the upper ground parts take off the cover underground parts installation 9 ...

Page 11: ...taps installation 10 ...

Page 12: ...connection pipe put on the rosette be careful to avoid scratches Fasten the brass nut onto the body use thread glue if necessary insert the 2 water pipes in the tap into the holes in the plastic box underground fasten the brass nut by 4 screws 11 ...

Page 13: ...push the rosette smoothly down to the ground install the hand shower sets taps installation 12 ...

Page 14: ...H Turn the handle according to arrow showed direction water comes out from spout Temperature from cold to hot by turning Turn the handle according to arrow showed direction water comes out from hand shower Temperature from cold to hot by turning 13 ...

Reviews: