background image

Coriolis Flow Meters

RCT1000 with RCS018…300 Sensors for Hazardous Locations

CRL-QS-01552-EN-05 April 2019

Quick Start Guide

Summary of Contents for CORIOLIS RCT1000

Page 1: ...Coriolis Flow Meters RCT1000 with RCS018 300 Sensors for Hazardous Locations CRL QS 01552 EN 05 April 2019 Quick Start Guide ...

Page 2: ...tallation Considerations 10 Sensor Mounting Positions and Locations 11 Vertical Mounting with Tubes to the Side Flow Going Down 11 Horizontal Mounting with Tubes Down 11 Horizontal Mounting with Tubes Up 12 Horizontal Position with Flexible Armored Hoses 12 Horizontal Position with Flexible Armored Hose Loops 12 Vertical Mounting with Tubes to the Side Flow Going Up 13 Transmitter Installation 14 ...

Page 3: ...ns 22 Remote RCTX Terminal Boxes 22 Transmitter Setup 23 Basic Operation 24 Using the Keypad 24 Conventions 24 The Active Line 24 Meter Checks 25 Startup Screens 25 Menu Map 26 Keyboard Lock 27 System Passwords 27 Default Passwords 27 Sensor Check 28 Initial Zeroing Procedure 28 Priming for Zero 28 Zeroing the System 28 Home Screen Setup 29 Enable Disable Hidden Menus 29 HMI Examples 30 Editing Pa...

Page 4: ...nd Setup 34 EIA 485 Port 34 USB Programming Port 34 EIA 485 Modbus RTU 34 Optional HART Communication Card 34 Optional Ethernet Communication Card 34 Troubleshooting 35 Navigation During an Alarm Condition 35 WARNING Help 35 Identifying System Faults 35 Red Green LED Diagnostics 35 Startup 35 Blink Code 35 Indicated Error Levels 36 Error Messages 37 Troubleshooting Symptoms 38 Coriolis Flow Meters...

Page 5: ...l Symbols Function Direct Current Alternating Current Earth Ground Protective Ground Chassis Ground Symbol RCT1000 transmitters employ modular construction and provide electrical safety for the operator Safety Precautions DANGER THE POWER SUPPLY BOARD CAN HAVE LINE VOLTAGES APPLIED TO IT DISCONNECT ELECTRICAL POWER BEFORE OPENING THE INSTRUMENT ENCLOSURE USE WIRING PRACTICES THAT CONFORM TO LOCAL ...

Page 6: ...ag depend on the sensor part number Certifications Ambient Fluid Temp Maximum Pressure Figure 1 Hazardous location sensor tag examples Remote Transmitter Certifications Figure 2 Remote transmitter tag example Remote Sensor Certifications Ambient Fluid Temp Maximum Pressure Compatible Transmitter Figure 3 Remote sensor tag example Product Label Page 6 April 2019 CRL QS 01552 EN 05 ...

Page 7: ...m 1 15 9 in 405 mm 2 5 1 in 131 mm 2 24 2 in 615 mm 23 2 in 590 mm RCS100 1 in 23 2 in 590 mm 1 16 8 in 426 mm 1 27 6 in 700 mm 2 6 4 in 163 mm 2 34 3 in 870 mm 33 3 in 845 mm RCS200 2 in 26 4 in 670 mm 2 18 5 in 472 mm 2 28 6 in 726 mm 3 7 9 in 203 mm 3 33 4 in 848 mm 32 4 in 823 mm RCS300 3 in 40 9 in 1040 mm 2 28 7 in 728 mm 2 40 4 in 1028 mm 3 9 5 in 243 mm 3 45 3 in 1150 mm 44 3 in 1125 mm 1 ...

Page 8: ... F 6 57 in 167 mm 5 20 in 132 mm 13 43 in 341 mm 5 85 in 148 7 mm 4 57 in 0 12 in 116 mm 3 mm 1 37 in 35 mm RCTX Remote Mount Conduit Outlet Box Dimensions 2X 1 2 FNPT A C D B Figure 6 Conduit outlet box for remote mount A B C D 4 5 in 116 mm 3 75 in 95 mm 2 4 in 62 mm 0 75 in 19 mm Dimensions Page 8 April 2019 CRL QS 01552 EN 05 ...

Page 9: ...ysical damage such as scratches loose or broken parts or any other sign of damage that may have occurred during shipment NOTE N If damage is found request an inspection by the carrier s agent within 48 hours of delivery and file a claim with the carrier A claim for equipment damage in transit is the sole responsibility of the purchaser TRANSPORTING THE METER The following instructions apply to tra...

Page 10: ...ation When using hose connections use a short section of rigid pipe on each side of the sensor for proper support The sensor should not hang from hose connections See Figure 16 on page 13 and Figure 14 on page 12 Use caution with fluids that harden or solidify at rest Do not pass fluids that react together through the same flow sensor Do not cover transmitter with insulation material If heat traci...

Page 11: ...ion make sure to use an isolation valve or other pipe restriction to prevent the sensor from running empty while measurement is being taken Flow Flow 1 2 3 4 5 Flow 1 Supply Tank 2 Sensor 3 Pipe Restriction 4 Valve 5 Batching Tank Figure 10 Mounting positions and locations Figure 11 Tubes to the side with flow going down Horizontal Mounting with Tubes Down The mounting orientation shown in Figure ...

Page 12: ...ble Armored Hoses Flow Flow 1 1 2 2 3 3 Figure 14 Flexible armored hoses 1 Supports Customer supplied Rigid pipe supports approximately 3 and 6 pipe diameters from the end of the sensor 2 Hose Customer supplied Flexible armored 3 Isolation Valves Customer supplied Full port ball Horizontal Position with Flexible Armored Hose Loops Flow Flow 1 1 3 3 2 2 Figure 15 Flexible armored hose loops 1 Suppo...

Page 13: ... 1 3 2 2 Flow Flow Figure 16 Tubes to the side with flow going up self draining 1 Supports Customer supplied Rigid pipe supports approximately 3 and 6 pipe diameters from the end of the sensor 2 Isolation Valves Customer supplied Full port ball 3 Ground Protective earth 10 AWG 4 mm2 minimum Sensor Installation Page 13 April 2019 CRL QS 01552 EN 05 ...

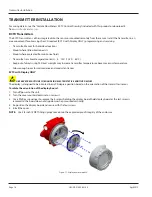
Page 14: ...maximum temperature Allow enough room for maintenance and conduit entrances RCTX with Display ONLY OBSERVE PRECAUTIONS FOR HANDLING ELECTROSTATIC SENSITIVE DEVICES The display is designed to be oriented in any 90 degree position based on the orientation of the transmitter sensor To rotate the orientation of the display board 1 Turn off power to the unit 2 Turn the cover counterclockwise to unscrew...

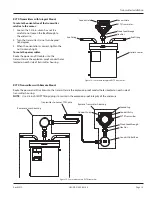
Page 15: ...ed Feedthrough End Fitting Coriolis Sensor Hex Nut Conduit Hole Conduit Hole End Fitting Figure 18 Sensor with integrated RCTX transmitter RCTX Transmitters with Remote Mount Route the power and I O cables into the transmitter via the explosion proof conduit holes located on each side of transmitter housing NOTE N Use 3 4 inch 14NPT fittings plugs to maintain the explosion proof integrity of the e...

Page 16: ...vices Make sure the supply voltage is switched off and the transmitter is in a non hazardous area Use connecting cables rated for a continuous service temperature of 10 95 C Tamb max 20 C Use only certified conforming to IEC 60079 14 Electrical Installations in Hazardous Areas cable glands and conduit hole plugs Seal unused entry holes with approved sealing plugs that correspond to the type of pro...

Page 17: ...ing the display board to the standoffs hold display board as the last screw is removed so the board does not drop down when mounted vertically See Figure 21 4 Gently turn over the display board 5 Open the tabs on the header assembly to release the cable ribbon connector See Figure 22 6 Remove the display board Remove Screws Remove Screws Cable Ribbon Header Assembly Tabs Figure 21 Phillips head sc...

Page 18: ...f the operator b The switch or circuit breaker must be marked as the disconnect device for the RCTX NOTE N DC power input is protected with an internal 1 5 Amp Slo Blo surface mount non field serviceable fuse This fuse protects only for a catastrophic failure and must be returned to factory for servicing if blown NOTE N User shall provide external circuit breaker at the source for normal operation...

Page 19: ...5 Communications Diff Pair 5 In_Status_1 In Digital Input Low 0V DC Active High 5 28V DC 6 In_Status_2 In Digital Input Low 0V DC Active High 5 28V DC 7 In_Status_3 In Digital Input Low 0V DC Active High 5 28V DC 8 GND Signal GND GND for all signals with the exception of power in 9 Out_Status_1 Out Digital Open Drain Output Requires an external pullup resistor to 5 28V DC max to provide a positive...

Page 20: ...B100 RCTX 100 mA Max 8 GND GND FREQUENCY OUTPUT Figure 25 Typical status_out 1 2 and frequency output interface EXTERNALEQUIPMENT RCTX CURRENT 15V DC 4 20 mA TB100 13 14 TO INPUT LOGIC R 500 Ohm Max Load GND GND 8 Figure 26 Typical lOut2 and lOut3 current interface HART MODULE EXTERNAL EQUIPMENT 15V DC 4 20 mA TB1 1 2 GND GND R TO INPUT LOGIC 500 Ohm Max Load Figure 27 Typical lOut1 HART interface...

Page 21: ...Remove Screws Cable Ribbon Header Assembly Tabs Figure 28 Phillips head screws Figure 29 Release cable ribbon 6 Attach the cable ribbon connector to the header assembly of the new display board 7 Fold the cable ribbon between the standoffs to avoid pinching it with the new board 8 Secure the display board with the 4 Phillips head screws removed in step 3 9 Replace the cover Replacing the Covers Tu...

Page 22: ...HT WHT VIO VIO GRN GRN ORG BLU GRY YEL BRN BRN YEL OR GRY GRY BLU ORG CORIOLIS SENSOR For wiring details see the Coriolis Flow Meters RCTX Control Drawing available at www badgermeter com Figure 32 Remote mounted hazardous location sensorg Remote RCTX Terminal Boxes The sensor wiring in the main transmitter enclosure is prewired If the cable must be replaced open the contact on the terminal block ...

Page 23: ... provided with purchase This software is also available for download at www badgermeter com For assistance with basic system requirements and configuring the software with the sensor and transmitter pair refer to the user manual The manual is available online at www badgermeter com and is also on the provided USB thumb drive The following procedure outlines the commissioning of the system via the ...

Page 24: ...meter value editing mode a Long Press moves the cursor one position to the left and a short Press changes a character In menus and parameter lists a short Press moves a menu or parameter list down Enter If a menu item is shown in the active line then a short Press enters into that menu If a parameter is shown in the active line then a Long Press starts parameter value editing mode if the parameter...

Page 25: ...city of the meter 8 Perform a zero calibration see Sensor Check on page 28 Startup Screens NOTE N Screens may differ depending on firmware version and enabled options 1 Example of startup splash screen Figure 35 Splash screen 2 The transmitter is looking to see if there is a sensor connected The Initializing text will display for one minute if no sensor is connected Figure 36 Transmitter initializ...

Page 26: ... FREQUENCY SETUP Parameter List COM PORTS Parameter List RELAYS Parameter List ANALOG INPUT Parameter List MENUS Parameter List PROGRAM Parameter List PASSWORD Parameter List DISPLAY Parameter List BATCH Parameter List PID Parameter List TOTAL Parameter List CONCENTRATION Parameter List APPLICATION Parameter List NET FLOW Parameter List ALARM A Parameter List ALARM B Parameter List ALARMS ALARM C ...

Page 27: ... parameters PWLv1 indicates the password level entered if any PWSet is the parameter used to change the password level 4 To change to another password level use Up or Down until PWSet is in the active line of the display then press and hold Enter 5 A cursor will appear under the first character of the password a Using Up or Down increment or decrement the value as needed b To move the cursor to th...

Page 28: ...luid for a minimum of 10 minutes at a flow rate greater than 20 of the rated full scale value of the flow sensor to purge both the process piping and sensor of air NOTE N Do not attempt the initial startup procedure with a partially filled sensor NOTE N If the process temperature or pressure changes significantly the meter may need to be re zeroed If the meter is to be re zeroed make sure the mete...

Page 29: ...e parameters to be displayed on the Home screen The parameter under Param1 will be the default parameter listed on the first line of the Home screen Param2 8 follow suit NOTE N On the Home screen use Up or Down to scroll through the available parameters Home screen Line 1 Param1 Home screen Line 5 Param5 Home screen Line 2 Param2 Home screen Line 6 Param6 Home screen Line 3 Param3 Home screen Line...

Page 30: ...o be edited first is the value of the unit Use Up or Down to change the value of the highlighted character Press and hold Up to move the cursor to the right or press and hold Down to move the cursor to the left NOTE N Measured values such as mFlo mass flow rate cannot be changed An attempt to do so will do nothing 3 After changing the value press Enter 4 The next item to be edited is the unit of t...

Page 31: ...e configuration whether it is a meter zero or a density factor Any time one of these is changed it will signal the transmitter of the change Once the user steps back out to the Home screen prior to entering the Home screen a prompt like this will appear Follow the on screen commands to either create or cancel the backup Figure 50 Parameter change triggered backup Manual Transmitter Backup To creat...

Page 32: ...d level must be Technician or Engineer to change settings 1 Enable the current output EN 2 Assign the parameter to use with the current output ID 3 Enter minimum current IVluMn and the minimum value of the assigned parameter VluMn 4 Enter maximum current IVluMx and the maximum value of assigned parameter VluMx Example Parameter Setting Parameter Setting EN Enable ID 59 mFlo IVluMn 4 mA VluMn 100 l...

Page 33: ... the frequency output at a fixed value set the output TstOut to the desired frequency and enable the test frequency AltFrq 128 Check that FrqOEN and EN are enabled While the test frequency is enabled the warning message 6 Freq out error shows on the transmitter Monitor Frequency To monitor the frequency output view FrqOut 122 Pulse Output 1 From the Frequency Output menu enable the pulse frequency...

Page 34: ...e to respond to all requests if both the EIA 485 and USB programming ports are busy EIA 485 Modbus RTU See RCT1000 Modbus RTU Communication Protocol user manual available at www badgermeter com Optional HART Communication Card See the Coriolis Flow Meter HART Bidirectional Communication Protocol Data Access user manual available at www badgermeter com Optional Ethernet Communication Card An option...

Page 35: ... to the menu related to the error NOTE N If the error is still present the WARNING message will come back DO NOT REMOVE OR REPLACE FUSE WHEN IT IS ENERGIZED Identifying System Faults When a fault is suspected 1 Identify the general symptom and if possible the fault type by referring to the tables in this section 2 When the fault has been identified run through the checks detailed to correct the pr...

Page 36: ... settable alarm limits one of the 4 20 mA limits or frequency output scaling limits is exceeded Error levels 1 5 have no effect on accurate fluid measurement and totalization Level 6 8 errors are more severe and accurate measurements cannot be achieved Level 6 8 errors are Measurement error IFCPU Tube frequency error RTD1 error No answer from IFCPU Sensor warning Driver overflow 100 Flash CSC is b...

Page 37: ...med high limit For Example if the upper span of the frequency was set to 1000 Hz at 1000 lb min and the low end was 1015 lb min the Freq High Limit alarm would be displayed If the flow was 90 lb min the Freq Low Limit would be displayed Cntr High Low Limit 4 PID output limits are being exceeded The computed output of the PID is greater than 100 high alarm or under 0 low alarm Answer Error 3 Master...

Page 38: ...om the mechanical vibration Check process loop for entrained air which will impact the mass flow Check that there is no air in the sensor when zeroing the meter Make sure that flow has completely stopped and all blocking valves are closed Re zero the meter Verify that the calibration factors on the sensor are entered correctly to the transmitter Set Up Calibration Flow FloFct Flow Factor Set Up Ca...

Page 39: ...sensor wiring Measure the resistance between brown and yellow gray sensor wires The resistance should be approximately 110 Ohms at 77 F 25 C The resistance will vary depending on the fluid temperature The resistance between the yellow and gray sensor wires should be less than 5 Ohms If there appears to be an open or short at the transmitter end of the cable remove the sensor cable from the sensor ...

Page 40: ... de C V Pedro Luis Ogazón N 32 Esq Angelina N 24 Colonia Guadalupe Inn CP 01050 México DF México 52 55 5662 0882 Europe Eastern Europe Branch Office for Poland Latvia Lithuania Estonia Ukraine Belarus Badger Meter Europe ul Korfantego 6 44 193 Knurów Poland 48 32 236 8787 Europe Middle East and Africa Badger Meter Europa GmbH Nurtinger Str 76 72639 Neuffen Germany 49 7025 9208 0 Europe Middle East...

Reviews: