background image


17 

17 

Electrical Connections 

The BSS-22 Scroll Saw is prewired for 120-volt power. 
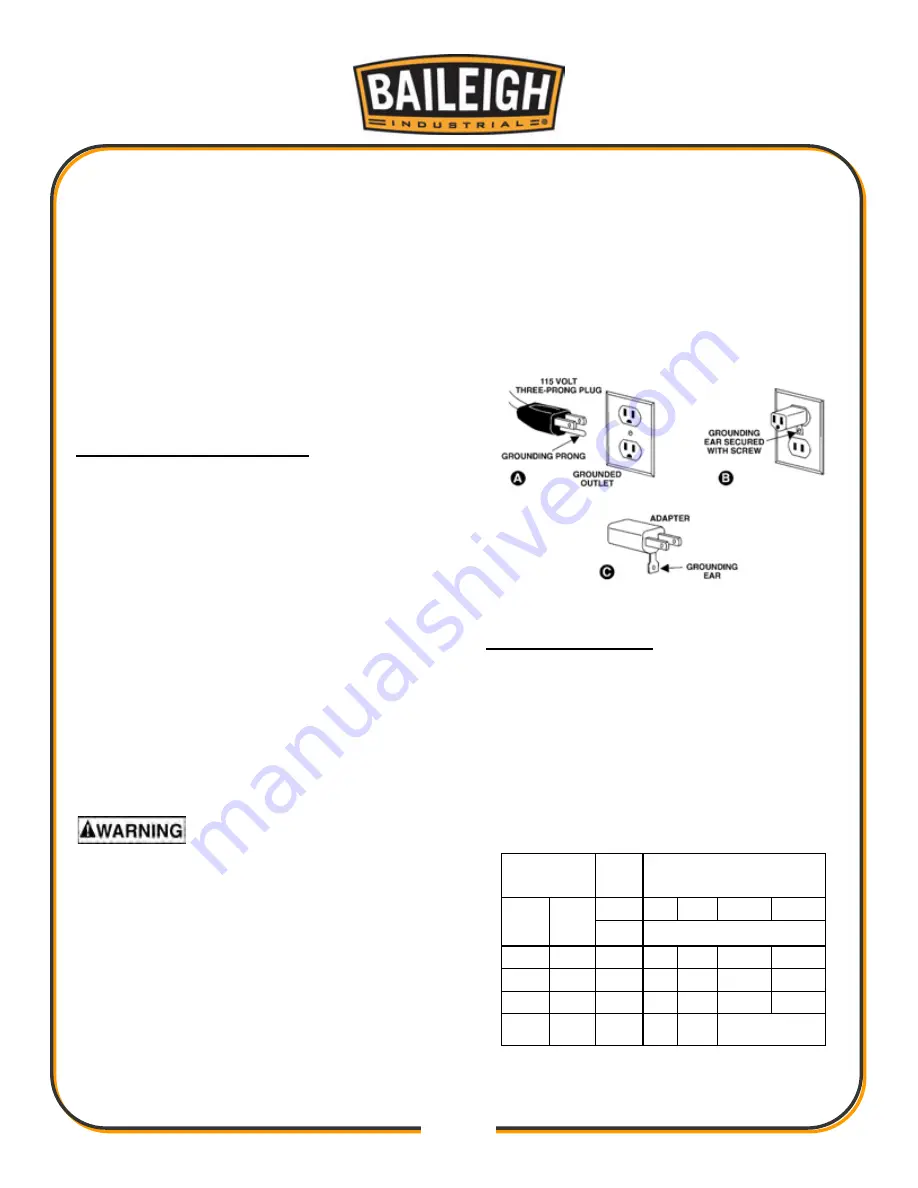
The  saw  comes  with  a  plug  designed  for  use  on  a 
circuit  with  a 

grounded  outlet 

that  looks  like  the  one 

pictured in 

A

, Figure 10. 

Before connecting to power source, be sure switch is 
in 

off 

position.  

It is recommended that the scroll saw be connected to 
a dedicated 15-amp circuit with circuit breaker or fuse. 
If connected to a circuit protected by fuses, use time 
delay  fuse  marked  “D”. 

Local  codes  take 

precedence over recommendations. 

Grounding Instructions 

This  machine  must  be  grounded.  In  the  event  of  a 
malfunction or breakdown, grounding provides a path 
of least resistance for electric current to reduce the risk 
of electric shock. This tool is equipped with an electric 
cord having an equipment-grounding conductor and a 
grounding  plug.  The  plug  must  be  plugged  into  a 
matching outlet that is properly installed and grounded 
in accordance with all local codes and ordinances. 

Do  not  modify  the  plug  provided  -  if  it  will  not  fit  the 
outlet,  have  the  proper  outlet  installed  by  a  qualified 
electrician. 

Improper  connection  of  the  equipment-grounding 
conductor  can  result  in  a  risk  of  electric  shock.  The 
conductor with insulation having an outer surface that 
is  green  with  or  without  yellow  stripes  is  the 
equipment-grounding 

conductor. 

If 

repair 

or 

replacement of the electric cord or plug is necessary, 
do not connect the equipment-grounding conductor to 
a live terminal. 

 Check with a qualified electrician 

or service pe

r

sonnel if the grounding instructions 

are not completely understood, or if in doubt as to 
whether the tool is properly grounded. Failure to 
comply may cause serious or fatal injury.


Use  only  3-wire  extension  cords  that  have  3-prong 
grounding  plugs  and  3-pole  receptacles  that  accept 
the tool's plug. 

Repair or replace damaged or worn cord immediately. 

This tool is for use on a nominal 120-V circuit and has 
a grounded plug that looks like the plug illustrated in 
sketch A in Figure 10. A temporary adaptor that looks 
like the adaptor illustrated in sketches B and C may be 
used  to  connect  this  plug  to  a  2-pole  receptacle  as 

shown in sketch B if a properly grounded outlet is not 
available. The temporary adaptor should be used only 
until  a  properly  grounded  outlet  (sketch  A)  can  be 
installed by a qualified electrician. The green colored 
rigid  ear,  lug,  or  the  like  extending  from  the  adaptor 
must be connected to a permanent ground such as a 
properly  grounded  outlet  box  cover.  Whenever  the 
adaptor  is  used,  it  must  be  held  in  place  by  a  metal 
screw.  

In  Canada,  the  use  of  a  temporary  adaptor  is  not 
permitted by the Canadian Electrical Code, C22.1. 

Figure 10: Plug Configuration 

Extension Cords 

The  use  of  extension  cords  is  discouraged;  try  to 
position  machines  near  the  power  source.  If  an 
extension cord is necessary, make sure it is in good 
condition. When using an extension cord, be sure to 
use  one  heavy  enough  to  carry  the  current  your 
product will draw. An undersized cord will cause a drop 
in  line  voltage  resulting  in  loss  of  power  and 
overheating.  Table  1  shows  correct  size  to  use 
depending  on  cord  length  and  nameplate  ampere 
rating.  If  in  doubt,  use  the  next  heavier  gauge.  The 
smaller the gauge number, the heavier the cord. 

Ampere 
Rating 

Volts  Total length of  

cord in feet 

More 
Than 

Not 
More 
Than 

120 

25 

50 

100 

150 


AWG 


18 

16 

16 

14 

10 


18 

16 

14 

12 

10 

12 


16 

16 

14 

12 

12 

16 


14 

12 

Not 
Recommended 


Extension Cord Recommendations 

Table 1 

Summary of Contents for BSS-22

Page 1: ...ILEIGH INDUSTRIAL IS PROHIBITED Baileigh Industrial does not assume and hereby disclaims any liability for any damage or loss caused by an omission or error in this Operator s Manual resulting from ac...

Page 2: ...d 15 Blade storage 16 Foot pedal 16 Dust collection 16 Electrical connections 17 Grounding Instructions 17 Extension cords 17 Adjustments 18 Arm tilt 18 Installing blade 18 Adjusting blade tension 19...

Page 3: ...BSS 22 Upper Lower Arm Assembly Exploded View 30 BSS 22 Upper Lower Arm Assembly Parts List 31 BSS 22 Table Cabinet Assembly Exploded View 32 BSS 22 Table Cabinet Assembly Parts List 33 BSS 22 Drive...

Page 4: ...e to Seller of any suspected defect in the Goods prior to the expiration of the warranty period The original end user must also obtain a RGA from Seller prior to returning any Goods to Seller for warr...

Page 5: ...s provided under this Agreement or at law or equity Attorney s Fees In the event legal action is necessary to recover monies due from Buyer or to enforce any provision of this Agreement Buyer shall be...

Page 6: ...unexpected occurrence Temporarily suspend installation Take necessary precautions while loading unloading or moving the machine to avoid any injuries Your machine is designed and manufactured to work...

Page 7: ...machine adjustments or maintenance with the machine unplugged from the power source 13 Remove adjusting keys and wrenches Form a habit of checking to see that keys and adjusting wrenches are removed...

Page 8: ...a flat surface without a suitable support Do not cut pieces of material too small to hold by hand 37 Care must be taken when cutting material with an irregular cross section The blade could pinch befo...

Page 9: ...precautions are not heeded it may result in serious injury or possibly even fatal injury SAVE THESE INSTRUCTIONS Switch lock out To safeguard your machine from unauthorized operation and accidental st...

Page 10: ...ational methods choice of blades or wood stock etc Additional knowledge can be obtained from experienced users or trade articles Whatever accepted methods are used always make personal safety a priori...

Page 11: ...rms that move articulated arms holding the blade The Baileigh Industrial scroll saw is this type Perpendicular 90 right angle intersection or position of vertical and horizontal planes such as saw bla...

Page 12: ...ees left 45 degrees right Main materials Body and tool tray steel Main table ground cast iron Trunnion steel Arm steel plastic cover Table Table dimensions LxW 23 62 x 12 67 in 600 x 322 mm Table slot...

Page 13: ...13 13 Mounting Hole Pattern Figure 2 Scroll Saw Mounting Hole Pattern General Features Figure 3 BSS 22 Features...

Page 14: ...n 1 Product registration card not shown Figure 4 Contents not to scale Tools Required for Assembly 14mm open end wrench for foot pads 3mm hex wrench for blade guide 4mm hex wrench for blade rack Unpac...

Page 15: ...roll saw will not be bolted down to a surface install the four foot pads to reduce vibration See Figure 7 Lower hex nut may be adjusted for height Tighten top hex nut down against saw foot Figure 7 Le...

Page 16: ...ack of foot pedal Then plug foot pedal into power source If not using foot pedal plug saw directly into power source the on off switch is then pressed to start and stop the saw It is strongly recommen...

Page 17: ...rounded Failure to comply may cause serious or fatal injury Use only 3 wire extension cords that have 3 prong grounding plugs and 3 pole receptacles that accept the tool s plug Repair or replace damag...

Page 18: ...m Tilt Adjustment Installing Blade 1 Turn off saw 2 Insert lower blade holder Figure 12 into hole in blade rack for leverage and loosen knob 3 Slide blade into holder deep enough to gain sufficient cl...

Page 19: ...ps one or both of the following adjustments may be needed Figure 15 Upper clamp spring pressure can be adjusted by lifting handle D to vertical position Rotate handle clockwise one turn to increase pr...

Page 20: ...ow often the saw is used and frequent use of the tilt mechanism Periodically check squareness of blade to table as follows 1 Turn off saw unplug from power source 2 Make sure blade is fully tensioned...

Page 21: ...of arm if measurements are different rotate arm adjustment knob L until upper arm is parallel Figure 20 Arm Table Parallelism 3 Install blade Adjustments to blade oscillation can be subtle place a sq...

Page 22: ...void awkward hand positions or getting fingers wedged between saw arm and workpiece when cutting small workpieces 11 For fretwork drill all needed pilot holes at the same time before moving to the scr...

Page 23: ...w from power before performing maintenance Failure to comply may result in serious personal injury General Maintenance Clean wood dust from the saw frequently using a vacuum or compressed air or damp...

Page 24: ...ace both at the same time Continued use of a damaged or worn brush may result in damage to motor armature 1 Unplug saw from power source 2 Unscrew and remove cap with flat blade screwdriver See Figure...

Page 25: ...h more teeth per inch will cut slowly but more smoothly and minimize vibration A coarse pitch fewer teeth per inch will cut faster but more roughly Try to use a blade that will have a minimum of 3 tee...

Page 26: ...angle Offers clean cuts at slower feed rates Skip Tooth More space between teeth for good chip removal and fast cuts Double Tooth A skip tooth with larger gaps between tooth sets good chip removal fas...

Page 27: ...ries These accessory items purchased separately can enhance the functionality of your scroll saw Contact your dealer to order or call Baileigh Industrial at the phone number on the cover 727201 Lower...

Page 28: ...ade tension Set proper tension Blade being overworked Reduce feed rate Wrong blade for job Select proper blade Blade twisting in workpiece Avoid side pressure on blade Reduce feed rate Too few teeth p...

Page 29: ...8 00 a m to 5 00 p m CST Having the Model Number and Serial Number of your machine available when you call will allow us to serve you quickly and accurately Some parts are shown for reference only and...

Page 30: ...30 30 BSS 22 Upper Lower Arm Assembly Exploded View...

Page 31: ...20 2 25 F009918 Button Head Socket Screw 1 4 20x2 1 2 2 26 TS 130205 Lock Washer 1 4 1 27 TS 081B012 Phillips Pan Head Machine Screw 8 32x1 4 2 28 TS 0720041 External Tooth Lock Washer 8 2 29 TS 0561...

Page 32: ...32 32 BSS 22 Table Cabinet Assembly Exploded View...

Page 33: ...n Head Socket Screw 10 32x5 16 8 18 TS 069204 Flat Washer 10x12x1 8 19 JWSS22B 319 Front Trunnion Plate 1 20 JWSS22B 320 Hex Flange Nut 1 4 20UNC 12 21 BSS22 321 Trunnion 2 22 BSS22 322 Side Panel 2 2...

Page 34: ...34 34 BSS 22 Drive Link Assembly Exploded View...

Page 35: ...r Bearing Sleeve Long 6 03x16 5mm 2 20 F005667 Socket Head Cap Screw M5x28 1 21 JWSS22B 421 Main Rocker Pivot 14 04x35 50mm 1 22 JWSS22B 422 Bearing Cover 2 23 JWSS22B 423 Bearing 1412 2 24 JWSS22B 42...

Page 36: ...ve Short 6 03x21mm 2 JWSS22B TSA Thumb Screw Assembly 56 thru 58 1 56 JWSS22B 456 Thumb Screw 1 57 JWSS22B 457 O Ring 1 58 JWSS22B 458 Press Bar 1 59 JWSS22B 459A Inner Bearing Sleeve 6 03x14 2mm 1 62...

Page 37: ...37 37 Electrical Connections BSS 22 Scroll Saw...

Page 38: ...38 38...

Page 39: ...39 39...

Page 40: ...40 40 BAILEIGH INDUSTRIAL 1625 DUFEK DRIVE MANITOWOC WI 54220 PHONE 920 684 4990 FAX 920 684 3944 www baileigh com...

Reviews: