background image


16 

16 

ELECTRICAL 


Power Specifications 

Your machine is wired for 220 volts, 60hz alternating current. Before connecting the machine to 
the power source, make sure the power source is OFF. 
Before switching on the power, you must check the voltage and frequency of the power to see if 
they meet with the requirement, the allowed range for the voltage is ±5%, and for the frequency 
is ±1%. 
 

Considerations 

  Observe local electrical codes when connecting the machine. 

  The circuit should be protected with a time delay fuse or circuit breaker with a amperage 

rating slightly higher than the full load current of machine. 

  A separate electrical circuit should be used for your machine. Before connecting the motor to 

the power line, make sure the switch is in the “OFF” position and be sure that the electric 
current is of the same characteristics as indicated on the machine. 

  All line connections should make good contact. Running on low voltage will damage the 

motor. 

  In the event of a malfunction or breakdown, grounding provides a path of least resistance for 

electric current to reduce the risk of electric shock. This machine is equipped with an electric 
cord having an equipment-grounding conductor and a grounding plug. The plug must be 
plugged into a matching outlet that is properly installed and grounded in accordance with all 
local codes and ordinances. 


CAUTION: 

HAVE ELECTRICAL UTILITIES CONNECTED TO MACHINE BY 

A CERTIFIED ELECTRICIAN!


Check if the available power supply is the same as listed on the machine nameplate. 

WARNING:

 Make sure the grounding wire (green) is properly connected 

to avoid electric shock. DO NOT switch the position of the green grounding wire if 
any electrical plug wires are switched during hookup. 

WARNING:

 In all cases, make certain the receptacle in question is 

properly grounded. If you are not sure, have a qualified electrician check the 
receptacle

.


Summary of Contents for IP-156

Page 1: ...STRIAL INC IS PROHIBITED Baileigh Industrial Inc does not assume and hereby disclaims any liability for any damage or loss caused by an omission or error in this Operator s Manual resulting from accid...

Page 2: ...ING BELT TENSION 20 FEED ROLL SPEED RATE 20 ROLL TRANSMITTING 21 CONNECTING DUST COLLECTOR 21 FEEDROLL PRESSURE AJDUSTMENT 21 ADJUSTMENT TRANSMITTING ROLLER 22 ADJUSTING TABLE ROLLER 22 ADJUST ROLLER...

Page 3: ...e to Seller of any suspected defect in the Goods prior to the expiration of the warranty period The original end user must also obtain a RGA from Seller prior to returning any Goods to Seller for warr...

Page 4: ...urther remedies provided under this Agreement or at law or equity Attorney s Fees In the event legal action is necessary to recover monies due from Buyer or to enforce any provision of this Agreement...

Page 5: ...ption of the functional parts of the machine Capacity charts Setup and start up instructions Machine operation Scheduled maintenance Parts lists GENERAL NOTES After receiving your equipment remove the...

Page 6: ...zardous situation which if not avoided will result in death or serious injury WARNING Indicates a hazardous situation which if not avoided could result in death or serious injury CAUTION Indicates a h...

Page 7: ...to protect against objectionable or uncomfortable loud noises BLADE HAZARD Keep hands and fingers away from the rotating knife blades These rotating knives can be extremely dangerous if you do not fol...

Page 8: ...term respiratory damage Be aware of the dust hazards associated with all types of materials DUST PARTICLES AND IGNITION SOURCES DO NOT operate the table saw in areas where explosion risks are high Suc...

Page 9: ...ns to a Baileigh machine Modifications or alterations to a machine may pose a substantial risk of injury to the operator or others and may do substantial damage to the machine Any modifications or alt...

Page 10: ...in damp or wet locations Do not expose to rain Keep work area well lighted DO NOT use electrically powered tools in the presence of flammable gases or liquids 15 Keep children away Children must never...

Page 11: ...t Always follow proper lockout tagout procedures 33 Using Quality Stock Inspect the stock over carefully that you intend to plane NEVER plane a board that has loose knots staples or nails in it DO NOT...

Page 12: ...36kg TECHNICAL SUPPORT Our technical support department can be reached at 920 684 4990 and asking for the support desk for purchased machines Tech Support handles questions on machine setup schematics...

Page 13: ...age painted surfaces Follow manufacturer s label instructions when using any type of cleaning product After cleaning wipe unpainted metal surfaces with a light coating of quality oil or grease for pro...

Page 14: ...lower gently to the floor Level the machine so that all the supporting feet are taking the weight of the machine and no rocking is taking place INSTALLATION IMPORTANT Consider the following when looki...

Page 15: ...consideration the size of the material to be processed Make sure that you allow enough space for you to operate the machine freely POWER SUPPLY PLACEMENT The power supply should be located close enou...

Page 16: ...and snug place straight edge through machine so that it lies across the main table and extension table Fig 3 4 Align the extension table to the main table When the tables are aligned hold in position...

Page 17: ...dust chute to the planer hood with hex head screws flat washer 2 Make sure the dust collection system has sufficient capacity and suction for your planer 3 Always turn on the dust collection system b...

Page 18: ...ndicated on the machine All line connections should make good contact Running on low voltage will damage the motor In the event of a malfunction or breakdown grounding provides a path of least resista...

Page 19: ...sted below LENGTH AMP RATING 25ft 50ft 100ft 1 12 16 16 14 13 16 14 12 12 17 20 12 12 10 21 30 10 10 No WIRE GAUGE An undersized cord decreases line voltage causing loss of power and overheating All c...

Page 20: ...18 18 ELECTRICAL DIAGRAM...

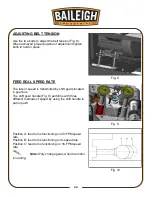
Page 21: ...position Fig 5 CHECKING PULLEY To verify that motor pulley B is in line with the shaft pulley of A using the edge of a straight scale check to see if they are on line with each other Fig 6 Adjusting...

Page 22: ...transmitted by shift gears located in gear box The shift gear handle Fig 9 performs with three different methods of speed by using the shift handle to pull or push Position A feed roll is functioning...

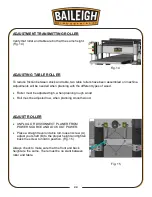
Page 23: ...back of machine The dust collector will collect all dust and particles while molding in process this system will give a clean and safe working environment Fig 12 FEEDROLL PRESSURE AJDUSTMENT The pres...

Page 24: ...ypes of wood Roller must be adjusted high when planning rough wood Roll must be adjusted low when planning smooth wood ADJUST ROLLER UNPLUG OR DISCONNECT PLANER FROM POWER SOURCE AND LOCK OUT POWER Pl...

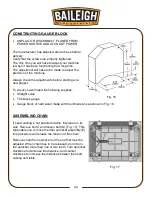
Page 25: ...ill need the following supplies Straight scale Thickness gauge Gauge block of hard wood made with the dimensions as shown in Fig 16 ASSEMBLING CHAIN If head casting is not parallel to table tilt plane...

Page 26: ...s are required The only verification you should make is to check indirectly the parallel of the cutter head and table Proceed with the following 1 UNPLUG OR DISCONNECT PLANER FROM POWER SOURCE AND LOC...

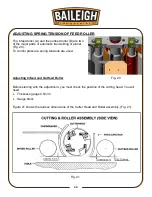
Page 27: ...itting of planer Fig 20 To control pressure spring tensions are used Adjusting Infeed and Outfeed Roller Before starting with the adjustment you must check the position of the cutting head You will ne...

Page 28: ...ch the top of gauge block 4 Once adjusted turn the nut tightly 2 and replace screw 1 5 The same procedures apply for the other end Outfeed Roller 1 Place gauge block under outfeed roller Fig 24 2 Loos...

Page 29: ...ake pressure bar touch the top of the gauge block 6 Turn the screw 1 tightly and replace the nut 2 CHECK HEIGHT OF CHIPBREAKER When adjusting the chipbreaker the correct position of wooden gauge and 0...

Page 30: ...ts that they are in order Clean and oil the tables so that the material will slide easily Clean any rust spots that may develop on the bed with a commercial rust remover Use compressed air to blow out...

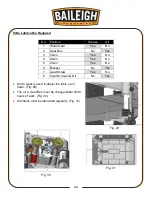
Page 31: ...hain Yes No 4 Chain Yes No 5 Chain Yes No 6 Bracket No Yes 7 Lead Screw Yes No 8 Column Clean Oil No Yes Worm Gear is used to adjust the table up or down Fig 29 The oil in Gear Box must be changed aft...

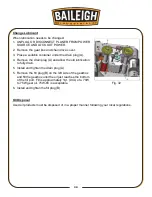
Page 32: ...g A and allow the old lubrication to fully drain 5 Install and tighten the drain plug A 5 Remove the fill plug B on the left side of the gearbox and fill the gearbox until the oil just reaches the bot...

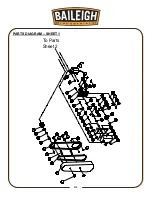
Page 33: ...31 31 PARTS DIAGRAM SHEET 1 To Parts Sheet 2...

Page 34: ...32 32 PARTS DIAGRAM SHEET 2 From Parts Sheet 1...

Page 35: ...33 33 PARTS DIAGRAM SHEET 3...

Page 36: ...34 34 PARTS DIAGRAM SHEET 4...

Page 37: ...75H 2 12 Key 5 x 5 x 12mm 1 13 Cap Screw M6 x 1 0P x 12 1 15 Dust Chute Assembly 1 18 Dust Hood Assembly 1 19 Cap Screw M6 x 1 0P x 20 20 20 Roller Bracket 3 21 Key 4 x 4 x 10mm 2 22 Handwheel 1 23 La...

Page 38: ...x 0 8P x 12 6 47 4 Knife Lock Bar Assembly 3 47 5 Tilt Plate 1 47 6 Knife Gauge 2 47 7 Retaining Ring ETW 9 4 47A Helical Cutter Head IP 156 HH JP31 1 47A 1 Cutter Inserts 15x15x2 5T Pkg of 10 68 48...

Page 39: ...Bearing 6204 1 78 Helical Gear 1 79 Cap Screw M6 x 1 0P x 25 6 80 Ball Bearing 6201 5 81 Gear 1 82 Shaft 1 83 Key 5 x 5 x 10mm 1 84 Gear Cover 1 85 Pin 2 87 Gear Shaft 1 88 Key 6 x 6 x 40mm 1 89 Gear...

Page 40: ...ord 12AWG 3C x 2000mm 1 109 Wire Protector 5 8 2 110 Plastic Sheet 570 x 440 x 0 05T 1 111 Eccentric Shaft 4 113 Roller Assembly 2 114 Lock Knob 2 115 Lock Smith 2 116 Screw Elevation 2 117 1 Cast Iro...

Page 41: ...Column 3 153 Base 1 154 Ball Bearing 6202 4 155 Retaining Ring RTW 35 4 156 Sprocket 4 157 Bracket 1 158 Shaft 1 159 Sprocket 1 160 S Ring STW 15 1 161 Hex Screw M8 x 1 25P x 25 2 162 Chain 410 x 134P...

Page 42: ...levation 1 196 Ball Bearing 6200 1 197 Retaining Ring RTW 30 1 198 Cap Screw M8 x 1 25P x 45 1 200 Pad 2 202 Flat Washer 6 2 x 22 x 3T 7 205 Hex Screw M8 x 1 25P x 30 1 206 Spring Washer 8 2 x 15 4 1...

Page 43: ...41 41 NOTES...

Page 44: ...OWOC WI 54220 PHONE 920 684 4990 FAX 920 684 3944 WWW BAILEIGH COM BAILEIGH INDUSTRIAL LTD UNIT 1 FULLWOOD CLOSE SWIFT VALLEY INDUSTRIAL ESTATE RUGBY WEST MIDLANDS CV21 1QH UNITED KINGDOM PHONE 44 0 2...

Reviews: