14
14
FLOOR:
This tool distributes a large amount of weight over a small area. Make certain that
the floor is capable of supporting the weight of the machine, work stock, and the operator.
The floor should also be a level surface. If the unit wobbles or rocks once in place, be sure to
eliminate by using shims.
WORKING CLEARANCES:
Take into consideration the size of the material to be
processed. Make sure that you allow enough space for you to operate the machine freely.
POWER SUPPLY PLACEMENT:
The power supply should be located close enough to the
machine so that the power cord is not in an area where it would cause a tripping hazard. Be
sure to observe all electrical codes if installing new circuits and/or outlets.
Base Levelling
The machine should be sited on a level, concrete floor. The accuracy of any machine depends
on the precise placement of it to the mounting surface. Locate the planer in an area that is level
and provides a solid foundation. Make sure that any potential kickback is not in line with aisles,
doorways, wash stations or other work areas.
Place the pads under the four leveling bolts
mounted in the base.
Place a level on the table of the planer and adjust
leveling bolts until the machine is resting level.
Tighten the hex nuts against the base of the planer
to keep the leveling bolts from turning.
Dust Chute Assembly
1. Mount the dust chute to the planer hood with six
M6 x 10 hex head screws (A). Three on top and
three under the hood.
2. Make sure the dust collection system has sufficient
capacity and suction for your planer.
3. Always turn on the dust collection system before
starting the planer.
WARNING:
Before operating; make sure it is positioned firmly on a solid
level floor. If it tips over on you, it could cause severe injury or death.
A
A
Summary of Contents for IP-2008-HD
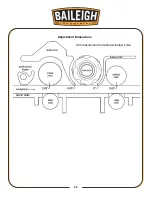
Page 28: ...25 25 All measurements are shown below knife Adjustment Dimensions...
Page 42: ...39 39 6 Loosen Nut on motor bracket 7 Remove belt 8 Remove cutterhead pulley...
Page 46: ...43 43...
Page 50: ...47 47 PARTS DIAGRAM...
Page 51: ...48 48...
Page 52: ...49 49...
Page 53: ...50 50...
Page 54: ...51 51...


