16
16
ELECTRICAL
Power Specifications
Your tool is wired for 220 volts, 60Hz alternating current. Before connecting the tool to the power
source, make sure the machine is cut off from power source.
Before switching on the power, you must check the voltage and frequency of the power to see if
they meet with the requirement, the allowed range for the voltage is ±5%, and for the frequency
is ±1%.
Considerations
Observe local electrical codes when connecting the machine.
The circuit should be protected with a time delay fuse or circuit breaker with a amperage
rating slightly higher than the full load current of machine.
A separate electrical circuit should be used for your tools. Before connecting the motor to the
power line, make sure the switch is in the “OFF” position and be sure that the electric current
is of the same characteristics as indicated on the tool.
All line connections should make good contact. Running on low voltage will damage the
motor.
In the event of a malfunction or breakdown, grounding provides a path of least resistance for
electric current to reduce the risk of electric shock. This tool is equipped with an electric cord
having an equipment-grounding conductor and a grounding plug. The plug must be plugged
into a matching outlet that is properly installed and grounded in accordance with all local
codes and ordinances.
WARNING:
Baileigh Industrial is not responsible for any damage caused
by wiring up to an alternative 3-phase power source other than direct 3-phase. If you
are using an alternate power source, consult a certified electrician or contact
Baileigh Industrial prior to energizing the machine.
CAUTION:
HAVE ELECTRICAL UTILITIES CONNECTED TO MACHINE BY
A CERTIFIED ELECTRICIAN!
Check if the available power supply is the same as listed on the machine nameplate.
WARNING:
Make sure the grounding wire (green) is properly connected
to avoid electric shock. DO NOT switch the position of the green grounding wire if
any electrical plug wires are switched during hookup.
Summary of Contents for IP-2008-HD
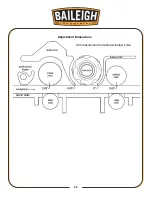
Page 28: ...25 25 All measurements are shown below knife Adjustment Dimensions...
Page 42: ...39 39 6 Loosen Nut on motor bracket 7 Remove belt 8 Remove cutterhead pulley...
Page 46: ...43 43...
Page 50: ...47 47 PARTS DIAGRAM...
Page 51: ...48 48...
Page 52: ...49 49...
Page 53: ...50 50...
Page 54: ...51 51...


