33
33
Operation Tips
Inspect lumber for defects, warping, cupping, twisting, and for foreign objects (nails, staples,
imbedded gravel, etc,). If you have any question about the quality of your lumber, do not use
it. Remember, wood stacked on a concrete floor can have small pieces of stone or concrete
pressed into the surface.
Use the full width of the planer. When feeding lumber into the planer, alternate between the
left, the right, and the middle. Your cutters will remain sharp much longer.
Scrape all glue from workpiece before planing.
Plane ONLY natural wood fiber. DO NOT plane MDF, plywood, laminates, or other synthetic
products.
Plane WITH the grain. Never feed end-cut or end-grained lumber into your planer.
Do not plane boards with loose or large knots, splits, cross grain or other obvious blemishes
or defects. These can damage the machine and pose a safety risk to the operator.
Keep your work area clear.
When planing long stock, get assistance to receive the workpiece from the outfeed table.
Avoid planing wood with high water content. Wood with more than 20% moisture content or
wood exposed to excessive moisture (such as rain or snow), will plane poorly and cause
excessive wear to the cutters and motor. Excess moisture can also hasten rust and
corrosion of the planer and/or individual components.
CUT TROUBLESHOOTING
Using a piece of semi-
finished stock, set up for a 1/16” (1.59mm) deep cut with the quick-set
table roller setting at zero. Start the machine and, standing to one side of the table, begin
feeding the stock into the machine.
The infeed roller should take the material and force it under the chipbreaker and cutterhead. If
the material feeds through effortlessly, examine the finished cut carefully for imperfections.
Learning to read a board for imperfections will save hours in adjusting a planer to operate
properly.
Following are some problems that may arise and their probable remedies. The illustrations are
exaggerated for clarity.
Summary of Contents for IP-2008-HD
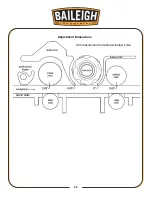
Page 28: ...25 25 All measurements are shown below knife Adjustment Dimensions...
Page 42: ...39 39 6 Loosen Nut on motor bracket 7 Remove belt 8 Remove cutterhead pulley...
Page 46: ...43 43...
Page 50: ...47 47 PARTS DIAGRAM...
Page 51: ...48 48...
Page 52: ...49 49...
Page 53: ...50 50...
Page 54: ...51 51...


