background image

86

Chapter 4

CARAVAN EQUIPMENT

periodically but make sure that the refrigerator is switched off when doing
this.

Travel Catch

All models are fitted with a travel catch to keep the refrigerator door
securely closed when the vehicle is on the move.  Remember always to
push the catch down so that its lower end fully engages the plastic bush
in the top of the door, before moving off.

The travel catch can also be used to position the door ajar so that the
refrigerator can be aired when not in use.

MODEL RM 6291L & 6271 

(continued)

Summary of Contents for 2002 Series

Page 1: ...Bailey of Bristol 2002 Series Owners Manual...

Page 2: ......

Page 3: ...______________________________________ Tel No ________________________________________________ Key Nos All Doors _____________________________________ Water Filler Cap ________________________________...

Page 4: ...so be sure of The Club s high standards both on our sites and in our dealings with members We re here to help you enjoy your caravanning but you re free to choose what you want fromThe Club Most membe...

Page 5: ...LTS 41 THE ELECTRICAL SYSTEM 12 VOLTS 47 CHAPTER 4 CARAVAN EQUIPMENT 52 TRUMA ULTRASTORE WATER HEATER 52 TRUMA S 3002 EL SPACE HEATER TRUMA VENT 58 TRUMA TRIOMATIC AUTOMATIC GAS CHANGE OVER SYSTEM 68...

Page 6: ...REMI FLAIR COMBINATION WINDOW BLINDS 116 M E C CARAVAN ALARM PAS 2 117 CHAPTER 5 GENERAL 120 GENERAL MAINTENANCE 120 FIRE AND SAFETY PRECAUTIONS 126 BUNK ASSEMBLY 129 FAULT FINDING 132 CHAPTER 6 TECHN...

Page 7: ...in the first instance to the dealer from whom the caravan was first purchased Your caravan is designed to give many years of use regular maintenance is however necessary to ensure trouble free service...

Page 8: ...caravan be delivered to and collected from the Bailey retailer Please note Whilst every effort is made within this Handbook to accuratelyreflectanddescribeourhomemarketcaravans thosepurchased and sto...

Page 9: ...er VIN Vehicle Identification Number shown in the top right hand corner This 17 character VIN will be die stamped into the caravan drawbar and chemically etched on up to a maximum of 10 eye level wind...

Page 10: ...heir escape routes in the event of a fire ii Always keep escape routes and exit points clear from obstruction and debris iii Provide one dry powder fire extinguisher of an approved type or complying w...

Page 11: ...ompact living environment and appliances should be treated in the same way as those in the home to prevent any accidental burning scalding keep young children away from hot surfaces viii Your tourer i...

Page 12: ...circumstances should the maximum technically permissible laden mass of this caravan be exceeded Mass in running order Mass of the caravan equipped to the manu facturer s standard specification User pa...

Page 13: ...ad at the coupling head The maximum nose weight for a caravan will be limited by either the towing vehicle tow hitch limits or the maximum load to which the caravan hitch is specified Caution The towi...

Page 14: ...r of the ground Kerb Weight The weight of the towing vehicle as defined by the vehicle manufacturer This is normally With a full tank of fuel With an adequate supply of other liquids incidental to the...

Page 15: ...9 Chapter 2 CARAVAN TOW VEHICLE MAYBE NO YES EQUAL 85...

Page 16: ...rear suspension is not deflected excessivelybythenoseweightonthetowball Ifitisexcessivethesteering and stability will be affected and at night the headlight beam is likely to dazzle other drivers whi...

Page 17: ...gvehiclesrear suspension will also result in poor towing stability The weight should be distributed so that each side of the caravan carries approximately the same load Noseweight It is recommended th...

Page 18: ...12 Chapter 2 CARAVAN TOW VEHICLE INCORRECT INCORRECT CORRECT HEAVY ITEMS MEDIUM ITEMS LIGHT ITEMS...

Page 19: ...tored in their transit positions 9 Fridge is on 12v operation and door lock is set if required 10 All windows are fully closed and latched Never tow with windows on night setting Leave all curtains an...

Page 20: ...all Rotatingthecaravansjockeywheelhandle can do this Clockwise to lower Anti clockwise to raise The assistant should position themselves by the front near side of the caravansothattheycanextendanarmho...

Page 21: ...indicator on the front radius to show whether or not it is properly connected to the tow ball A green band will show immediately below the red indicator button on the hitch head when a proper connect...

Page 22: ...rake Carryoutasecondcheckthatthehitchissecureandthesecondarybraking cable is connected Adjust all of the car s driving mirrors from driving seat to ensure good rear wards visibility Towing Speed limit...

Page 23: ...its normal length Do not suddenly swing out Carry out all manoeuvres as smoothly as possible Use nearside wing mirror to check caravan has cleared when overtaking Reversing Proficiency at reversing ca...

Page 24: ...e caravan when being towed the width of the towing vehicle when driven solo Any additional rear view mirror fitted shall be of an approved European type and cover the field of view as stipulated by th...

Page 25: ...gher speed However a good stabiliser can make an acceptable caravan towing vehicle combination more comfortable and easier to handle Caution Holes should not be drilled in either the coupling head or...

Page 26: ...NCTION 1 YELLOW REVERSING LIGHT 2 BLUE NO CONNECTION 3 WHITE COMMON RETURN EXCEPT FRIDGE 4 GREEN INTERIOR 5 BROWN NO CONNECTION 6 RED FRIDGE 7 BLACK RETURN FOR FRIDGE ONLY 1 6 7 3 2 4 5 TUBES PINS Tow...

Page 27: ...r out Itisdangeroustoneglecttyredamage Shouldyoudetectablister rupture orcutexposingthecasing orifithassufferedaviolentimpact forexample against a kerb such that there is a risk of internal damage it...

Page 28: ...iciently If alloy wheels are fitted consult your caravan retailer as the tightening torque and wheel bolts will be different to the caravan standard wheels Warning The torque settings should be checke...

Page 29: ...spare wheel then reverse the above procedure viii Remembertotightenallboltstothecorrecttorqueandre checkafter 50kms 30 miles Caution under no circumstances should the corner steadies be used as a jac...

Page 30: ...eplace towball cover Park your vehicle alongside the caravan on the offside Levelling the caravan Levellingmustbecarriedoutinbothdirectionsinorderfortherefrigerator and other equipment to function cor...

Page 31: ...and tested to British Standard BS AU 114b or ISO 3853 Driving licences A driver passing a test after 1 January 1997 is restricted to a car caravan combination not exceeding 3500kg maximum laden weigh...

Page 32: ...y lubricate inlet nipple O rings with vegetable oil or Vaseline this reduces the friction between O rings and plastic surface of the pump plug assembly ii Place pump into a full water container ensuri...

Page 33: ...he lid to clear the plug shoulder from the lid recess hold the pump at the plug whilst retracting it from the socket 2 Routine Maintenance i Ensure the hose adapter O ring and the socket in the housin...

Page 34: ...red extending the life of the filter ii The Filter should be replaced every season iii In winter months the filter should be drained by disconnecting the flexible pipe from the bottom of the filter re...

Page 35: ...n 12 volt supply at main panel isolator switch vi Water will flow from open taps expelling any trapped air within a few seconds vii Turn off tap the system is now ready for use Warning Care should be...

Page 36: ...ront of the caravan Firstly ensure that the over flow pipe is fully tightened into the base of the water tank The overflow pipe is removed to drain the water tank This can be accessed by removing the...

Page 37: ...completed Water can now be obtained from the in board tank by switching pump switch on the control panel to INT position and opening the appropriate tap An LED located on the main control panel will f...

Page 38: ...ing of every season for frost damage or loose connections A Free Parks Directory listing all parks throughout the UK where you can use the Aquasource WATER SYSTEM WINTERISATION Caravans may be in use...

Page 39: ...mmended at this point to sterilise your water container and flush the system through with a sterilising fluid v Renew old filter after flushing system through It is also recommendedthatthewatersystemi...

Page 40: ...r Caution ensure that the exit ends of the waste water pipes that direct the waste water into the holding container cannot be submerged by the waste water in the holding container at any time Upon arr...

Page 41: ...supplied in the UK in Green or Blue bottles Continental bottles usually have a male left hand thread similar to but not identical with UK Butane Butane is suitable for use at temperatures down to 2 C...

Page 42: ...ome industrial LPG appliances operate at high pressure and require a high pressure regulator This often has an adjusting handle on it Never use such a regulator on a caravan Propane and Butane gas reg...

Page 43: ...d Gas safety advice LPG is not poisonous There is a danger if all air and oxygen were excluded Ventilation holes must be kept clear at all times The manufacturers have given LPG a smell in order to id...

Page 44: ...tent service engineer consulted Avoid naked lights when connecting or changing a cylinder Ensure the gas valve is turned off Check the flexible hose frequently Remember the gas is heavier than air and...

Page 45: ...leaves insectsetc Inspectregularlyanduseabrushandsoapywaterasnecessary It may be necessary to remove the weather shield located on the under side of the floor of the caravan to gain access for cleani...

Page 46: ...SERVICE SYSTEMS THE GAS SYSTEM continued Appliances such as cookers with naked flames should never be used for room heating No appliance shall be used inside when being connected to the external BBQ...

Page 47: ...erly earthed Never accept a supply from a socket outlet or plug having only two pins or from a lighting outlet iii check that any residual current device earth leakage circuit breaker in the mains sup...

Page 48: ...a report on its condition obtained as prescribed in the Regulations for Electrical Installations published by the Institute of Electrical Engineers Generators i Switch off all appliances the miniatur...

Page 49: ...The significance of reverse polarity is that when equipment is switched off it may not be electrically isolated The only certain way of making equipment safe is to unplug it A means of checking the p...

Page 50: ...operate the RCD residual current device and trip the main switch to the OFF position This switch is only re settable after elimination of the fault To re set operate the switch as for M C B s Every t...

Page 51: ...ins hook up point provides a maximum output of 10 amps and on some continental sites the available output may be as low as 5 amps If your loadingexceedsthesitesupplyitmaytriptheparkscircuitbreaker Ple...

Page 52: ...46 Chapter 3 CARAVAN SERVICE SYSTEMS...

Page 53: ...let socket located in the battery box compartment and that the RCD MCB switches are in the UP position 12 volt power will now be available to the main control panel The battery charger will only funct...

Page 54: ...control panel controls the operation of various 12V equipment i Indicated charge level of the caravan battery a good battery should indicate 13 8 volts The BCA 1212 Unit Thesystemisfittedwithanautoma...

Page 55: ...rinterior upposition Senator only or exterior down position Off is central The 12 volt electrical system fuses are located in the caravan bed box It has 12 fuses each having identification to there pa...

Page 56: ...be used to connect the battery terminals should be shrouded Always switch off all appliances and lamps before disconnecting the auxiliary battery The battery should be secured to prevent movement when...

Page 57: ...51 Chapter 3 CARAVAN SERVICE SYSTEMS CONTROL PANEL SPB2...

Page 58: ...can prevent filling if there is a frost The water heatercanbedefrostedbyswitchingontheheaterforashortperiod max 2mins Frozen pipes can be defrosted by heating the room Gas operating instructions Atten...

Page 59: ...failure The reason for such an indication is no gas available or air in the gas supply system triggering off the excess temperature monitor etc To reset the red light switch off the appliance wait 5...

Page 60: ...tly to the outside via the safety drain valve Check that the water contents have been completely drained 10 litres Maintenance Use wine vinegar for de scaling the water heater this being introduced in...

Page 61: ...nction of the appliance being impaired through water dirt or insects ii Theguaranteewillbeinvalidatedifthispointisnotobserved Always remove the cowl cover prior to operating the water heater iii If th...

Page 62: ...ation to the appliance including cowl b The use of non Truma spare parts accessories c Non observance of the operating instructions iii The operating pressure for the gas supply is 30mbar or for 28mba...

Page 63: ...itres Water pressure up to max 2 8 bar Type of gas Liquid Gas propane or butane Operating Pressure 30mbar or 28mbar butane 37mbar propane Rated thermal output 1500W Gas consumption 120g h Heating time...

Page 64: ...lknobpresseddownforafurther10secondstoallow the safety pilot to operate iv Watch through the flame window for another 10 seconds to make sure that the flame does not go out through air in the supply p...

Page 65: ...ontrol knob to 0 If turning off for a longer period of time close the valve of the gas cylinder Important operating notes i If the gas supply line is filled with air it may take up to a minute before...

Page 66: ...nowfromthecowl vi If the heater is repeatedly blown out in very windy parking spots or when using in winter we recommend the SKV cowl extension kit Art No 30690 00 which can be screwed onto the cowlsh...

Page 67: ...ger and base plate Warning Children should be kept away from this product when it is in operation the front can get very hot Alternatively a fireguard should be used General Safety Notes i If the gas...

Page 68: ...ys be upright Technical data Type of Gas Liquid gas propane butane Rated thermal output 3400 W Gas Consumption 30 280 g h Product Ident No CE 0085AP0325 230V OPERATION Control panel with thermostat TH...

Page 69: ...self off before overheating occurs as a result of the stronger gas burner Switching off 1 Push slide switch a to the OFF position Operating Notes 1 Repairs may only be carried out by an expert 2 Thehe...

Page 70: ...original Truma parts as well as the non observance of the installation and operating instructions will lead to the cancelling of the guarantee and exclusion of liability claims Technical Data Power s...

Page 71: ...ation heating The output steadily adjusts to the respective heat emission of the heater The maximum output can be limited at the control knob as required The regulating between this value and slow run...

Page 72: ...s in all current type caravans and mobile homes The quantity of air can be individually adjusted at the air flap Fig 1 d for warm air distribution In centre position 50 of the warm air is distributed...

Page 73: ...severely soiled Cleaning with switched off appliance Caution Werecommendremovingdustwhichhascollectedontheheatexchanger and base plate of the heater and on the impeller wheel of the Trumavent fan once...

Page 74: ...ombination fittings for the cylinders Always assemble the regulators 6 7 in such a way that the blue safety caps are facing upwards Caution do not kink or severely bend the gas hoses First open the va...

Page 75: ...nd unscrew the operating regulator 6 from the gas bottle Warning aresidualamountofgasmaybepresentduringthisoperation no smoking or naked flames All gas appliances can be supplied from the reserve cyli...

Page 76: ...ks If the pressure drops the gas system is leaking The gas system should then be inspected and repaired by a competent person Technical Data Operating pressure 30 mbar Operating regulator 0 6bar Reser...

Page 77: ...rner flames being accidentally extinguished turn off the burner control and do not attempt to re ignite theburnerforatleastoneminute Therespectiveknobpositionsareshown To light the burner press in and...

Page 78: ...appliance as reduced performance may result When using small pans the flames should not spread beyond the base of the pan as this will reduce the efficiency of the burner THE MIDI OVEN GRILL Grill Wa...

Page 79: ...is similar except thattheburnercanbeignitedbydepressingtheignitionbuttonwhich is located on the fascia Ignition must be carried out with the door open and if the burner has not lit within 15 seconds...

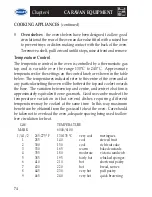
Page 80: ...ndcoolertowards the base The variation between top and centre and centre to bottom is approximately equivalent to one gas mark Good use can be made of the temperature variation in that several dishes...

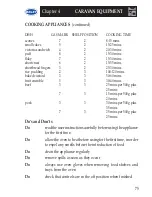
Page 81: ...00g plus 25 mins 7 3 15 mins per 500g plus 20 mins pork 3 3 30 mins per 500g plus 35 mins 7 3 25 mins per 500g plus 25 mins Do s and Don ts Do readtheuserinstructionscarefullybeforeusingtheappliance f...

Page 82: ...or oven glass lid before raising it Failure to do so could accidentally switch on the tap when lifting the glass lid Maintenance Servicing This appliance needs little maintenance other than cleaning...

Page 83: ...utomatically re activate after approximately 7 minutes and sound the alarm if particles of combustion are still present The hush feature may be used repeatedly until the air has cleared DenseSmokewill...

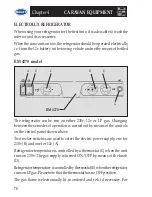
Page 84: ...nging between these modes of operation is carried out by means of the controls on the control panel shown above Two rocker switches are used to select the electric power supply one for 230v B and one...

Page 85: ...Set the thermostat knob E to the highest setting v Keepingtheflamefailuredevicebutton D pressed depressthepiezo igniter button G rapidly several times in quick succession until the flame lights vi Kee...

Page 86: ...take a few hours for the refrigerator to reach normal operating temperature so it is suggested that the fridge is pre cooled before loading with foodstuffs On LP Gas operation Therefrigeratortemperat...

Page 87: ...und and the flashing will stop 4 Keep rotary switch B depressed for another 10 15 seconds then release 5 If the flame goes out the ignition system will repeat the ignition process automatically 6 Adju...

Page 88: ...therefrigeratorandthefrozenfoodcompartmentajar Switching off gas operation If the refrigerator is to be taken out of service for an extended period of time the on board shut off valve and the cylinder...

Page 89: ...tion should only be selected where the supply voltage of the connection for power supply corresponds to the value specified on the dataplate Anydifferenceinvaluesmayresultindamagetotheappliance 1 Set...

Page 90: ...tilation grilles or the flue outlets are not blocked by snow leaves etc Your caravan is supplied with Electrolux winter covers as standard equipment These covers should be fitted when the outside temp...

Page 91: ...is used to run the refrigerator viii Therefrigeratorisnotoverloaded alsoensureaircirculationbetween cooling fans and contents ix If the refrigerator does not work on mains operate on gas Cleaning the...

Page 92: ...to keep the refrigerator door securely closed when the vehicle is on the move Remember always to push the catch down so that its lower end fully engages the plastic bush in the top of the door before...

Page 93: ...assette by pulling straight out When Cassette hits stop tilt downward slightly and remove stop for safety when Cassette if full v Position tank vertical and swivel pour out spout upward vi Remove cap...

Page 94: ...water Emptying the Cassette The Cassette capacity is 20 litres and should be emptied when the waste level gauge indicator goes from green to red The gauge does not begin to move from green to red unt...

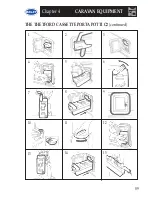
Page 95: ...89 Chapter 4 CARAVAN EQUIPMENT THE THETFORD CASSETTE PORTA POTTI C2 continued 1 2 3 4 5 6 7 8 9 10 11 12 13 14 15...

Page 96: ...position Also ensure the arrows on the sliding cover and waste tank are in line The pour out spout end of the tank should be visible through the access door opening Add water to the fresh water tank...

Page 97: ...dingtank Aslidingcoverguaranteesyouoptimalhygiene Themodel identification can be found on the identification label see exploded view Preparing for use i Open access door pull retaining clip upwards fi...

Page 98: ...o flush some water into the bowl by lifting and pressing down the flush handle fig 9 x After use open the blade by pushing the blade handle anticlockwise fig 10 xi Toflush lifttheflushhandleandpressit...

Page 99: ...93 Chapter 4 CARAVAN EQUIPMENT THE THETFORD CASSETTE C 200 CW CWE continued 1 2 3 4 5 6 7 8 9 10 12 13 14 15 11...

Page 100: ...ventilation and the seal for the cap are made from rubber These seals have to be cleaned regularly once or twice a month depending on the frequency of use For best results use Thetford Bathroom Clean...

Page 101: ...the fresh water tank by taking out the drain plug fig 15 Empty the holding tank and clean the unit as described above Clean the seals and lubricate them where appropriate after drying See cleaning and...

Page 102: ...started by the red switch or blowing or suction The airflow is adjusted by the black switch position 1 7m3 min 245 cft min 15W 1 2 A position 2 12m3 min 420 cft min 30W 2 5 A position 3 20m3 min 700...

Page 103: ...of the best forms of corrosion protection It does however require minimal maintenance in certain circumstances When new the chassis is of a bright and shining appearance As the galvanisingcuresduring...

Page 104: ...Three rubber elements are contained within a hexagonal axle tube These provide suspension and have inherent damping characteristics Only the hubs and wheel brakes require attention see axle booklet P...

Page 105: ...eviously described Lift the coupling clear of the towing ball either manually or by operating the telescopic jockey wheel Caution If the nose of the caravan is lifted manually the locking trigger AK 1...

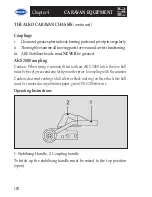
Page 106: ...ng a caravan fitted with an AKS 2000 hitch the tow ball must be free of grease and any foreign matter prior to coupling with the caravan Caution dacromet coatings dull silver or black coating on the v...

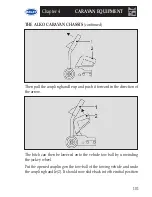
Page 107: ...e direction of the arrow The hitch can then be lowered onto the vehicle tow ball by unwinding the jockey wheel Put the opened coupling on the tow ball of the towing vehicle and undo the coupling handl...

Page 108: ...s well Closure and fastenings are automatic Warning the ball coupling is fully coupled correctly connected when the green band of the safety button is visible Press the stabilising handle 1 down until...

Page 109: ...le with a lever or your foot Do not pull on the Stabilising handle to manoeuvre the caravan Warning When opening or closing the stabilising handle do not leave your hand on the coupling handle Caution...

Page 110: ...stabilising handle till resistance is felt friction linings are in contact with the tow ball but not under pressure iv The mark on the pressure plate position 4 is between the two marks on the housing...

Page 111: ...embly but will require periodic maintenance to ensure smooth operation of the braking system i Regrease the shaft bearings via the grease nipples provided at 3000 mile intervals and before storage ii...

Page 112: ...rly when the handbrake is not in the fully off position fig 1 iii Jack up one side of the caravan see Jack Operation Instructions iv Remove the inner plastic bung from the backplate to expose the star...

Page 113: ...abutment is fitted to the front axle only viii Repeat for other wheel or wheels ix On tandem axles the brake cables from the rear axle shouldpassoverthisaxleand cross over each other before being conn...

Page 114: ...ke rod by adjusting the long ball nut rear of the balance bar ensuring the overrun lever makes contact with the end of the towing shaft Over adjustment to the long ball nut Fig 3 could induce movement...

Page 115: ...wheels to lock up xvi When parking the handbrake lever must always be engaged into thefullyuprightposition 90 Thisistocompressthespringwithin the spring cylinder and thereby create an energy store whi...

Page 116: ...110 Chapter 4 CARAVAN EQUIPMENT Warning Thetorquesettingsshouldberecheckedafter50miles Wheel bolts should never be lubricated THE ALKO CARAVAN CHASSIS continued...

Page 117: ...on to pull the flyscreen back into the cassette b From outside To release hook push handle crossbar away from you then still holding the handle crossbar allow the tension to pull the flyscreen back in...

Page 118: ...he screen back to the top position Caution The screen is controlled by a tensioned spring Do not let the screen whiplash back into the cassette It is not advisable to keep the screen closed when trave...

Page 119: ...operate sunscreen and flyscreen a Pullflyscreenhandleallthewayacrossapertureandtwisthandle until it hooks onto retaining channel b The sunscreen can be pulled all the way across aperture or to any int...

Page 120: ...lvents Caution DO NOT spray water under the cover There is an air gap between the frame and the cover for fixed air ventilation through which water deliberately sprayed under the cover would enter the...

Page 121: ...en bar at the selected height To release gently push the finger grip towards the window If required the fly screen may be pulled down completely with the sunscreen in the open or down position Caution...

Page 122: ...the cassette taking care not to allow it to re wind too fast as this will damage the spring Retensioning REMIflair blinds are delivered with the correct amount of tension in the spring However it may...

Page 123: ...ng sequence Activate the keypad enter your code and enter the code for the required operation Note The alarm code is initially set in the factory to 1111 four 1 s To ARM the alarm follow this sequence...

Page 124: ...To change the code from 1111 to 5678 example follow this sequence Press To activate the keypad the red LED will be illuminated Press 1111 To enter your alarm code Press To select the change of alarm f...

Page 125: ...119 Chapter 4 CARAVAN EQUIPMENT The keypad will now be set at new code example 5678 Factory set entry time 18 seconds exit time 18 seconds M E C CARAVAN ALARM PAS 2 continued...

Page 126: ...body panel when the caravan is being towed The gas bottle storage locker must not be loaded in such away that pressure is exerted on the front body panel as this will cause the panel to crack Warning...

Page 127: ...may be used on furniture The interior walls have a PVC lining which should not require cleaning too often Awipe over with a damp cloth and a very mild detergent is all that is needed to keep it immacu...

Page 128: ...c Caution Curtainsshouldnotbeleftclosedduringdaytimeotherwisesomefading will be experienced Dry cleaning only recommended Caution No Ethylene based cleaning material must be used Hinges and Catches Li...

Page 129: ...cleaning The symptoms caused by bacterial contamination are not purely limited to gastro intestinal diseases but may also manifest themselves as ear nose throat eye or skin infections It is therefore...

Page 130: ...den hoses be used to fill water tanks For Systems 1 Drain down the system Open all taps to allow air in enabling the system to drain quickly 2 Remove any water filters fitted and replace with a short...

Page 131: ...ssory shop chemists or home brew shops It is not however recommended to use bleach or sodium metabisulphite Thisguidancehasbeenpreparedwiththekindco operationandassistance of The Environmental Health...

Page 132: ...re blanket next to the cooker Familiarise yourself with the instructions on your fire extinguisher and the local fire precaution arrangements Afatpanfireshouldnothaveanextinguisheraimedatitbutbesmothe...

Page 133: ...use a brush and soapy water as necessary The mesh screens fitted should be kept free of obstructions by dust leaves insects etc Inspect regularly and use a brush and soapy water as necessary Warning U...

Page 134: ...eating equipment other than electric heaters that are not of the direct radiant type as it is a fire and asphyxiation hazard Modifications Warning Never allow modification of electrical or LPG systems...

Page 135: ...129 Chapter 5 GENERAL ASSEMBLING THE BUNKS 2 1 5 4 3 6...

Page 136: ...ow vii The metal safety rails and ladder can now be slotted into position Rear Lift Down Bunk i Draw the rear curtains ii Undothetwoturnbucklesthatsecurethebunkundertherearlocker iii Carefully pull ou...

Page 137: ...g rail until bed is fully extended iii Arrangeseatcushionstosuit Side Dinette Bed Fig 2 i Remove table from support leg ii Place the table top between seats on ledge iii Arrange seat cushions as appro...

Page 138: ...ring connections and then replace with fuse of correct rating Battery disconnected Check connections Pump seized or overheated Refer to pump manufacturers servicing instructions If a pressure pump is...

Page 139: ...causing pump to run Check battery state of charge refer to electrical slowly supply note If new taps have been fitted they may be Disconnect and check that they have at least restricting flow 6 3mm bo...

Page 140: ...ng Refer to water supply note pressure too high Switched tap water system pump flow rate Refer to water supply note is greater than tap flow rate capacity FAULT Water heater difficult to drain Cause C...

Page 141: ...o soon or not fully Refer to lighting instructions when knob depressed is released Thermocouple or valve failure Seek service attention Goes out after Bottle temperature too low See gas supply notes a...

Page 142: ...able sticking Examine free off cable or replace Brakes under adjusted Check complete brake transmission system and re adjust if necessary Shock absorber weak or ineffective Replace Drawshaft sticking...

Page 143: ...inings worn out Replace brake shoe assemblies FAULT Hot brakes Cause Cure Brakes overadjusted Re adjust as described Hub bearings overtight Re adjust as described Pull off spring broken Replace spring...

Page 144: ...5 4 6 2 3 1 7 TAIL STOP INDICATOR FOG No PLATE No PLATE FOG INDICATOR STOP TAIL GREY 7 PIN PLUG BLACK 7 PIN 12N PLUG FRONT MARKER LIGHT O S FRONT MARKER LIGHT N S O S REAR MARKER LIGHT OR SIDE MARKER...

Page 145: ...T Required car wiring for 12S Grey 7 pin socket Note When the 12S plug is connected to the towcar and ignition switched on only the fridge and caravan battery charge circuits will be activated With th...

Page 146: ...140 Chapter 6 TECHNICAL INFORMATION 230 VOLT 12 VOLT PRIMARY CIRCUIT DIAGRAM RANGER...

Page 147: ...141 Chapter 6 TECHNICAL INFORMATION 230 VOLT 12 VOLT PRIMARY CIRCUIT DIAGRAM SENATOR...

Page 148: ...90 39 2 75 PAGEANT MAGENTA 2 4 547m 6 213m 2 19m 2 71m 1 90m 195 R14 LI96 35 2 46 PAGEANT IMPERIAL 2 4 731m 6 397m 2 19m 2 71m 1 90m 195 R14 LI96 35 2 46 PAGEANT MONARCH 2 4 731m 6 397m 2 19m 2 71m 1...

Page 149: ...0kg 81kg 99kg 3kg 183kg PAGEANT MAGENTA 879cm 1181kg 1001kg 73kg 104kg 3kg 180kg PAGEANT IMPERIAL 892cm 1176kg 995kg 73kg 105kg 3kg 181kg PAGEANT MONARCH 892cm 1202kg 1021kg 73kg 105kg 3kg 181kg PAGEA...

Page 150: ...hould reduced overall height be required DIMENSIONS SPECIFICATIONS continued MODEL BERTHS INTERNAL SHIPPING OVERALL OVERALL MAXIMUM TYRE TYRE BODY LENGTH BODY HEIGHT HEADROOM SIZES PRESSURE LENGTH WID...

Page 151: ...ith TV aerial removed is 2 68m Wheel rim size 5 1 2J x 14H2 ET30 112mm PCD 5 Stud DIMENSIONS SPECIFICATIONS continued MODEL AWNING MAXIMUM M R O MASS OF PAYLOAD PAYLOAD TOTAL SIZE TECHNICAL ESSENTIAL...

Page 152: ...particular caravan RANGER 380 2 794 cms 460 2 869 cms 470 4 883 cms 500 5 927 cms 510 4 927 cms 520 4 927 cms 550 6 961 cms PAGEANT Majestic 831 cms Magenta 879 cms Imperial 892 cms Monarch 892 cms Au...

Page 153: ...ights 12 volt 21 watt OBC Number plate light 12 volt 10 watt SBC Brake high level x 2 12 volt 5 watt Festoon Reversing light 12 volt 21 watt SBC INTERIOR LIGHTS Fluorescent lights Front Rear 12 volt 8...

Page 154: ...p blade red Permanent live supply from car 10 amp blade red Fridge 15 amp blade blue Pump 10 amp blade red Auxiliary 1 10 amp blade red Auxiliary 2 10 amp blade red Lights 10 amp blade red Truma Ultra...

Page 155: ...should be used which should comply with the minimum specification laid down below Measurement range 6 to above fibre saturation in wood to nominal 100 Resolution 0 1 Operating Temperature 10 to 45 C R...

Page 156: ...y remedial work THERMAL INSULATION HEATING GRADE All Bailey caravans are manufactured and approved by the National CaravanCounciltoEN1645 1thermalinsulationandheatingclassification grade 2 Grade 2 is...

Page 157: ...RIDGE VENT SEALS AROUND THE EXTERIOR DOOR BOTTOM SIDE RAIL OFF SIDE AND NEAR SIDE AROUND ALL SIDE WINDOWS AROUND OFF SIDE AND NEAR SIDE WHEEL BOX SPACE HEATER FLUE SEAL OFF SIDE AND NEAR SIDE TOP AND...

Page 158: ...DAMP CHECK DEALER STAMP 6000 MILES OR 2 YEARS AFTER DELIVERY STANDARD DAMP CHECK DEALER STAMP DATE VIN No DATE VIN No 9000 MILES OR 3 YEARS AFTER DELIVERY STANDARD DAMP CHECK 12000 MILES OR 4 YEARS A...

Page 159: ...AMP CHECK DEALER STAMP 18000 MILES OR 6 YEARS AFTER DELIVERY STANDARD DAMP CHECK DEALER STAMP DATE VIN No DATE VIN No 21000 MILES OR 7 YEARS AFTER DELIVERY STANDARD DAMP CHECK 24000 MILES OR 8 YEARS A...

Page 160: ...154 Chapter 6 TECHNICAL INFORMATION NOTES...

Page 161: ...155 Chapter 6 TECHNICAL INFORMATION NOTES...

Page 162: ...156 Chapter 6 TECHNICAL INFORMATION NOTES Designed and Produced by Preset Graphics Rayburn House 1 Parcel Terrace Derby DE1 1LY Tel 01332 205136 Fax 01332 206356...

Page 163: ......

Page 164: ...Bailey of Bristol South Liberty Lane Bristol BS3 2SS England www bailey caravans co uk...

Reviews: