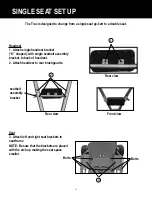
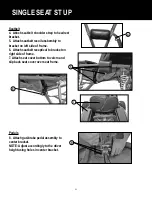
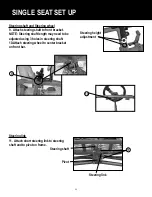
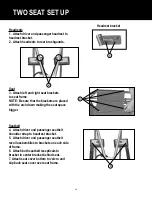
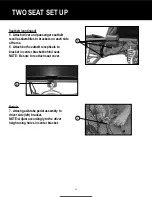
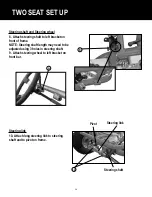
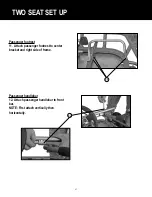
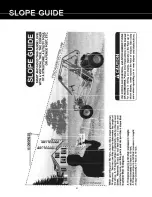
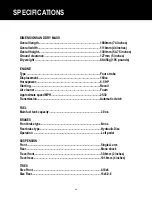
background image

45

BAJA INC. – EMISSION CONTROL SYSTEM WARRANTY

YOUR WARRANTY RIGHTS AND OBLIGATIONS

The emission control system warranty period for this vehicle begins on the date the vehicle is delivered to the first purchaser 

other than an authorized dealer, or the date it is first used as a demonstrator, lease, or company vehicle, whichever comes first 

and continues for 60 months after that date, or 5,000km, whichever comes first, provided there has been no abuse, neglect or 

improper maintenance of your vehicle.  Where a warrantable condition exists, the Distributor will repair your vehicle at no cost 

to you, including diagnosis, parts and labor.  If an emission-related part on your vehicle is defective, the part will be repaired 

or replaced by the Distributor.  This is your emission control defects warranty.

OWNER’S WARRANTY RESPONSIBILITIES

As the vehicle owner, you are responsible for the performance of the required maintenance. You should maintain a record 

of all maintenance performed on your vehicle and retain all receipts covering maintenance on your vehicle.  You may not be 

denied a warranty claim solely because of your failure to ensure the performance of all scheduled maintenance or lack of 

maintenance records or receipts.  You are responsible for presenting your vehicle to an authorized dealer as soon as a problem 

exists. The warranty repairs should be completed in a reasonable amount of time, not to exceed 30 days.

As the vehicle owner, you should be aware that you may be denied your warranty coverage if your vehicle or a part has failed 

due to abuse, neglect, improper maintenance, or unapproved modifications.

WARRANTY COVERAGE

The Distributor warrants that each new 2009 and later vehicle:

• 

is designed, built, and equipped so as to conform at the time of initial retail purchase with all applicable regulations 

of the United States Environmental Protection Agency, and the California Air Resources Board; and

• 

is free from defects in material and workmanship which cause such vehicle to fail to confirm with applicable regula-

tions of the United States Environmental Protection Agency or the California Air Resources Board for the periods specified 

above.

Your emission control system warranty covers components whose failure would increase an engine’s emission, including elec-

tronic controls, fuel injection system, carburetor, the ignition system, catalytic converter, or any other system utilized in this 

vehicle to control emission if it is originally equipped.  Also included may be hoses, connectors and other emission-related 

assemblies.  Replacing or repairing other components (including parts, labor, and other costs) not covered by this emission 

control system warranty or the standard warranty is the responsibility of the owner.

Coverage of repairs under this warranty applies only when repairs are completed at an authorized dealer or repair facility.  The 

Distributor will not cover repairs performed outside of an authorized dealer or repair facility.  The use of replacement parts not 

equivalent to the original parts may impair the effectiveness of your vehicle’s emission control system.  If such a replacement 

part is used and an authorized dealer determines it is defective or causes a failure of a warranted part, your claim for repair to 

bring your vehicle into compliance with applicable standards may be denied.

This Emission Control System Warranty is in addition to the standard Limited Warranty.

EXCLUSIONS AND LIMITATIONS

This warranty does not cover the following:

• 

Failures or malfunctions of the emission control systems caused by abuse, alteration, accident, misuse, the use of 

leaded gasoline.

• 

Replacement of expendable maintenance items unless they are original equipment defective in material or work-

manship under normal use, and the first required replacement interval for the item has not been reached.  Expendable main-

tenance items include but not limited to spark plugs, filters, coolant, lubricants, gaskets, hoses, and belts.

• 

Replacements of parts and other services and adjustments for required maintenance.

• 

Any vehicle equipped with an odometer or hour meter where the reading is altered so that actual mileage cannot be 

readily determined.

• 

Repairs or replacements as a result of:

Accident

Misuse

Summary of Contents for Trax

Page 1: ...acts and regulations pertaining to owning and operating an off road vehicle OWNER S MANUAL Minimum Age Requirement 12 Weight limit 200lbs Trax 6 5HP Go kart Read this manual carefully It contains impo...

Page 2: ...ame Warranty 90 days Warranty is void if Frame is bent or broken due to abuse Wheels are bent or broken Fender bent or broken due to abuse Any sign of impact accident jumping spin outs or roll over BA...

Page 3: ...ed to a new user or operator The manual contains important safety information and instructions which should be read carefully before operating the vehicle WARNING The engine exhaust from this product...

Page 4: ...INSPECTION BEFORE RIDING 16 SAFETY GEAR SEATBELTS 18 BREAK IN 19 MAINTENANCE SCHEDULE 21 ENGINE OIL 23 AIR FILTER 25 TIRES 27 BRAKE ADJUSTMENT 28 CHAIN ADJUSTMENT 29 IGNITION SYSTEM CHECK 30 SINGLE SE...

Page 5: ...fer it to another user or owner All information illustrations photographs and specifications contained in this manual are based on the latest product information available at the time of publication D...

Page 6: ...fety information in this manual you will find safety labels on the product FOLLOW ALL WARNING BOTH IN THIS MANUAL AND ON THE PRODUCT Information which is particularly important is distinguished in thi...

Page 7: ...h stationary objects that the vehicle could travel under Do not ride in areas where other recreational vehicles are being operated Be respectful of landowners and the environment 4 Prevailing Torque t...

Page 8: ...eration includes responsibility for the safety or a passenger if any 10 A DOUBLE SEAT VEHICLE IS DESIGNED FOR ONE OPERATOR AND ONE PASSENGER No one should ever attempt to ride on this vehicle without...

Page 9: ...ll and experience to choose a speed suitable for the terrain and riding conditions 16 The governor settings for this vehicle s engine must not be tampered with altered or changed The governor is set b...

Page 10: ...fore storage in any enclosure Read and keep all printed material supplied with this vehicle Timely and specific instructions and an Operator s Manual revisions are included in supplements If any print...

Page 11: ...applicable contains sulfuric acid and must not come in contact with skin eyes or clothing since this will cause severe burns possibly causing disfigurement Also battery may generate explosive gases an...

Page 12: ...9 Trax 6 5HP Go Kart Headlights Front tire Rear tire Steering wheel Seatbelts Brushgaurd Headrest Air filter Gas tank Chain Front shock Rear shock Nerf bar Kill switch Clutch Steering height adjust...

Page 13: ...GINE OIL Your 6 5 HP Go kart has a four stroke engine Please use oil as described in the chart below By using prescribe oil you will realize the best lubrication for engine Use the chart to select a v...

Page 14: ...KART WITHOUT PROPER INSTRUCTIONS Beginners require mature supervision NEVER OPERATE THIS GO KART ON PUBLIC ROADS It is intended for off road use only NEVER OPERATE THIS GO KART AT EXCESSIVE SPEEDS NEV...

Page 15: ...BE TIED UP AND SECURED AT OR ABOVE SHOULDER LENGTH ALL LOOSE CLOTHING MUST BE SECURED ALL NECKLACES AND SCARVES MUST BE SECURED Moving parts can crush and cut Keep hands clear Do not operate with gua...

Page 16: ...e rotor and slows or stops the go kart Throttle pedal Depressing the throttle pedal will engage the clutch and move the go kart forward Kill Switch The engine will shut off by pressing the kill switch...

Page 17: ...s on and warmed up move the choke lever to OPEN position Procedures for stopping the engine 1 Release the throttle pedal to slow down go kart 2 Press down the brake pedal to slowly stop the go kart 3...

Page 18: ...good place to practice review the control system on your Go kart before riding Learn to find these controls without looking for them because you will not have time to look for them when you are riding...

Page 19: ...ment No play or looseness Brakes Proper brake lever free play enough brake force Tires Proper air pressure Enough tread depth No cracks rips or other damages Fuel Enough fuel for the intended trip Fue...

Page 20: ...r exceed the stated load capacity for this Go kart Operating this Go kart with improper modifications could be hazardous Improper installation of accessories or modifications to this vehicle may cause...

Page 21: ...a face shield Wear proper clothing when you ride The proper clothes can protect you from injury Wear a good pair of gloves strong boots that are over the ankle long pants and a long sleeve shirt Oper...

Page 22: ...much Avoid Constant Low Rotating Speed Operating the engine at constant low rotating speed light load can cause parts to glaze and not seal properly Allow the engine to accelerate freely without exce...

Page 23: ...t is very important to inspect and maintain your Go kart regularly Follow the guidelines in the chart The intervals between periodic services in months are shown At the end of each interval be sure to...

Page 24: ...ou use your Go kart under severe conditions it will need maintenance more often than shown in the chart Operating your Go kart under severe conditions causes more wear on your Go kart Severe condition...

Page 25: ...k 5 Add oil if oil is below minimum mark on dipstick Do Not fill above maximum mark Refer to page for correct engine oil type Engine oil replacement The engine oil should be changed every 20 to 40 hou...

Page 26: ...proof gloves such as dish washing gloves when changing oil If oil contacts your skin wash thoroughly with soap and water Launder any clothing or rags if wet with oil Recycle or properly dispose of us...

Page 27: ...Wash foam air filter as instructed below 4 Reinstall air filter and tighten wing nut AIR FILTER REMOVAL The air filter element must be kept clean to provide good engine power If you use your vehicle...

Page 28: ...ing to inspect the air filter element frequently if the vehicle is used in dusty wet or muddy conditions could damage your Go kart The air filter element could become clogged under these conditions an...

Page 29: ...en the tires are cold Recommended pressure Front 4PSI Rear 4PSI Operating this Go kart with improper tires or even improper tire air pressure could be hazardous If you use improper tires or improper t...

Page 30: ...e repaired using a plug type patch If the damage is from a cut or if the puncture cannot be repaired using a plug the tire should be replaced When operating your Go kart in areas where transportation...

Page 31: ...NCE SCHEDULE 1 Loosen nut 1 and pull brake cable in out When set to desired position tighten nut 1 IF MORE ADJUSTMENT IS NEEDED PROCEED TO STEP 2 2 Loosen nut 2 turn bolt in out When set to desired po...

Page 32: ...ing the Chain To Tighten Chain 1 Loosen all four bolts under engine mount plate 2 Slide engine back until chain is adjusted to the desired tension 0 8 inches to 1 2 inches of slack To Loosen Chain 1 L...

Page 33: ...ve is not clogged and the fuel tank is not clogged either 4 Check the idle speed If necessary adjust it using a tachometer The correct idle speed is 1400 1600 r min Performing the spark test improperl...

Page 34: ...racket U shaped with single seatbelt assembly bracket to back of headrest 2 Attach headrest to rear brushgaurds 1 2 Rear view Rear view Front view Seat 3 Attach left and right seat brackets to seat fr...

Page 35: ...side of frame 6 Attach seatbelt receptical to bracket on right side of frame 7 Attach seat cover bottom to velcro and slip back seat cover over seat frame SINGLE SEAT ST UP 4 5 6 7 Pedals 8 Attach ga...

Page 36: ...t NOTE Steering shaft length may need to be adjusted using 3 holes in steering shaft 10 Attach steering wheel to center bracket on front bar Steering height adjustment 9 10 Steering link 11 Attach sho...

Page 37: ...ure that the brackets are placed with the arch down making the seat space bigger 3 Seatbelt 4 Attach driver and passenger seatbelt shoulder strap to headrest bracket 5 Attach driver and passenger seat...

Page 38: ...to brackets on each side of frame 6 Attach both seatbelt recepticals to bracket in center bracket behind seat NOTE Be sure to reattach seat cover 5 6 Pedals 7 Attach gas brake pedal assembly to driver...

Page 39: ...racket on front of frame NOTE Steering shaft length may need to be adjusted using 3 holes in steering shaft 9 Attach steering wheel to left bracket on front bar 8 9 Steering link 10 Attach long steeri...

Page 40: ...SET UP Passenger footrest 11 Attach passenger footrest to center bracket and right side of frame 11 Passenger handlebar 12 Attach passenger handlebar to front bar NOTE First attach vertically then hor...

Page 41: ...38 31...

Page 42: ...uld be hazardous Fuel could catch fire if you do not handle it properly When draining fuel from the carburetor be sure to shut the engine off Do not smoke and never drain or refuel in an area where th...

Page 43: ...reduce engine cooling ability conceal damage or increase wear of certain parts It is important to remove all debris during cleaning PREPARATION FOR CLEANING Wash the Go kart before any mud dries on th...

Page 44: ...e used Be careful with brushes as they may scratch plastic or painted surfaces Rinse the Gokart thoroughly with clean water Dry all areas using a chamois or soft absorbent cloth INSPECTION AFTER CLEAN...

Page 45: ...Inflate tires to the normal pressure EXTERNAL 1 Spray all vinyl and rubber parts with rubber protection 2 Spray unpainted surfaces with rust preventative 3 Coat painted surfaces with car wax PROCEDURE...

Page 46: ...bers to help your authorized service center or Baja Motorsports order parts The Frame number is stamped on the frame on the passenger side front end The engine number is located on the front of the en...

Page 47: ...Type Four stroke Displacement 169cc Horsepower 6 5 HP Starting Recoil Air cleaner Foam Approximate speed MPH 25 30 Transmission Automatic clutch FUEL Main fuel tank capacity 30 oz BRAKES Front brake...

Page 48: ...applicable regula tions of the United States Environmental Protection Agency or the California Air Resources Board for the periods specified above Your emission control system warranty covers componen...

Page 49: ...not liable to any person for incidental consequential or special damages of any description whether arising out of express or implied warranty or any other contract negligence or other tort or otherwi...

Page 50: ...47 Baja INC P O Box 61150 Phoenix AZ 85082 Tel 602 443 9180 Toll Free 888 863 2252...

Reviews: