background image

DRIVE CHAIN CLEANING, OILING AND 

ADJUSTING

Clean and oil the chain as the following:

1.  Wash the chain with water.
2.  Dry the chain, and then oil the links with Chain lube or equivalent.

Adjusting the Drive Chain

The drive chain should be adjusted and make sure there is 20~30 mm 

(0.8~1.2 inches) of slack, as shown above.


WARNING

Failing to inspect the drive chain slack before each use of the ATV could 

be hazardous.

Too much chain slack could cause the chain to come off the sprockets, 

resulting in an accident or serious damage to the ATV.

Inspect the drive chain slack before each use.

20~30 mm

(0.8~1.2 inches)

To adjust chain:

1.   Loosen 4 nuts (1).  

Adjust slack 

in drive chain by loosening cinch nut 

(3) and then turning chain adjusting 

bolt (2) 

3.   When proper adjustment is obtained, 

tighten nuts(1) and cinch nut (3)

e

1

2

3

      INSPECTION AND MAINTENANCE

Summary of Contents for WD90UR-2

Page 1: ...f 16 should be supervised by a responsible adult Always wear a helmet It could save your Life Please obtain review and follow provincial municipal government acts and regulations pertaining to owning...

Page 2: ...Warranty is void if Frame is bent or broken due to abuse Wheels are bent or broken Fender bent or broken due to abuse Any sign of impact accident jumping spin outs or roll over BAJA INC is not liable...

Page 3: ...to a new user or operator The manual contains important safety information and instructions which should be read carefully before operating the vehicle The engine exhaust from this product contains c...

Page 4: ...STARTING OFF 25 BRAKING 26 TURNING 27 SKIDDING OR SLIDING 28 OPERATION ON HILLS 29 CLIMBING A HILL 30 DESCENDING A HILL 31 TRAVERSING A SLOPE 32 RIDING OVER OBSTACLES 32 RIDING THROUGH WATER 33 RIDIN...

Page 5: ...KING 60 FRONT DRUM BRAKES 60 REAR HYDRAULIC DISC BRAKE AND PARKING BRAKE 61 GENERAL LUBRICATION 62 TROUBLESHOOTING 63 FUEL SUPPLY CHECK 63 IGNITION SYSTEM CHECK 64 TRANSPORTING 65 CLEANING PROCEDURE 6...

Page 6: ...another user or owner All information illustrations photographs and specifications contained in this manual are based on the latest product information available at the time of publication Due to imp...

Page 7: ...ATV carefully and follow the operations procedures as described Never operate the ATV without proper instruction Take a training course Beginners should be trained by a licensed instructor Always fol...

Page 8: ...ve speeds Never operate the ATV on hills that are too steep for the ATV or for the operator s ability Practice on smaller hills before attempting larger hills Always follow the proper procedures for c...

Page 9: ...surfaces such as ice go slow and be very cautious in order to avoid going out of control when skidding or sliding Never operate an ATV in fast flowing water or in water deeper than that specified in...

Page 10: ...ft Rear Tire Gas Cap Seat Front Rack Rear Rack Carburetor Muffler Front Tire Oil cap Front shocks Rear shock Choke Tail Light Head lights Fuel Shut off Valve Gas Cap vent hose Left side rear view mirr...

Page 11: ...roke engine Please use oil as described in the chart below By using prescribe oil you will realize the best lubrication for engine Use the chart to select a viscosity rating based on the temperature r...

Page 12: ...ation of the ATV by children under the age of 12 increases the risk of severe injury or death Adult supervision required for children under age 16 NEVER permit children under age 12 to operate this AT...

Page 13: ...habilet s ou pour les conditions Sur les routes publiques une collision peut survenir avec un autre v hicule Avec un passager l quilibre et la direction seront affect s et augmente les risques de la p...

Page 14: ...ever set tire pressure below the recommended level It could cause the tire to dislodge from the rim LOADING Maximum vehicle capacity is 220 lbs PRESSION DES PNES FROIDS Recommand Avant 5 psi Arri re 5...

Page 15: ...hour from 0 to 23 After the hour is set press B once to adjust the minute press A to change the minute from 00 to 59 press B once when the correct time is displayed Pressing B will finish the time ad...

Page 16: ...limiter screw HANDLEBAR SWITCHES LEFT HANDLEBAR With the Engine stop switch in the Stop position The engine cannot be started With the Engine stop with in the Run position The engine can be started R...

Page 17: ...EL VALVE There are two positions ON and OFF See the picture below for the correct operation of these two fuel valves FUEL TANK CAP To open the fuel tank cap take the end of the vent tube out from the...

Page 18: ...s Failing to follow safety precautions when refueling could result in a fire or let you to breathe toxic fumes Refuel in a well ventilated area Make sure the engine is off and avoid spilling fuel on a...

Page 19: ...se controls without looking for them because you will not have time to look for them when you are riding Canadian residents must obtain review and follow all provincial and municipal government acts a...

Page 20: ...Proper air pressure Enough tread depth No cracks rips or other damages Fuel Enough fuel for the intended trip Fuel hose connected securely No damage to fuel tank or cap Fuel tank cap closed securely...

Page 21: ...s ATV with improper modifications could be hazardous Improper installation of accessories or modifications to this vehicle may cause changes in handling In some situations this could lead to an accide...

Page 22: ...without wearing an approved DOT motorcycle helmet eye protection and protective clothing could be hazardous Operating without an approved DOT motorcycle helmet or eye protection increases your chance...

Page 23: ...oid Constant Low Rotating Speed Operating the engine at constant low rotating speed light load can cause parts to glaze and not seal properly Allow the engine to accelerate freely without exceeding th...

Page 24: ...START to start the engine 6 After engine has warmed up set choke to up position WARNING Running your ATV indoors where there is little or no ventilation could be hazardous Breathing in exhaust gases f...

Page 25: ...or highways could be hazardous You may collide with another vehicle if you ride on the public roads Never operate this ATV on any public street road or highway even dirt or gravel street roads or high...

Page 26: ...kills and operator experience WARNING Attempting wheelies jumps and other stunts could be hazardous Stunt riding increases the chance of an accident including an overturn Never attempt stunts such as...

Page 27: ...oles without enough time to react This could cause the ATV to overturn or go out of control Go slow and be extra careful when operating on unfamiliar terrain Always be alert to changing terrain condit...

Page 28: ...trol of the ATV Make sure to apply the rear brake before you release the parking brake Release the rear brake lever and open the throttle gradually to move forward WARNING Opening the throttle suddenl...

Page 29: ...you begin to turn BRAKING WARNING Braking hard on slippery surfaces could be hazardous The ATV could skid and go out of control if you brake too hard Apply the brakes lightly and carefully on slippery...

Page 30: ...ard the inside of the turn to maintain your balance Natural turning forces which can push the vehicle to the outside of the turn increase as the speed or the turn sharpness increases This means you mu...

Page 31: ...ing or sliding improperly could be hazardous You may lose control of your ATV when you regain traction unexpectedly This may cause the ATV to overturn Learn to safely control skidding or sliding by pr...

Page 32: ...go over the top of any hill at a high speed An obstacle a sharp drop or another vehicle or person could be on the other side of the hill To climb a hill with the ATV follow the directions below 1 Spee...

Page 33: ...king down a hill WARNING Attempting to turn an ATV around on a steep hill while climbing could cause the ATV to roll over which could result in severe injury or death The ATV could overturn if you try...

Page 34: ...straight down the hill if possible WARNING Going down a hill improperly could be hazardous Going down a hill improperly could cause loss of control or cause the ATV to overturn Always follow the prope...

Page 35: ...ble WARNING Operating this ATV over obstacles improperly could be hazardous Improperly crossing obstacles could cause loss of control or a collision It would also cause the ATV to overturn If you come...

Page 36: ...deep or fast flowing water could be hazardous The ATV tires may float losing traction and then loss of control This could lead to an accident Never operate this ATV in fast flowing water or in water...

Page 37: ...warmer area to allow the brakes to thaw out After the brakes thaw dry them by applying them several times before riding If the brakes do not regain full stopping power ask your authorized service cent...

Page 38: ...ntion of hypothermia Information is available at libraries and through government agencies Plan your winter rides with safety and comfort in mind Dress for the worst conditions you might encounter Be...

Page 39: ...of control Severe injury or death could occur if you lose control of the ATV Go slowly and be careful when riding on snow covered terrain Always be alert to changing terrain conditions WARNING Riding...

Page 40: ...ity of 100 Kg 220 lbs 2 Check accessory mounting brackets and other attachments to make sure they provide a rigid non movable mount 3 Accessories added to the handlebar of the ATV should be as light a...

Page 41: ...e vehicle as well as both sides of the vehicle Locate cargo weight as close to the center of the vehicle if possible 7 Secureyourloadwell Shiftingweightcanaffectyourabilitytohandlethe vehiclesafely 8...

Page 42: ...d muffler bolt T T T Cylinder head cylinder and muffler C C Spark plug C R Idle Speed I I I Throttle cable I I I Fuel line I I I Brakes I I I Tires Inspect every month Drive Chain Clean lubricate and...

Page 43: ...ur ATV under severe conditions it will need maintenance more often than shown in the chart Operating your ATV under severe conditions causes more wear on your ATV Severe conditions include operating u...

Page 44: ...e engine may need adjustment or another plug type may be needed Consult your authorized dealer or BAJA INC if your plug insulator is not a light brown color CAUTION Failing to use the proper spark plu...

Page 45: ...thickness gauge to check the gap CAUTION Improper installation of the spark plug could damage your ATV An overly tight or cross threaded spark plug will damage the aluminum threads of the cylinder hea...

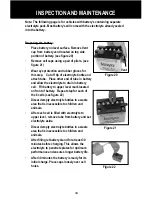
Page 46: ...OM THE AREA WHILE THIS PROCEDURE IS BEING PERFORMED POISON CAUSES SEVERE BURNS Contains sulfuric acid Avoid contact with skin eyes or clothing To prevent accidents rinse empty container with water ANT...

Page 47: ...cell Fill battery to upper level mark located on front of battery Repeat step for each of the 6 cells see figure 22 Discard empty electrolyte bottles in a waste area that is inaccessible to children...

Page 48: ...the black negative y cable 3 Charging rate Charge battery 0 7 Amps for 5 10 hours After charging is complete re install securely all six battery caps see figure 25 Install battery into battery tray l...

Page 49: ...sses and charge in a ventilated area If battery gets hot to the touch discontinue charging and allow battery to cool down Do not use fast charging unless it is an emergency At the beginning or end of...

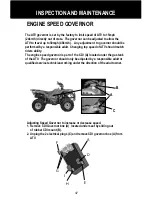
Page 50: ...atch riders ability The engine speed governor is part of the CDI A located under the gas tank of the ATV The governor should only be adjusted by a responsible adult or qualified service technician wor...

Page 51: ...ate the two phillip head screws G with metal jumper F connecting screws together 2 Loosen both phillip head screws G and remove metal jumper F Re tighten phillip head screws after metal jumper is remo...

Page 52: ...not within the correct limits WARNING Operating the vehicle with an inadequate throttle lever free distance could be hazardous Inadequate throttle lever free distance could cause engine speed to rise...

Page 53: ...t of the idle speed could be hazardous An idle speed that is too high could cause the ATV to launch forward when you start the engine This may cause an accident Excessive engine wear may also result i...

Page 54: ...washing gloves when changing oil If oil contacts your skin wash thoroughly with soap and water Launder any clothing or rags if wet with oil Recycle or properly dispose of used oil CAUTION Failure to...

Page 55: ...move the oil cap 3 Remove the drain bolt and drain oil into proper container 4 Reinstall the drain bolt 5 Pour fresh oil of the specified type through the oil fill hole NOTE Approximately 900ml 1 Qt o...

Page 56: ...e hazardous If the air cleaner element did not filter dirt severe engine damage would occur if the dirt entered the running engine Never run the engine without the air cleaner element in place CAUTION...

Page 57: ...lement in the solvent and wash it 2 Squeeze the element by pressing it between the palms of both hands to remove excess solvent A Do not twist or wring the element or it will develop cracks 3 Immerse...

Page 58: ...lly the element for tears before and after cleaning it Replace the element with a new one if it is torn CAUTION Failing to position the air cleaner element properly could damage your ATV Air will bypa...

Page 59: ...nter INSPECTING THE SPROCKETS If it is determined the drive chain is damaged check the sprocket also for damage A worn chain can have an adverse affect on the front and rear sprockets When inspecting...

Page 60: ...WARNING Failing to inspect the drive chain slack before each use of the ATV could be hazardous Too much chain slack could cause the chain to come off the sprockets resulting in an accident or serious...

Page 61: ...the tires are cold WARNING Operating this ATV with improper tires or even improper tire air pressure could be hazardous If you use improper tires or improper tire air pressure you may lose control of...

Page 62: ...ype patch If the damage is from a cut or if the puncture cannot be repaired using a plug the tire should be replaced When operating your ATV in areas here transportation or service facilities are not...

Page 63: ...accelerated brake wear This could lead to an accident If you operate your vehicle under these conditions the brake must be inspected more often than recommended in the MAINTENANCE SCHEDULE 4 6mm 0 16...

Page 64: ...ke fluid Level Brake fluid reservoir 1 Inspect the rear disk brake caliper and brake fluid reservoir for leakage If brake fluid leaks the safety of riding could be affected 2 Inspect the brake hose fo...

Page 65: ...when you use your ATV in severe conditions Your authorized service center should do general lubrication as shown in the MAINTENANCE CHART The authorized service center will lubricate the vehicle such...

Page 66: ...w seconds Shut off engine d Loosen the drain screw and check that the carburetor is filled back up with fuel e If fuel is reaching the carburetor the ignition system should be checked next WARNING Dra...

Page 67: ...ace it if necessary 3 Make sure the fuel valve is not clogged and the fuel tank is not clogged either 4 Check the idle speed If necessary adjust it using a tachometer The correct idle speed is 1400 16...

Page 68: ...u do not handle it properly When draining fuel from the carburetor be sure to shut the engine off Do not smoke and never drain or refuel in an area where there are open flames or sparks Do not spill t...

Page 69: ...cooling ability conceal damage or increase wear of certain parts It is important to remove all debris during cleaning PREPARATION FOR CLEANING Wash the ATV before any mud dries on the ATV Block or sea...

Page 70: ...d Be careful with brushes as they may scratch plastic or painted surfaces Rinse the ATV thoroughly with clean water Dry all areas using a chamois or soft absorbent cloth INSPECTION AFTER CLEANING Remo...

Page 71: ...rmal pressure EXTERNAL 1 Spray all vinyl and rubber parts with rubber protection 2 Spray unpainted surfaces with rust preventative 3 Coat painted surfaces with car wax PROCEDURE FOR RETURNING TO SERVI...

Page 72: ...ized service center or BAJA INC order parts The frame vin number is stamped on the front of the frame as shown in the photograph The engine serial number is stamped on the left side of the crankcase W...

Page 73: ...1 Bore X Stroke 47 X 49 5mm Displacement 86cc Corrected Compression ratio 8 6 1 Carburetor DZ19G Air cleaner Polyurethane Foam element Max power 4 6Kw 8500r min Rated power 4 2Kw 8000r min Max torque...

Page 74: ...71 CN90U WD90U WD90UR Wire Diagram WIRE DIAGRAM...

Page 75: ...your vehicle and retain all receipts covering maintenance on your vehicle You may not be denied a warranty claim solely because of your failure to ensure the performance of all scheduled maintenance o...

Page 76: ...r determines it is defective or causes a failure of a warranted part your claim for repair to bring your vehicle into compliance with applicable standards may be denied This Emission Control System Wa...

Page 77: ...l damages of any description whether arising out of express or implied warranty or any other contract negligence or other tort or otherwise No express emission control system warranty is given by the...

Page 78: ...Baja INC P O Box 61150 Phoenix AZ 85082 Tel 602 443 9180 Toll Free 866 250 7155...

Reviews: