

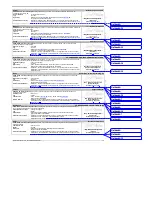
6
BA RoofOn V30 R16 12_2012 GB mit CE BAK.doc
WELDING
Welding procedure:
•
Adjust the welding parameters.
•
The welding temperature must have been reached.
•
Weld shape overlap:
•
Position the welding machine on the overlapping geomembrane liners or plastic films.
•
Align the guide roller to the overlap.
•
Lower the hot air system and slide the nozzle between the overlapping geomembrane liners
or plastic films. The device will start automatically.
•
Guide the welding machine along the overlap. Always observe the position of the guide
roller.
•
Weld shape tape/protection against vandalism/measuring tape:
•
Position the welding machine on the geomembrane liner or plastic film.
•
Position the guide roller at the joint or marking.
•
Lower the hot air system and slide the nozzle between geomembrane liner or plastic film and
tape. The device will start automatically.
•
Guide the welding machine along the joint or marking. Always observe the position of the
guide roller.
•
After welding, slide out the nozzle and raise it.
•
Turn off the heating with the respective switch to cool down the nozzle.
•
Switch off the device with the main switch.
ASSISTANCE AND SUPPORT
The
HERZ
group and its authorised service centres offer free support and assistance in the area of
applications technology.
Our specialists will be pleased to help you.
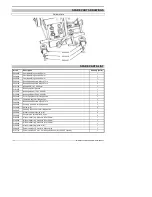
ACCESSORIES
Available accessories:
Additional weight (5230177), handle (5230077), running wheel relocation / edge roller (5230183).
The automatic welding machines can either be supplied with the accessories directly assembled or the
assembly can be easily carried out by the operator himself.
Optimum results will be achieved when
HERZ
accessories and spare parts are used.
Please refer to our brochures for additional information.
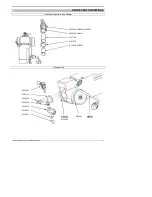
ASSEMBLY
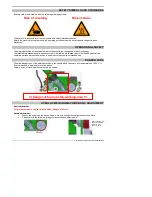
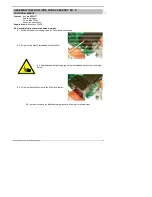
!!! ATTENTION !!!
ALWAYS unplug the device before working on it !!!
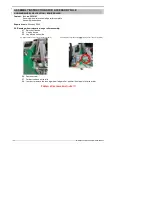
1.0. Changing the heating element
(only when the device has cooled down)
1.1. Swivel out and lock the hot air system
1.2. Loosen four screws at the flange of the nozzle
1.3. Pull off the nozzle
1.4. Pull off the mica tube (careful, fragile)
1.5. Remove the gasket
1.6. Pull off the defective heating element
1.7. Insert the new heating element - observe marking, voltage and power rating
1.8. Slide on the mica tube
1.9. Slide on the gasket and position the boreholes
1.10. Slide on the nozzle and fix with 4 screws
1.11. Readjust the nozzle as described under
basic adjustments
on page 4 - 6.
INSTALLATION INSTRUCTIONS 8.0 and 9.0 ARE ENCLOSED WITH THE ACCESSORIES !!!


