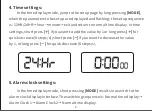
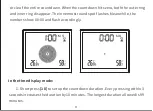
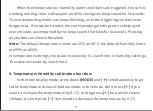
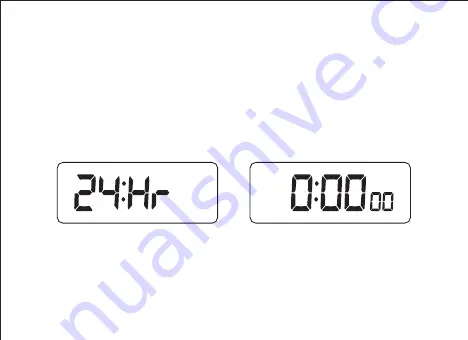
background image

4. Time settings:

          In the time display mode, jump to the setup page by long pressing 

[MODE]

when the parameters to be set up are displayed and flashing; the setup sequence 
is: 12HR/24HR→hour→minute→exit and return to normal time display. In time 
settings, short press 

[

if you want to add the value by 1 or long press

 [ ]

 for 

quick increase (8 steps/s); short press 

[

if you want to decrease the value 

by 1, or long press

 [

for quick decrease (8 steps/s).

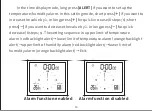
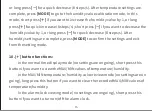
5. Alarm clock settings:

          In the time display mode, short pressing 

[MODE] 

results in a switch to the 

alarm clock display interface. The switching sequence is: Normal time display→
Alarm Clock 1→Alarm Clock 2→Normal time display.

8

Summary of Contents for TS-WP10

Page 1: ...TS WP10 User Manual...

Page 2: ...TS WP10 Bathroom Clock Display of all functions S M AM PM 1 2 H AL o L AL MIN MAX H AL o L AL MIN MAX 1...

Page 3: ...H AL o L AL H AL o L AL H AL o L AL MIN H AL o L AL MIN AM 1 Temperature Humidity Max Min values Alarm icon Alarm clock icon Snooze icon Time icon A M P M Time display Dynamic clock Countdown Minute S...

Page 4: ...wn Start countdown One button snooze turn on backlight Mode selection Beyond limit alarm settings View max min values Forward adjustment Backward adjustment C F switch Foldable support Revolving clip...

Page 5: ...m clocks Snooze function Five minutes by default Countdown function Dynamic countdown progress bar indicator Dynamic seconds countdown indicator Indoor temperature measuring range 0 C 50 C 32 F 122 F...

Page 6: ...dies out if no buttons are pressed To keep the backlight indicator constantly on long press CLEAR for at east 2 seconds until the beep sound is heard andthen enable Always On of the backlight indicato...

Page 7: ...he clock is not always on when powered by batteries Remarks This clock is shipped without batteries MODE ALERT MAX MIN C F 1 5V SIZE AAA AM4 LRO03 1 5V SIZE AAA AM4 LRO03 1 5V SIZE AAA AM4 LRO03 USB D...

Page 8: ...ds and the backlight color alternates in the order of red orange and white for one cycle The initial interface of the system is displayed after a beep sound Default display after startup white backlig...

Page 9: ...lay In time settings short press if you want to add the value by 1 or long press for quick increase 8 steps s short press if you want to decrease the value by 1 or long press for quick decrease 8 step...

Page 10: ...st 3 seconds when the Hour place starts flashing then short press MODE and the Minute place starts flashing Short press if you want to increase the value by 1 or long press for quick increase 8 steps...

Page 11: ...LIGHT CLEAR 10 1 Top touch button 7 Countdown settings In the countdown mode the numbers of the current time show the minute and second countdown values and the second point is fixed without flashing...

Page 12: ...disappear The innermost round spot flashes Meanwhile the numbers show 00 00 and flash accordingly S M S M In the time display mode 1 Short press 10 to set up the countdown duration Every pressing with...

Page 13: ...wn time minute by minute up to 99 minutes 5 During time settings short press CLEAR anytime if you want to clear and exit from the countdown settings 6 If no action takes place within 3 seconds after a...

Page 14: ...ds the clock automatically goes back to the countdown display interface When the countdown hits zero the clock gives beep sound for 2 minutes as prompt If any button is pressed during this period the...

Page 15: ...short press if you want to decrease the value by 1 or long press for quick decrease 8 steps s The setting sequence is upper limit of temperature alarm red backlight alert lower limit of temperature a...

Page 16: ...ressing any button can silence the alarm Note The default temperature limits are 50 C and 0 C the default humidity limits are 99 and 20 In temperature settings the value increases by 0 1 each time in...

Page 17: ...er humidity settings are complete press MODE to confirm the settings and exit from the setting mode 10 button functions In the normal time display mode no settings are ongoing short press this button...

Page 18: ...p or several steps 11 button functions In the normal time display mode no settings are ongoing short press this button if you want to switch the temperature unit between C and F In the setting mode sh...

Page 19: ...TS WP10 18...

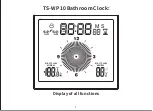
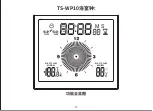
Page 20: ...TS WP10 S M AM PM 1 2 H AL o L AL MIN MAX H AL o L AL MIN MAX 19...

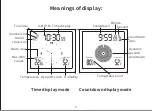
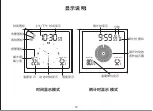
Page 21: ...S M H AL o L AL H AL o L AL H AL o L AL MIN H AL o L AL MIN AM 1 20...

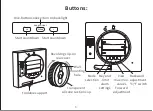
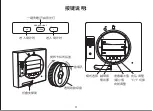
Page 22: ...MODE ALERT MAX MIN C F SNOOZE LIGHT CLEAR 10 1 21...

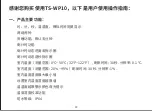
Page 23: ...TS WP10 0 50 32 122 30 0 1 20 99 30 1 IPX4 22...

Page 24: ...1 USB DC DC 8 CLEAR 2 Bi CLEAR 2 Bi DC 2 3 7 MODE ALERT MAX MIN C F 1 5V SIZE AAA AM4 LRO03 1 5V SIZE AAA AM4 LRO03 1 5V SIZE AAA AM4 LRO03 USB DC 3 7 23...

Page 25: ...LED 3 BI 0 00 24 24...

Page 26: ...MODE 12HR 24HR 8 8 MODE 1 2 25...

Page 27: ...1 MODE 3 MODE 8 8 MODE CLEAR 5 SNOOZE LIGHT CLEAR 10 1 26...

Page 28: ...MS 1 1 0 0 00 00 S M S M 27...

Page 29: ...1 10 3 10 99 2 1 3 1 99 3 10 10 10 99 4 1 1 2 99 5 CLEAR 6 3 BI 7 MS 8 CLEAR BI 9 BiBiBiBi 2 3 2 2 28...

Page 30: ...ALERT ALERT 1 8 1 8 H AL o L AL H AL o L AL 2 29...

Page 31: ...5 5 50 0 99 20 0 1 1 MODE 0 1 8 0 1 8 MODE 1 8 1 8 MODE 30...

Page 32: ...MAX MIN MAX MIN MAX MIN 31 RoHS MADE IN CHINA...

Reviews: