3.4 Setting up the display
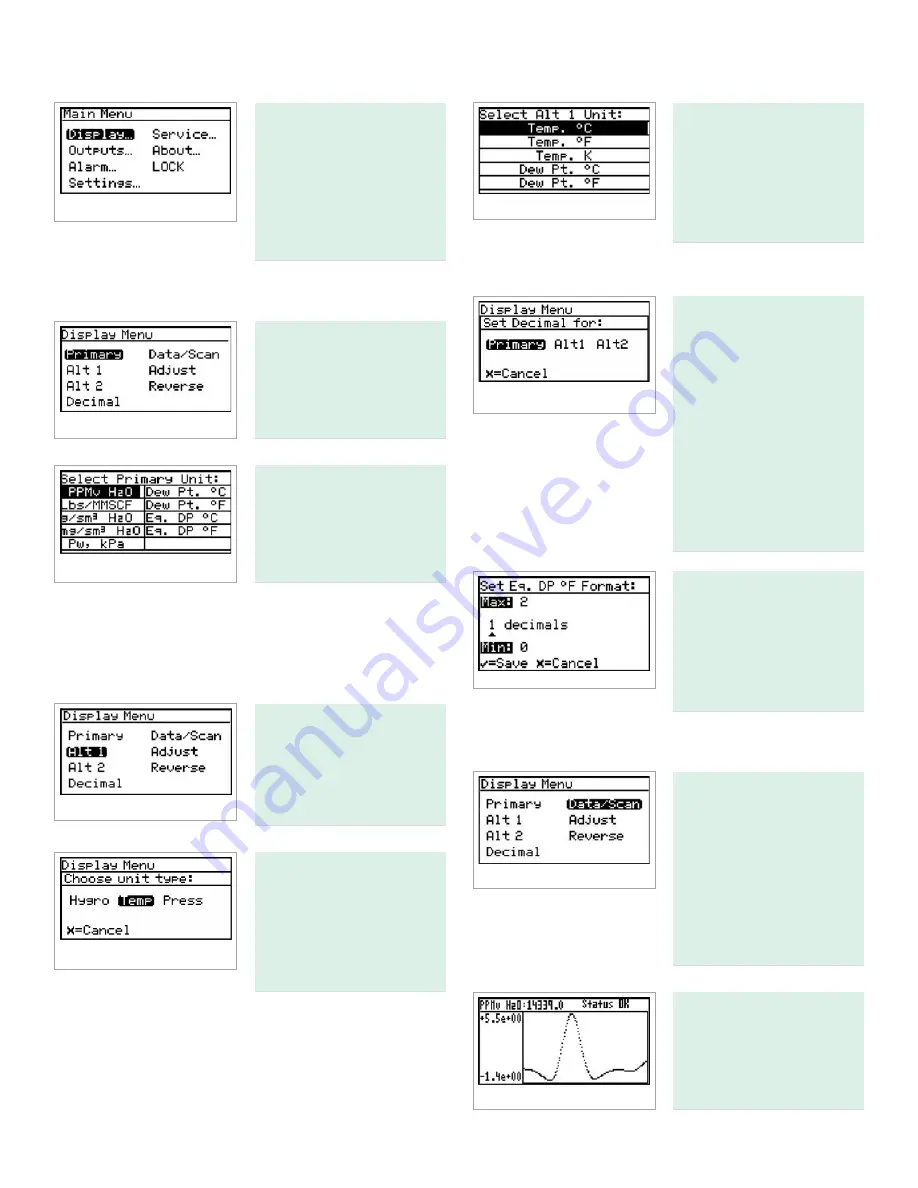
When the screen is
unlocked, touch the menu
key and the main menu
appears with several
options. To set up the
display, select display...
and press enter. The
following screen appears:
3.4.1 Selecting primary units
To select units for the
primary display, select
primary and press enter.
The following screen
appears:
Use the arrow keys to
highlight the desired
units and press enter.
The screen returns to the
display menu.
3.4.2 Selecting alt 1 and alt 2 units
Use the arrow keys to highlight the desired unit and press
enter. The screen returns to the display menu. Use the same
procedure to change other units.
To set the units for alt 1
and/or alt 2, use the arrow
keys to highlight the one
to be set, and press enter.
The following screen
appears:
Use the arrow keys to
highlight the desired unit
type (hygro, temperature
or pressure) and press
enter. If temp is selected,
the following screen
appears.
Use the arrow keys to
highlight the desired
unit and press enter.
The screen returns to
the display menu. Use
the same procedure to
change other units.
3.4.3 Setting decimal places
To set the decimal places
for unit values, from the
display menu use the
arrow keys to highlight
decimal and press enter.
Then select the type of
display and press enter.
The decimal places
setting determines the
number of digits displayed
for the value to the right of
the decimal symbol (“.”),
if possible.
Use the arrow keys to
change the number of
decimal places and press
enter, or press cancel if no
changes are necessary.
The screen returns to the
display menu.
3.4.4 Data/scan
To toggle the display
between showing the
numeric values (data),
and a graphic plot of the
2f waveform (scan), from
the display menu use the
arrow keys to highlight
data/scan and press
enter. A screen similar to
the following appears.
NOTE:
The scan can
be used for diagnostic
purposes when a PC with
AuroraView
is not readily
available.
27
Summary of Contents for Panametrics Aurora H2O
Page 2: ...ii...
Page 4: ...no content intended for this page proceed to next page iv...
Page 20: ...no content intended for this page 10...
Page 32: ...no content intended for this page 22...
Page 71: ...Figure 74 Exporting a simplified image Figure 75 Selecting enhanced metafile 61...


