background image

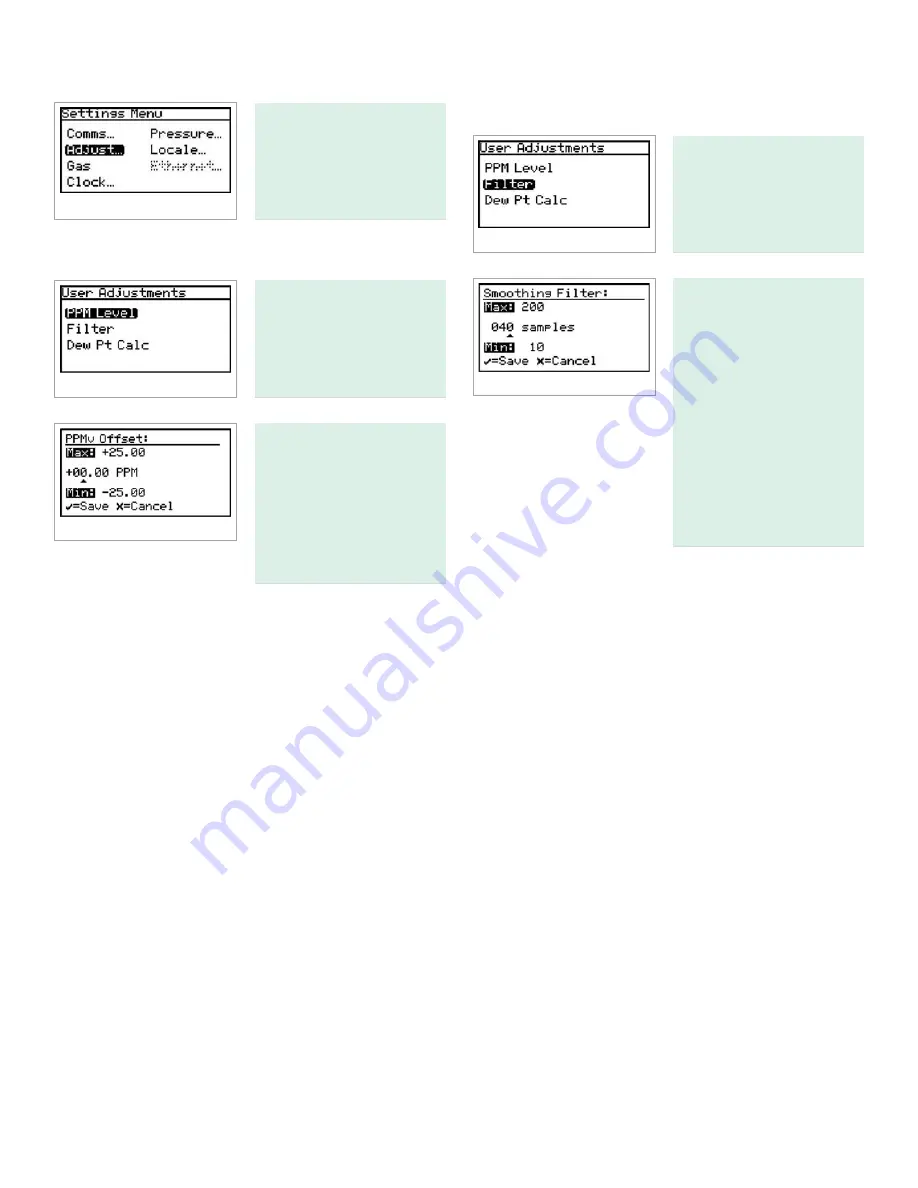
4.2  Adjust offset values

To adjust offset values, 

from the settings menu 

select adjust... and press 

enter. The following screen 

appears.

4.2.1  Adjusting the PPMv offset

To adjust the PPMv offset, 

select PPM level and press 

enter. The following screen 

appears.

Use the left and right 

arrow keys to select each 

digit to be changed. Use 

the up and down arrow 

keys to change the value. 

When finished, press enter

The screen returns to the 

user adjustments menu.

4.2.2  Adjusting the smoothing filter

To adjust the smoothing 

filter, from the user 

adjustments menu select 

filter and press enter. The 

following screen appears.

The smoothing filter setting 

is used to change the 

system responsiveness.  

It is a moving average filter 

to smooth the moisture 

readings. 1 sample = 1 

scan. The minimum setting 

is 10 samples, or ~ 0.6 

seconds. The maximum 

setting is 500 samples, or 

~ 31 seconds. The default 

value of 40 samples, as 

set at the factory, is ~2.5 

seconds.

Use the left and right arrow keys to select each digit to be 

changed. Use the up and down arrow keys to change the 

value. When finished, press enter. The screen returns to the 

user adjustments menu.

37

Summary of Contents for Panametrics Aurora H2O

Page 1: ...Aurora H2O User s manual 910 284 Rev J ATTENTION This manual is intended for units with S N 3999 software v 001 A through v 001 U or lower only For units with S N above 3999 use manual 910 317...

Page 2: ...ii...

Page 3: ...nalyzer for natural gas User s manual 910 284 Rev J April 2017 ATTENTION This manual is intended for units with S N 3999 software v 001 A through v 001 U or lower only For units with S N above 3999 us...

Page 4: ...no content intended for this page proceed to next page iv...

Page 5: ...outputs 8 1 4 10 Enclosure 8 1 4 11 Laser certification 8 1 4 12 User interface 9 1 4 13 Weight and dimensions 9 1 4 14 Hazardous area certification 9 1 4 15 European certification 9 1 4 16 Software...

Page 6: ...ust 28 3 4 6 Reverse 28 3 5 Setting up the outputs 29 3 5 1 Selecting an output for setup 29 3 5 2 Selecting output units 29 3 5 3 Selecting an output type 29 3 5 4 Changing the upper output span 29 3...

Page 7: ...3 4 5 3 Changing the constant 43 4 5 4 Editing pressure calibration 44 4 6 Regional settings 45 4 6 1 Setting the country code 45 4 6 2 Setting the decimal format 45 4 6 3 Setting the date format 45 4...

Page 8: ...play 71 7 3 Display dim or hard to read 71 7 4 Status messages and indicators 71 7 5 No flow measurement indicated on Aurora H2O measurement cell outlet 73 7 6 Verifying Aurora H2O performance in the...

Page 9: ...on that provides a deeper understanding of the situation but is not essential to the proper completion of the instructions IMPORTANT These paragraphs provide information that emphasizes instructions t...

Page 10: ...horized operation Make sure that unauthorized personnel cannot gain access to the operation of the equipment Environmental compliance RoHS The Aurora H2O fully complies with RoHS regulations Waste Ele...

Page 11: ...rgy grid Class 1 laser product WARNING Use of controls or adjustments or the performance of procedures other than those specified herein may result in hazardous laser exposure 1 2 Features Optical res...

Page 12: ...tiplied by 106 and divided by the total pressure yields the volume ratio in ppmv parts per million by volume The laser diode is housed in a hermetically sealed and dry housing The light is transmitted...

Page 13: ...NOTE Refer to Figure 2 below and Table 1 on page 5 to identify your Aurora components 1 3 12 11 4 6 7 5 13 14 8 9 10 15 2 Figure 2 Aurora H2O system assembly with optional USA CAN heater 3...

Page 14: ...NOTE Refer to Figure 3 below and Table 1 on page 5 to identify your Aurora components 1 3 12 4 6 7 5 13 14 8 9 10 15 2 Figure 3 Aurora H2O system assembly with optional EU ATEX heater 4...

Page 15: ...and magnetic stylus keypad 3 Wiring terminals 4 Isolation valve needle valve 5 Membrane filter 6 Membrane filter drain and fast loop vent 7 Pressure regulator w 0 10 psig outlet pressure gauge 8 Magn...

Page 16: ...regulator which functions to reduce the pressure If it is not possible to install the insertion filter consult Panametrics application engineers for information about a sample conditioning system 1 3...

Page 17: ...Figure 5 USA CAN heater wiring diagram Customer cable Cable to thermostat Cable to heater 1 2 3 4 Figure 6 EU ATEX heater wiring diagram Cable function Conductor Color J box terminal Customer power L...

Page 18: ...kPa 1500 psig maximum higher pressure available using additional sampling system components 1 4 6 Temperature Operating 20 to 65 C 4 to 149 F Storage 20 to 70 C 4 to 158 F Optional heater thermostat s...

Page 19: ...ification CE Complies with EMC directive 2014 30 EU low voltage directive 2014 35 EU and pressure directive 2014 68 EU for DN 25 1 4 16 Software Displays all key parameters provides time base graphing...

Page 20: ...no content intended for this page 10...

Page 21: ...ual on CD ROM AuroraView software on CD ROM Aurora H2O calibration data sheet Maintenance accessories kit Optional Pipeline insertion filter regulator assembly 2 3 Unpacking The Aurora H2O is shipped...

Page 22: ...2 Avoid unnecessarily long lengths of sample transport tubing to minimize transport time to the analyzer 3 Avoid dead legs in the sample transport tubing to minimize the possibility of liquid build up...

Page 23: ...applications that may have entrained particulate and liquid contaminants especially TEG carry over from TEG dryers Panametrics recommends the use of a insertion probe regulator see Figure 9 below to...

Page 24: ...ckwise until it is at its extreme upper position Apply thread sealant to the threaded area below vertical slots in the threads see Figure 11 below Do not allow the thread sealant to enter the slot as...

Page 25: ...rom becoming unintentionally unscrewed from the thread o let The pipeline my now be pressurized 2 7 2b Installing the insertion membrane liquid separator pressure regulator assembly 1 Confirm that the...

Page 26: ...lot Second vertical slot Figure 18 Installing the probe Insertion nut Insertion washer Pin Housing Figure 19 Threading the insertion nut wall The pins will be in the middle of the second vertical slot...

Page 27: ...rce 750 psig 300 psig 500 psig 50 of the average source pressure Pressure adjustment screw Lock nut Pressure gauge Figure 23 Turning the pressure adjustment screw 2 8 Making electrical connections Ref...

Page 28: ...the Aurora H2O in RS 485 mode and to prevent signal reflections on the high speed RS 485 connections it is recommended that the far end of the RS 485 lines be terminated properly The termination can b...

Page 29: ...N or EU Connect the AC power using a separate conduit from the power for the Aurora H2O analyzer The heater is equipped with a thermostat preset to 25 C 77 F nominal Use 12 18 AWG 3 3 0 82 mm2 wires T...

Page 30: ...Figure 31 Aurora H2O outline and mounting ref dwg 712 1456 15 66 10 92 18 31 10 24 13 08 9 29 typ 3 18 typ 24 91 33 12 26 16 95 24 26 125 1 622 20 20...

Page 31: ...connections See note 1 Notes 1 I O connections and pressure transmitter wire gauge range 12 24 awg 2 AC and DC connection wire gauge range 12 18 awg See note 1 Customer ground Figure 32 Aurora H2O ele...

Page 32: ...no content intended for this page 22...

Page 33: ...pidly it will activate the liquid block feature of the membrane filter 8 shutting off gas flow b If this occurs fully close the supply gas isolation valve 4 c Wait 30 seconds and then go back to step...

Page 34: ...Figure 33 Aurora H2O sample system ref dwg 902 004 3 3 Keypad features Inlet isolation needle valve Bypass needle valve Pressure regulator Sample purge 3 way ball valve Purge inlet needle valve 24 24...

Page 35: ...rument has been engaged or B the instrument keypad has not been used for a period of several minutes engaging a software feature to lock out inadvertent key usage Type B keypad lock out is overcome by...

Page 36: ...layed with an ellipsis shown as a series of three dots after the menu item will bring up more choices while those without take immediate action Figure 38 Main menu 3 3 7 Entering numeric values Since...

Page 37: ...and press enter If temp is selected the following screen appears Use the arrow keys to highlight the desired unit and press enter The screen returns to the display menu Use the same procedure to chang...

Page 38: ...rrow keys to increase decrease display brightness Use the right left arrow keys to increase decrease display contrast Press enter to save the changes or press cancel to return to the previous setup Th...

Page 39: ...from the output menu select type and press enter A screen similar to the following appears Use the arrow keys to select a new output type Press enter to save or cancel to keep the previous value and r...

Page 40: ...easurement is indicated with a signal between 3 8 and 20 5 mA The lower zero and Upper span settings determine the measurement value assigned to 4 0 and 20 0 mA respectively For the measurement assign...

Page 41: ...le above Lo Hi Under range AND over range errors are inhibited NAMUR signaling will NOT occur for these error conditions NAMUR signaling will occur for all other errors in the table above ALL ALL erro...

Page 42: ...ws NOTE Since you cannot trim 0 mA for negative offsets trim for the lower end of the scale is at the 4 mA output level Use the left and right arrow keys to select each digit to be changed and the up...

Page 43: ...owing screen appears Use the arrow keys to select off or on and press enter The display returns to the alarm menu 3 6 3 Selecting alarm units To select alarm units from the alarm menu select units and...

Page 44: ...Figure 41 below for descriptions of the various alarm types Upper Lower Hysteresis Trip Trip Trip Trip Trip Reset Reset Reset Reset Setpoint In band Out band Reset Figure 41 Example of alarm types 3 6...

Page 45: ...in the instrument program and comm port 2 is aligned to service This setup enables the user to have comm port 1 set up for the primary digital output for example RS 485 to the customer SCADA system an...

Page 46: ...er of stop bits Use the arrow keys to highlight the desired number and press enter The screen returns to the comm port menu 4 1 4 Selecting protocol To choose the protocol from the comm port menu sele...

Page 47: ...g the smoothing filter To adjust the smoothing filter from the user adjustments menu select filter and press enter The following screen appears The smoothing filter setting is used to change the syste...

Page 48: ...ments menu 4 2 4 Setting the dew point calculation method The dew point is the temperature at which the air is saturated with respect to water vapor over a liquid surface The frost point is the temper...

Page 49: ...To change the type of background gas from the settings menu select gas and press enter The following screen appears From the gas data menu select background and press enter The following screen appear...

Page 50: ...Pressing x erases the highlighted character Pressing the down arrow will move the highlight to the keyboard section see Figure 44 below Note that the context menu has changed again it displays prompts...

Page 51: ...ings menu 4 4 Clock settings The clock settings are for informational purposes They are used to keep track of the test analyzer start time and the laser operational time To reset the clock from the se...

Page 52: ...clock menu select date and press enter The following screen appears Use the left and right arrow keys to select each digit to be changed Use the up and down arrow keys to change the value When finish...

Page 53: ...the left and right arrow keys to select the line pressure source Live accepts a pressure value from a pressure transmitter and remote accepts a value via a modbus connection To set a constant value se...

Page 54: ...p and down arrow keys to highlight select cal point and press enter The following screen appears Use the left and right arrow keys to select zero or span and press enter The screen returns to the prev...

Page 55: ...o change the value When finished press enter The screen returns to the regional settings menu Country codes international telephone country codes Default 1 for U S Option 81 for Japan is available to...

Page 56: ...l be available in the menu 4 7 User calibration Beginning with software revision H2O 001 F the Aurora H2O supports a two point user calibration for use in methane natural gas This is provided so that...

Page 57: ...ro The Aurora H2O performs multiple measurements for approximately 15 seconds indicating its progress When the readings are complete you will be prompted to apply the span gas and continue If there is...

Page 58: ...urora H2O was powered on or reset Started is the date and time that the Aurora H2O was last powered on reset Start temp is the laser housing temperature as measured at the last startup reset Laser hou...

Page 59: ...calibration installed The calibration in use can be verified at any time using the Aurora H2O about menu From the main menu select about and press enter The following screen appears From the about Au...

Page 60: ...Laser hours i e 85 Boot Prog Displays composition of selected background gas Passcode protected Regional settings Enter line signal i e 04 000 mA Select calibration point Passcode protected Set node...

Page 61: ...s from AuroraView to other Window applications like Microsoft Powerpoint or Word AuroraView does not provide functionality for the following Aurora H2O software updates Save the Aurora H2O configurati...

Page 62: ...e in the root directory of the CD see Figure 47 below Double click the file to start the installation 4 Exit all other programs before running the installer see Figure 48 below 5 The next screen see F...

Page 63: ...ons for initiating the installation When ready click next to begin 8 During installation the screen shown in Figure 52 below appears 9 The screen shown in Figure 53 below appears when the installation...

Page 64: ...5 4 Starting AuroraView 1 From the start menu click programs AuroraView AuroraView see Figure 54 below Figure 54 AuroraView in programs menu 54 54...

Page 65: ...2 AuroraView boots up and displays a screen similar to Figure 55 below Figure 55 AuroraView main screen 55...

Page 66: ...surement units to the right of the decimal place i e 20 78 would result from a setting of 2 Read Check this box if you want to show the value in the current readings pane Plot Check this box if you wa...

Page 67: ...nfiguration Set output parameter Set output type 0 20mA or 4 20mA Set zero or lower range set span or upper range Figure 62 Other output options 4 Click scan This section enables you to pick the desir...

Page 68: ...on the button click to datalog 2 AuroraView will request a file location Pick a file location and a file name to save your data log file All data log files are comma delimited txt files by default 3...

Page 69: ...a series of graph tools available at the top left of the trend plot area see Figure 70 below Pointer Zoom tool gives you six options as shown in Figure 71 below Hand tool enables you to graph the tre...

Page 70: ...ng a trend plot Figure 73 Pasting a trend plot Another option is to right click and chose the option export simplified Image see Figure 74 below When you do this a variety of image file formats will a...

Page 71: ...Figure 74 Exporting a simplified image Figure 75 Selecting enhanced metafile 61...

Page 72: ...Working with trend tabular data you will be able to see data in tabular format as shown in Figure 77 below You can adjust column widths to see data more easily with full titles in the header row Figu...

Page 73: ...is more hazardous than specified 6 1 Spare parts Table 5 Aurora H2O spare parts list Part no Description Qty 704 688 12 RS 232 cable SUB 9 F to tinned leads 12 ft 1 Aurora H2O maintenance kit N A Plas...

Page 74: ...Turn the inlet isolation needle valve item 4 in Figure 2 on page 3 or Figure 3 on page 4 to the closed position b Ensure that the sample flow rotatmeter indicates zero flow 3 Wear a pair of disposable...

Page 75: ...ependent upon the mirror integrity Do not touch the mirror surface with any tools objects hands or fingers 2 Make a visual inspection of the mirror surface see Figure 81 below Record any observation o...

Page 76: ...using a new lens tissue each time Each lens tissue wetted with acetone is used only once to clean off any visible residue on the mirror surface 8 Visually inspect the mirror and record any observatio...

Page 77: ...assembly from the bottom of the absorption cell While Figure 87 below shows this procedure for a dismounted cell it is NOT necessary to dismount the optical absorption cell assembly to remove the mirr...

Page 78: ...g it with the tweezers Puff repeatedly until the mirror surface appears dry see Figure 85 on page 66 9 Repeat steps 6 8 above at least three times using a new lens tissue each time Each lens tissue we...

Page 79: ...ed Additional upstream filtration Heat Heat tracing of the sample line and sample system components sufficiently above both the water and hydrocarbon dew point will keep the sample in the gas phase To...

Page 80: ...no content intended for this page 70...

Page 81: ...messages are displayed in the upper right corner of the display with continuous scrolling from right to left for long messages A fault is a non recoverable condition that can affect the quality of mea...

Page 82: ...o live and no pressure transmitter is attached Laser temp unstable Warning The temperature of the laser is not stable This warning occurs briefly at power on as the Aurora H2O sets the correct operati...

Page 83: ...ng capability of the PM880 to determine when steady state conditions are reached Consult Panametrics if you have application questions regarding this process 7 6 2 Using a moisture standard The best m...

Page 84: ...background selection unlocked The lockout switch is positioned to the right of the laser indicator see Figure 101 below When the switch is in the up position the background selection menu is unlocked...

Page 85: ...odbus organization at http modbus ida org A 2 Modbus functions and data types The modbus functions supported by Aurora H2O include 0x03 read holding registers 0x04 read input registers 0x08 diagnostic...

Page 86: ...eft units Measurement unit to display Reg address of meas 1200 Integer Alt 1 left decimals of decimal places to display Measurement dependent 1210 Integer Alt 2 right units Measurement unit to display...

Page 87: ...tripped 1 tripped 3100 Integer Switch 0 OFF 1 ON 3110 Integer Units Reg address of meas 3120 Integer Type Set point 0 in band 1 out band 2 3130 Integer Upper Depends on unit type 3140 Double float Low...

Page 88: ...ion kPa 0 3500 kPa 5530 Double float Pressure span calibration kPa 0 3500 kPa 5535 Double float Pressure source Constant value 0 live sensor 1 5540 Integer Device ID Aurora H2O serial number 8100 8 ch...

Page 89: ...present but only the latching register will show it if the condition is no longer present Writing 0 to the latching register will clear the error code it contains 2 The trim sequence start resume live...

Page 90: ...smitter is attached 0x00000200 Power supply under voltage 0x00000400 System ground fault 0x00000800 The temperature of the laser is not stable This warning occurs briefly at power on as the Aurora H2O...

Page 91: ...s arising from course of dealing or usage or trade Return policy If a Panametrics instrument malfunctions within the warranty period the following procedure must be completed 1 Notify Panametrics givi...

Page 92: ...bon reduction targets across critical industries including Oil Gas Energy Healthcare Water and Wastewater Chemical Processing Food Beverage and many others Join the conversation and follow us on Linke...

Reviews: