4
5. RADIANTS
Mount the "A" shaped radiants over the burners with each end mounted on special supports on the front and
rear of the chamber. A radiant should be mounted over eachburner assembly..
6. TOP GRATES
Place a grate over each of the radiants. For normal operation the pointed side of the grate is facing up. For
use with foods that require extra, support, the flat side may be used.
On XXE models, grates can be placed on three levels; two positions are built into the rear of the unit; the third
position requires a special adapter which is supplied with the unit.
The adapter covers only half of the broiler. To cover the entire unit. optional adapters can be ordered.
7. LIGHTING:
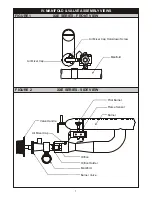
Each burner has a standing pilot burner which must be lit before the burners can be lit. To light the pilot
burners:
(A)
Turn all broiler valves to off position
(B)
Open main gas shut off valve ( provided by customer).
(C)
Press. turn counterclockwise and hold the burner control knob to the pilot burner ignition
position.
(D).
Using a lit taper, light the pilot burner
(E)
Release the knob after 30 seconds. Pilot burner should stay lit.
If the pilot burner does not remain lit, wait for 5 minutes and repeat steps C and D.
Hold the knob pressed longer before releasing.
(F)
With a screwdriver adjust the pilot burner flame to about 1/2" (12.7 mm). Turn the adjusting
screw clockwise to reduce or counterclockwise to increase the pilot burner flame.
(G)
Each burner may now be adjusted to the desired flame size by turning the individual burner
valve knob.
(H)
Turn the knob to the pilot burner ignition position to shut down the main burner.
(I)
Turn the knob to off position to shut down the pilot burners.
NOTE: WAIT FIVE MINUTES BEFORE ATTEMPTING TO RELIGHT THE PILOT
BURNERS.
8. GREASE PAN
A grease pan is provided below the burners to hold any grease that drips down past the radiants while
broiling. An additional grease drawer is provided in the front right corner of the grease pan to collect the
grease from the grease drain in the front which in turn drains into the grease collector.
Water is usually added to the grease pan to reduce flare-up and flash back. The . grease drip will extinguish
as it hits the water.
9. GRIDDLE PLATE (optional)
Griddle plates should not cover more than 50% of the BROILING area. Each Griddle Plate fits on top of two
grates. It is not necessary to remove the top grates and radiants before installing the griddle plate.
10. ADDITIONAL INSTALLATION INSTRUCTIONS
(A)
Keep the area around the broiler free and clear of combustible materials.
(B)
The provision of an adequate air supply to your broiler is essential. Provide for sufficient
outside air to enter the broiling area and assure that this air flow is not obstructed.
(C)
Air enters the burner area from the front of your broiler. Assure that this area is kept open and
unobstructed.
(D)
Servicing is accomplished through the front and top of the broiler. Assure that this area is
kept unobstructed for proper servicing and operation.


