Control Wiring 5-25
MN766
5.14 Mint WorkBench
As an alternative to using the keypad for programming and setup, Baldor’s Mint WorkBench software version 5.5 or greater
can be used. When the software is installed and confi gured, the help topics provide information on how to use the software.
The following procedure will help you install and confi gure the software.
Before you can use Mint WorkBench software, it must be installed on your PC’s hard drive.
Be sure that the USB port of the control is connected to a USB port on your PC.
This must be connected to establish communication after the software is installed.
5.14.1 Install USB Driver
The control connects to a PC by using USB cable connection. This procedure installs the USB driver that is required by
Windows.
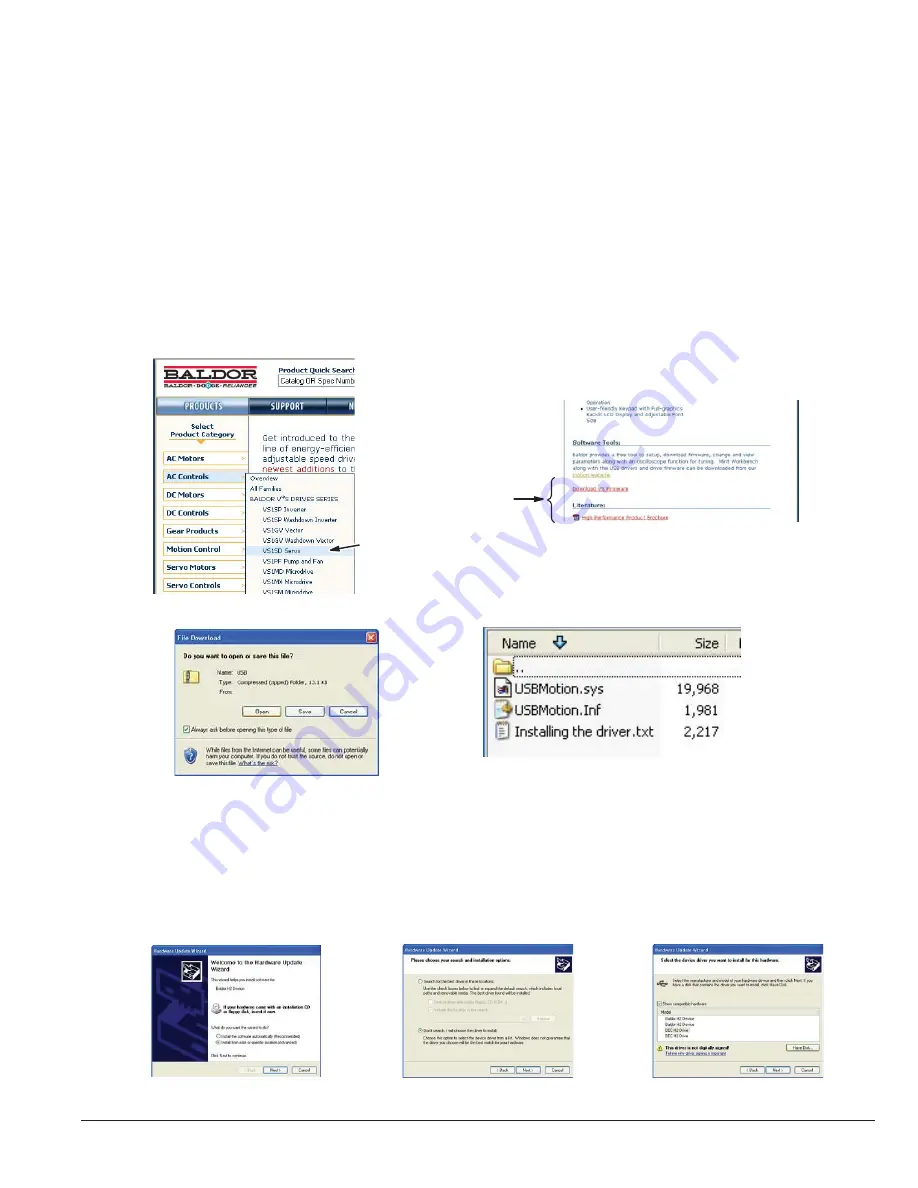
1. The software must be downloaded from the Baldor site: http://www.baldor.com Simply log into that web site and select
Products then select AC Controls then select VS1 Series AC Servo to locate the Software tools.
2. USB Device Driver
Figure 5-26 USB Driver
Select Control Type
Select Software Tool
3. Click on USB Device Drive and select Open to view the uncompressed fi les.
4. Select the inf and sys fi les and copy them to a folder on your hard drive. These will be installed next.
5. Be sure the control is powered up.
6. Connect the USB cable to the control. Windows should fi nd a new USB device.
7. Install the USB drivers.
a. Choose “install from a list or specifi c location” and click Next.
b. Choose “Don’t search I will choose the driver to install”.
c. Click “Have Disk”. Then enter the location that you stored the inf and sys fi le (in step 3) and click Next to install the
driver fi les.
8. Proceed to the Mint WorkBench installation procedure.
Summary of Contents for VS1SD
Page 1: ...05 13 Installation Operating Manual MN766 VS1SD AC Servo Control...
Page 12: ...2 2 General Information MN766...
Page 16: ...3 4 Installing the Drive MN766...
Page 108: ...7 34 Parameter Descriptions MN766...
Page 114: ...8 6 Customizing Your Application MN766...
Page 128: ...9 14 Troubleshooting MN766...
Page 154: ...12 12 Monitor and RTC Description MN766...


