-
6
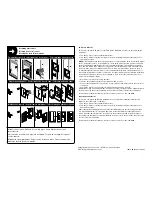
Tilt the Hea
drail Bracket th
rough th
e slot i
n the
Battery Han
ger an
d press u
ntil sn
ug
A
B
SNAP
7
Snap t
he Batt
ery Pack
Assemb
ly on th
e backsi
de of th
e wind
ow
shade
8
Connec
t the w
ire lead
from th
e
Battery P
ack to
the mo
tor wir
e lead
A
B
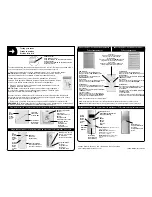
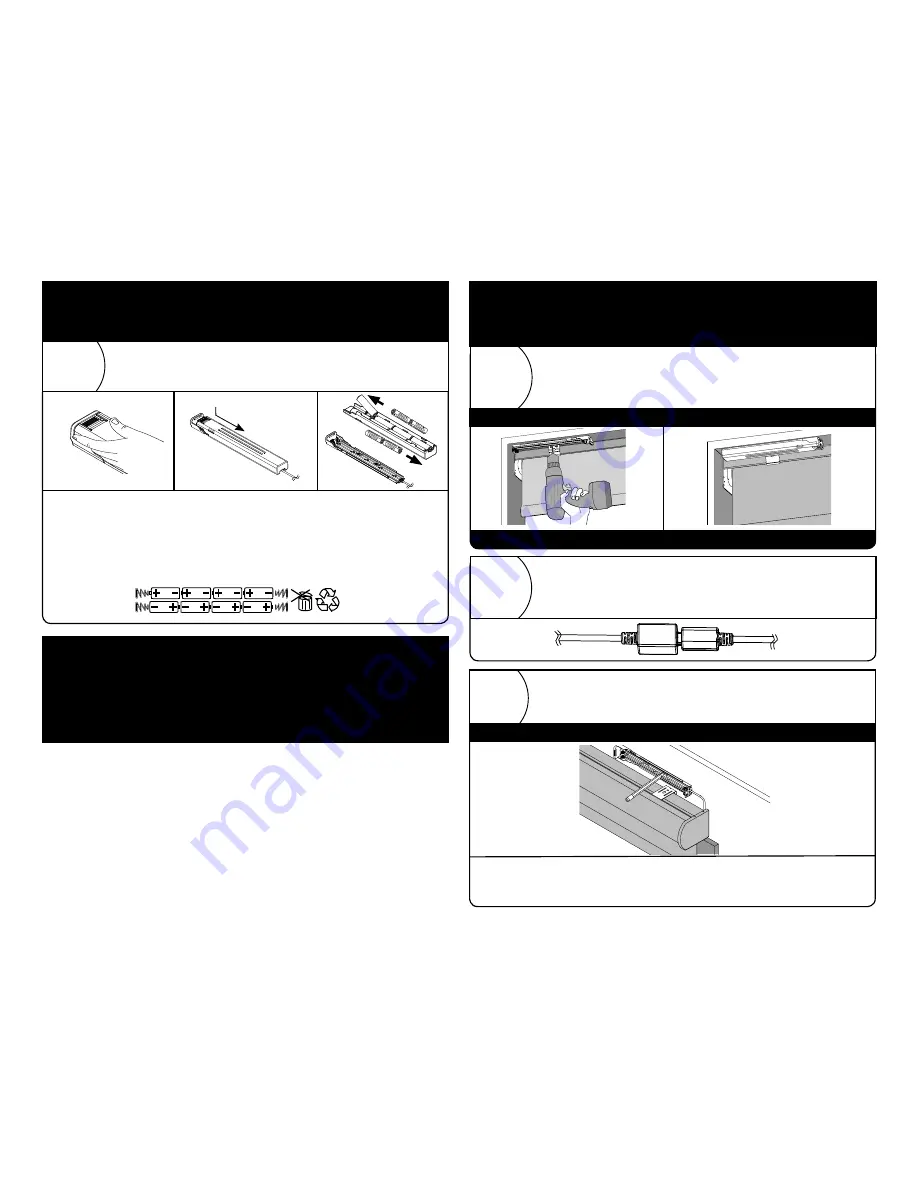
Mount battery pack directly to surface (inside or outside mount)
Paquete de batería para montaje directamente en la superficie
(montaje externo o interno)
Installer le bloc-piles directement sur la surface (montage intérieur ou extérieur)
2
Mark and predrill screw holes; secure back plate
Marque los orificios para los tornillos; perfore con el taladro y fije
la placa posterior
Marquer et pré-percer les trous de vis; fixer la plaque arrière
Connect battery wire connector to motor lead
Conecte los conectores del cable de la batería al cable de motor
Relier le connecteur de fil des piles au fil du moteur
Inside mount • Montaje interno • Montage intérieur
2a
Battery pack location and installation
Instalación y ubicación del paquete de baterías
Emplacement du boîtier à piles et installation
Shade
Headrail Bracket
Battery Pack Base
Battery Pack Lid
Battery Pack Hanger 6optionalb
8 AA Lithium Batteries
Screws 6optionalb
1
2
3
4
5
6
7
No tools required
Tools Needed - Herramientas necesarias - Outillage nécessaire
Hanger Bracket Option
Screw Mount Option
1
7
2
1
6
AA
8
AA
AA
AA
AA
AA
AA
AA
AA
Everything needed to install your battery pack
2
Remove the Battery Pack Lid from the Battery Pack Base and insert batteries into the Battery Pack Lid
A
B
Align battery polarity with
labels on Battery Pack Lid
3
4
5
3
Reattach the Battery Pack Lid to the Battery
Pack Base by aligning the pegs with the
slots
4
Slide the Battery Pack Lid into the base
while depressing the button to lock
5
Attach the Battery Pack Hanger to the assembled Battery Pack
SNAP
B
A
1
Remove battery case lid; insert batteries into lid
Retire la cubierta de la caja de la batería, inserte las baterías en la cubierta
Retirer le couvercle du boîtier à piles, insérer les piles dans le couvercle
Shade
Headrail Bracket
Battery Pack Base
Battery Pack Lid
Battery Pack Hanger 6optionalb
8 AA Lithium Batteries
Screws 6optionalb
1
2
3
4
5
6
7
No tools required
Tools Needed - Herramientas necesarias - Outillage nécessaire
Hanger Bracket Option
Screw Mount Option
1
7
2
1
6
AA
8
AA
AA
AA
AA
AA
AA
AA
AA
Everything needed to install your battery pack
2
Remove the Battery Pack Lid from the Battery Pack Base and insert batteries into the Battery Pack Lid
A
B
Align battery polarity with
labels on Battery Pack Lid
3
4
5
3
Reattach the Battery Pack Lid to the Battery
Pack Base by aligning the pegs with the
slots
4
Slide the Battery Pack Lid into the base
while depressing the button to lock
5
Attach the Battery Pack Hanger to the assembled Battery Pack
SNAP
B
A
+
+
-
-
AA
AA
CAUT
ION: BA
TTERIES MUST BE INST
ALLED AS SHOWN.
FAILURE TO DO SO MA
Y RESU
LT IN INJU
RY AND WILL IN
VALDA
TE W
ARRANT
Y.
USE ONL
Y 8 AA BA
TTERIES • INST
ALL AS SHOW
N
AA
AA
CAUTION: BA
TTERIES MUST BE INST
ALLED AS SHOWN.
FAILURE TO DO SO
MA
Y RESU
LT IN INJU
RY
AND WIL
L IN
VALDA
TE W
ARRANT
Y.
USE ONL
Y 8 AA BA
TTERIES • INST
ALL AS SHOW
N
USE ONLY 8 AA LITHIUM BATTERIES. 12 VOLTS.
CAUTION: BATTERIES MUST BE INSTALLED AS SHOWN. FAILURE TO DO SO MAY RESULT IN INJURY AND WILL
INVALIDATE WARRANTY. DO NOT MIX TYPE, BRAND, OR OLD WITH NEW. DO NOT ATTEMPT TO RECHARGE.
UTILICE ÚNICAMENTE 8 BATERÍAS AA DE LITIO. 12 VOLTIOS
PRECAUCIÓN: LAS BATERÍAS SE DEBEN INSTALAR COMO SE MUESTRA. DE LO CONTRARIO, SE PUEDEN
PRODUCIR LESIONES Y SE ANULARÁ LA GARANTÍA. NO MEZCLE BATERÍAS DE DISTINTOS TIPOS O MARCAS NI
BATERÍAS USADAS CON BATERÍAS NUEVAS. NO INTENTE RECARGARLAS.
UTILISER UNIQUEMENT HUIT PILES AA AU LITHIUM. 12 VOLTS.
MISE EN GARDE : LES PILES DOIVENT ÊTRE INSTALLÉES COMME IL EST ILLUSTRÉ. LE NON-RESPECT DE CETTE
CONSIGNE PEUT ENTRAÎNER DES BLESSURES ET ANNULERA LA GARANTIE. NE MÉLANGEZ PAS LES TYPES, LES
MARQUES OU DE VIEILLES PILES AVEC DES PILES NEUVES. NE PAS TENTER DE RECHARGER.
Determine inside, inside with space-saving hanger, or outside mount, then
follow directions for that mounting style
Determine si utilizará montaje interno, montaje interno con soporte para
ahorrar espacio o montaje externo y luego siga las instrucciones para ese
estilo de montaje
Choisir le montage intérieur, le montage intérieur avec support compact ou le
montage extérieur, puis suivre les directives pour ce style de montage
Follow steps used in step 2, 2a.
Siga los pasos realizados en el paso 2 y 2a
Suivre les étapes utilisées dans 2, 2a
Outside mount • Montaje externo • Montage extérieur
Mount above the shade (outside mount)
Montaje por encima de la persiana (montaje externo)
Montage au-dessus du store (montage extérieur)
2b
Rear view • Vista posterior • Vue arrière
79074-00 (03/18) 18-8285
Springs Window Fashions, LLC • Middleton, WI 53562-1096
www.springswindowfashions.com

