(M)
(K)
(I)
(G)
(E)
(C)
(A)
(L)
(J)
(H)
(F)
(D)
(B)
(I)
(J)
Page 5 of 5
Customer Service: 800-367-2810
Online: www.ballarddesigns.com
(N)
(I)
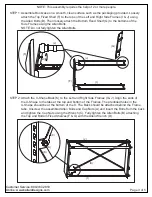
NOTE: Assemble the Bookcase in the desired location.
STEP 5: Insert the Shelf Guards (N) into the Left and Right Side Frames (I & J) by inserting the Guards
into the front holes of the Side Frames first and then sliding the back of the support into the
corresponding key hole in the Side Frames back. Make sure the button on the Guard
is facing inward and the Guards are in a horizontal position.
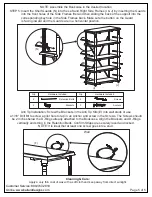
2
Retention Belts
2
Brackets
Qty.
2
2
Qty.
Hardware Included
Screws
Anchors
Hardware Included
Cleaning & Care:
Apply a very thin coat of wax with a soft cloth and keep away from direct sunlight.
Wall
(F)
Anti Tip Installation: Screw the Brackets in the Anti Tip Kits (E) into wall studs or use
a 1/16” Drill Bit to screw a pilot hole to tap in an Anchor and screw in the Screws. The Screws should
be 2 Inches below the D-Rings already attached to the Bookcase. Align the Brackets and D-Rings
vertically and string in the Retention Belts. Confirm Straps are securely laced and locked.
NOTE: It is ideal that at least one screw goes into a stud.


