background image

6

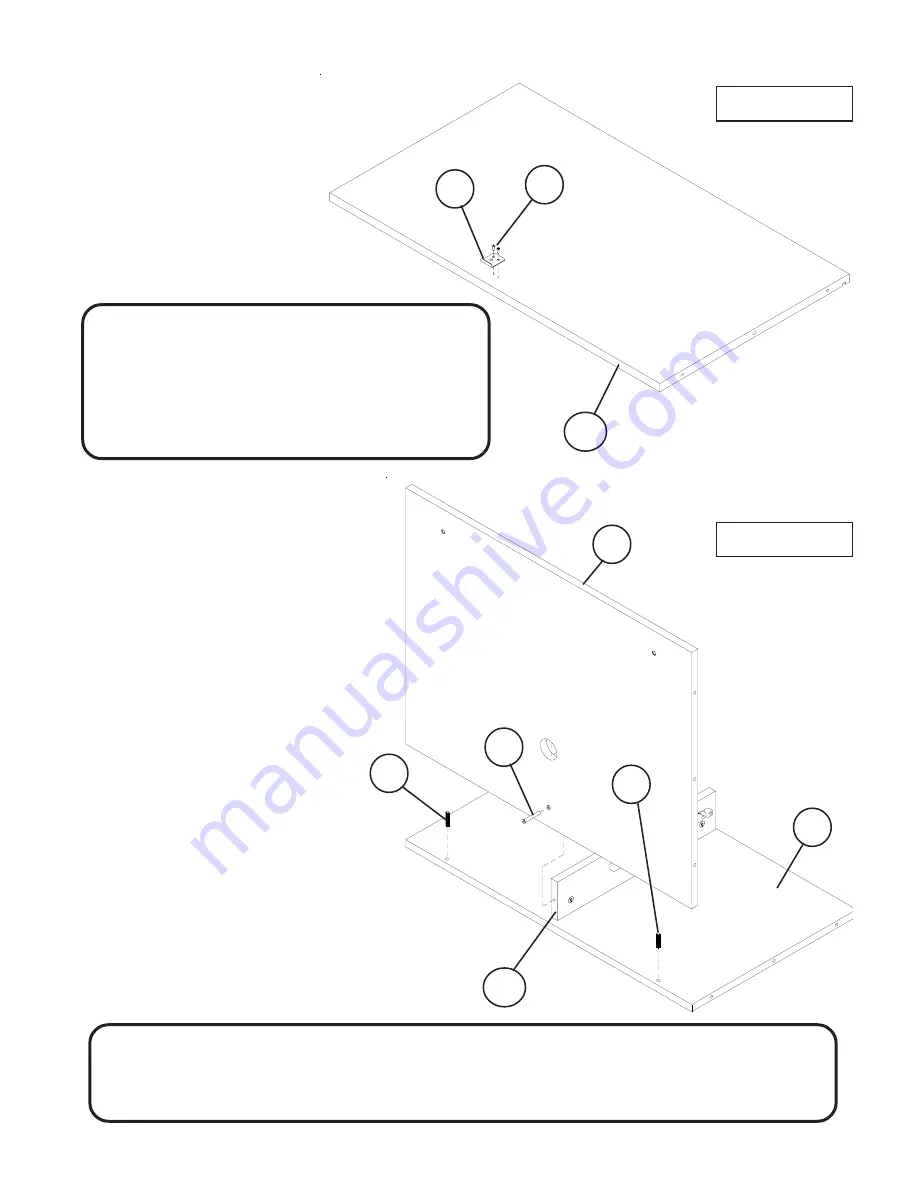
Slide Back Panel (P-5) over
the Wood Dowels (E) in the
Divider Panel (P-4)

Secure Back Panel (P-5) to
Drawer Support (P-14)
using 1 Wood Screw (A) as
shown in illustration # 5.

Tighten Screw using Allen
Wrench (S).

P-4

P-14

11.

12.

Place the Divider Panel (P-4) with the
Pre-drilled holes facing up and  install
2 each Dowels (E) into the holes  as
shown in illustration # 5.

P-5

A

Do not use unless all screws are tight. At least every six months, check all screws

to be sure they are tight. If parts are missing, broken, damaged, or worn, stop use

of the product until repairs are made by your dealer using factory authorized parts.

Illustration # 5

13.

14.

E

E

Should you require assistance during assembly,

please call our Customer Service Department

Monday - Friday  8 a.m. - 5 p.m.

Central Standard Time

Toll-Free Customer Service

1-800-749-2258

Illustration # 5

10.Place the Work Panel (P-3) with the

Pre-drilled holes facing up(slot facing down)
and install Lock Plate (L1) using 2 Screws
(A4) as shown in illustration # 5.

P-3

L1

A4

Summary of Contents for 89832

Page 1: ...34567890121234567890123456789012345678901212345678901234 123456789012345678901234567890121234567890123456789012345678901212345678901234 1234567890123456789012345678901212345678901234567890123456789012...

Page 2: ...Dowel 14 EA F Door Hinge 6 EA P 1 Left Side Panel 1 EA P 2 Right Side Panel 1 EA P 3 Work Panel 1 EA P 4 Divider Panel 1 EA P 5 Back Panel 1 EA P 6 Laminate Back 1 EA P 7 Top Panel 1 EA P 8 Bottom Pan...

Page 3: ...eve 1 EA R2 Grommet Cap 1 EA S Allen Wrench 1 EA Part Drawing Description Qty Part Drawing Description Qty 89832 Office in a Box Hardware List P 11 Removable Shelf 1 EA P 12 Keyboard Shelf 1 EA P 13 P...

Page 4: ...e Left Side Panel P 1 using 4 Screws A4 as shown in illustration 1 Install 5 Dowels E into the holes as shown in illustration 1 Illustration 1 1 2 3 Illustration 2 Top Bottom Left Side Right Side Atta...

Page 5: ...ce the Divider Panel P 4 with the Predrilled holes facing up and install 2 each Cam Posts D in the 2 holes as shown in illustration 4 Attach Drawer Support P 14 to Divider Panel P 4 as shown in illust...

Page 6: ...t At least every six months check all screws to be sure they are tight If parts are missing broken damaged or worn stop use of the product until repairs are made by your dealer using factory authorize...

Page 7: ...he Right Side P2 Attach Top Panel P7 to the Left Side P1 and the Right Side P2 using 4 Screws A and 2 Wood Dowels E as shown in illustration 7 19 20 21 Secure Back P5 to Bottom P8 using 2 Screws A6 Ti...

Page 8: ...as shown in illustration 8 Attach 1 Door Handle K to Right Door P 10 using 2 screws A1 25 26 27 24 Attach 1Door Handle K to Left Door P 10 using 2 screws A1 Attach 1 Caster W Bracket P using 1 Socket...

Page 9: ...h 1 KB Left Endcap H1 and 1 KB Right Endcap H2 P 24 H2 P 24 H1 H1 P 12 P 13 H2 Pull out Left Keyboard Slide P 20 and Right Keyboard Slide P 21 and attach 1 Keyboard Shelf P 12 using 4 each Screws A4 a...

Page 10: ...P 10 with the Right Side Panel P 2 and attach 3 Door Hinges F using 6 Short Wood Screws A3 in the pre drilled holes Secure 3 Door Hinges F to the Right Side Panel P 2 using 9 Short Wood Screws A3 as...

Page 11: ...ll Grommets Insert Grommet Sleeve R1 in Round opening in Back P 5 and as shown in illustration 17 Snap Grommet Cap R2 into Grommet Sleeve R1 as shown in illustration 17 Place 4 Metal Shelf Pins J in t...

Reviews: