background image

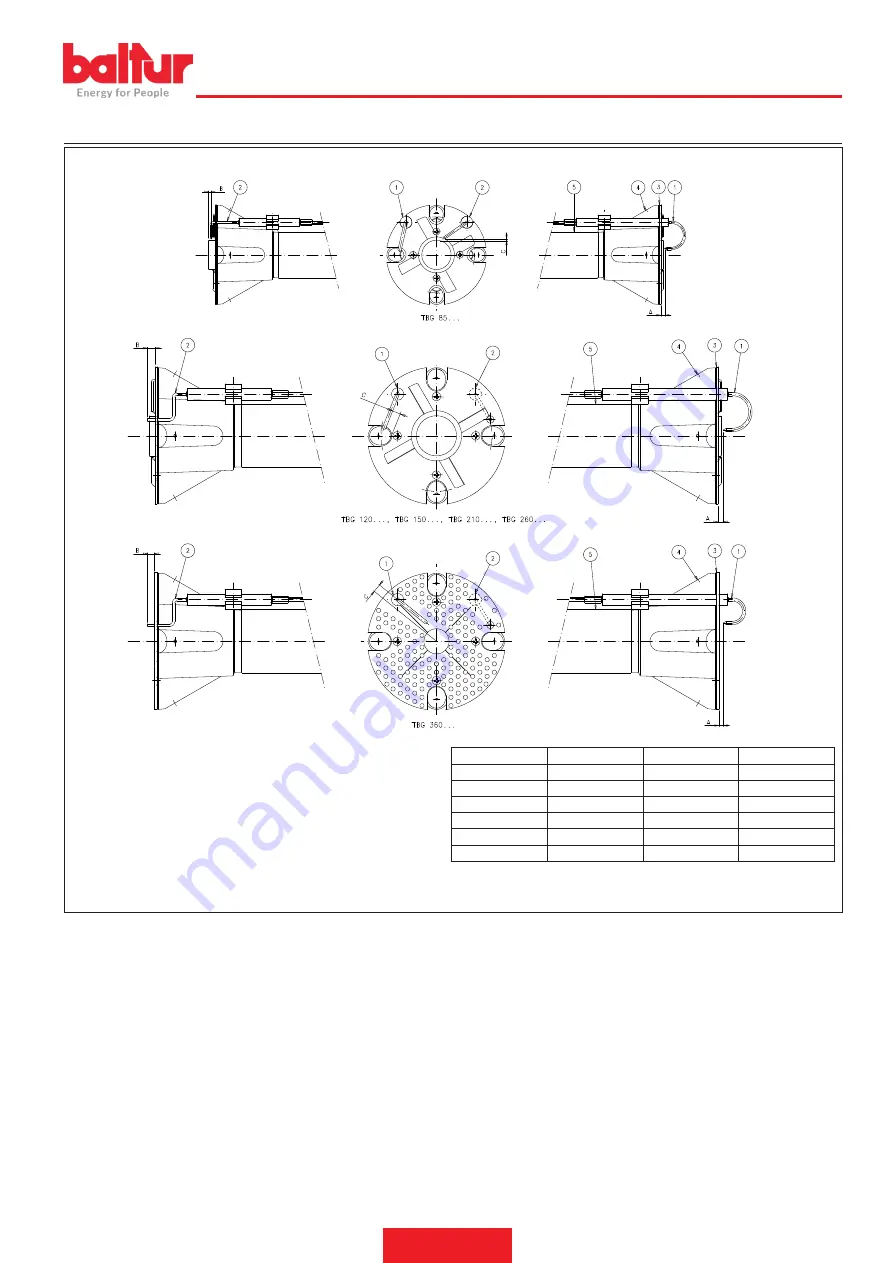
SCHEMA DI REGOLAZIONE DISTANZA DISCO ELETTRODI

0002934692

1 - Elettrodo ionizzazione

2 - Elettrodo accensione

3 - Disco fiamma

4 - Miscelatore

5 - Tubo mandata gas

Modello

A

B

C

TBG 85 MC

5

3

3

TBG 120 MC

5

5

-

TBG 150 MC

15

5

6

TBG 210 MC

5

5

-

TBG 260 MC

5

5

-

TBG 360 MC

5

5

10

ITALIANO

21 / 34

0006160008_201912

Summary of Contents for CE-0085BS0067

Page 1: ...GE GAS BURNERS ITALIANO Manuale istruzioni per l installazione l uso e la manutenzione IT Instruction manual for installation use and maintenance EN TBG 85 MC TBG 120 MC TBG 150 MC TBG 210 MC TBG 260 MC TBG 360 MC ISTRUZIONI ORIGINALI IT ORIGINAL INSTRUCTIONS IT 0006160008_201912 ...

Page 2: ......

Page 3: ...one del funzionamento della modulazione 15 Controllo tenuta valvole VPS 504 se presente 16 Regolazione aria sulla testa di combustione 17 Accensione e regolazione 17 Misurazione della corrente di ionizzazione 20 Schema di regolazione distanza disco elettrodi 21 Apparecchiatura di comando e controllo LME 22 Manutenzione 26 tempi di manutenzione 28 Vita attesa 29 Precisazioni sull uso del propano 30...

Page 4: ...GENERALI La data di produzione dell apparecchio mese anno sono indicati sulla targa identificazione bruciatore presente sull apparecchio L apparecchio non è adatto a essere usato da persone bambini compresi le cui capacità fisiche sensoriali o mentali siano ridotte oppure con mancanza di esperienza o di conoscenza l uso dell apparecchio è consentito a tali persone solo nel caso in cui possano bene...

Page 5: ...ocue quelle parti che potrebbero essere potenziali fonti di pericolo AVVERTENZE PER L AVVIAMENTO IL COLLAUDO L USO E LA MANUTENZIONE L avviamento il collaudo e la manutenzione devono essere effet tuati esclusivamente da personale professionalmente qualificato in ottemperanza alle disposizioni vigenti Fissato il bruciatore al generatore di calore accertarsi durante il collaudo che la fiamma generat...

Page 6: ...ondi zione della categoria di sovratensione III Sguainare l isolante esterno del cavo di alimentazione nella misura strettamente necessaria al collegamento evitando così che il filo possa venire a contatto con parti metalliche L uso di un qualsiasi componente che utilizza energia elettrica comporta l osservanza di alcune regole fondamentali quali non toccare l apparecchio con parti del corpo bagna...

Page 7: ...ca assorbita 60hz kW 1 6 2 3 2 Tensione di alimentazione 50 hz 3N 400V 10 3N 400V 10 3N 400V 10 Tensione di alimentazione 60 hz 3N 380V 10 3N 380V 10 3N 380V 10 Grado di protezione IP54 IP54 IP54 Rilevazione fiamma SONDA IONIZZAZIONE SONDA IONIZZAZIONE SONDA DI IONIZZAZIONE Apparecchiatura LME 22 LME 22 LME 22 Regolazione portata aria CAMMA MECCANICA CAMMA MECCANICA CAMMA MECCANICA Temperatura ari...

Page 8: ...W 4 2 6 5 10 4 Tensione di alimentazione 50 hz 3N 400V 10 3N 400V 10 3N 400V 10 Tensione di alimentazione 60 hz 3N 380V 10 3N 380V 10 3N 380V 10 Grado di protezione IP54 IP54 IP54 Rilevazione fiamma SONDA DI IONIZZAZIONE SONDA DI IONIZZAZIONE SONDA DI IONIZZAZIONE Apparecchiatura LME 22 LME 22 LME 22 Regolazione portata aria CAMMA MECCANICA CAMMA MECCANICA CAMMA MECCANICA Temperatura aria ambiente...

Page 9: ...bili gassosi 8 Pressione combustibili gassosi 9 Viscosità combustibili liquidi 10 Potenza motore ventilatore 11 Tensione di alimentazione 12 Grado di protezione 13 Paese di costruzione e numeri di certificato di omologazione 14 Data di produzione mese anno 15 16 Codice a barre matricola bruciatore DATI REGISTRAZIONE PRIMA ACCENSIONE Modello Data ora Tipo di gas Indice di Wobbe inferiore Potere cal...

Page 10: ...o contrario vanno consultati i costruttori Il bruciatore non deve operare al di fuori del campo di lavoro dato TBG 360 ME MC IMPORTANTE I campi di lavoro sono ottenuti su caldaie di prova rispondenti alla norma EN676 e sono orientativi per gli accoppiamenti bruciatore cal daia Per il corretto funzionamento del bruciatore le dimensioni della camera di combustione devono essere rispondenti alla norm...

Page 11: ...cco rampa gas TBG 360 MC 6 Quadro elettrico 7 Motore 8 Servomotore regolazione aria gas 9 Targa identificazione bruciatore 8 7 9 1 3 4 6 2 5 6 1 0002471570N1 10 QUADRO ELETTRICO 1 Apparecchiatura 2 Pressostato aria 3 Trasformatore d accensione 4 Contattore motore 5 Relè termico 6 Connettore 7 poli 7 Connettore 4 poli 8 Pannello sinottico 9 Quadro elettrico ITALIANO 9 34 0006160008_201912 ...

Page 12: ...80 170 200 1280 TBG 260 MC 795 375 420 570 400 170 200 1250 TBG 360 MC 820 400 420 610 390 220 200 1250 Modello D E Ø F Ø I I1 LØ M N Ø TBG 85 MC 175 400 180 178 280 280 250 325 M12 190 TBG 120 MC 200 450 224 219 320 320 280 370 M12 235 TBG 150 MC 200 450 240 219 320 320 280 370 M12 250 TBG 210 MC 200 450 250 219 320 320 280 370 M12 255 TBG 260 MC 200 450 250 219 320 320 280 370 M12 255 TBG 360 MC...

Page 13: ...ruciatore Per ottenere il miglior funzionamento del regolatore di pressione è opportuno che sia applicato sulla tubazione orizzontale dopo il filtro Il regolatore di pressione del gas deve essere regolato mentre il bru ciatore lavora alla massima portata La pressione in uscita deve essere regolata ad un valore leggermente inferiore a quella massima realizzabile quella che si ottiene avvitan do qua...

Page 14: ...el portellone caldaia MONTAGGIO RAMPA GAS Sono possibili diverse soluzioni di montaggio 8 8a 9 9a della rampa gas TBG 85 260 MC 8 8a TBG 360 MC 9 PERICOLO ATTENZIONE Con valvola di dimensioni notevoli esempio DN65 oppure DN80 prevedere un adeguato supporto per evitare sollecitazio ni eccessive al raccordo di attacco della rampa gas MONTAGGIO CORPO VENTILANTE Posizionare le semicerniere presenti su...

Page 15: ...te elettrica come previsto dalle normative di sicurezza vigenti Per i collegamenti elettrici linea e termostati vedere il relativo schema elettrico Sguainare l isolante esterno del cavo di alimentazione nella misura strettamente necessaria al collegamento evitando così che il filo possa venire a contatto con parti metalliche Per eseguire il collegamento del bruciatore alla linea di alimentazione p...

Page 16: ... trasparente sul quadro procedere posizionando i ganci in corrispondenza delle ri spettive sedi 9 far scorrere lo sportellino nella direzione indicata dalla freccia e riavvitare le viti 10 CAUTELA AVVERTENZE L apertura del quadro elettrico del bruciatore è consentita esclusivamente a personale professionalmente qualificato In caso di reti elettriche a 230 V fase fase se queste sono sbi lanciate la...

Page 17: ...di chiusura in sosta Nel caso in cui il dispositivo di controllo non rilevi la presenza di fiam ma l apparecchiatura si arresta in blocco di sicurezza 10 entro 3 secondi dall apertura della valvola principale In caso di bloccco di sicurezza le valvole vengono immediatamente richiuse Per sbloc care l apparecchiatura dalla posizione di sicurezza occorre premere il pulsante di sblocco 9 MotReg_002 7 ...

Page 18: ...ione a monte Volendo effettuarne la verifica inserire un manometro in corrispon denza della presa di pressione PA Se il ciclo di prova ha esito positivo dopo alcuni secondi si accende la lampada di consenso LC gialla Per ripartire è necessario sbloccare l apparecchiatura trmite il pulsan te luminoso LB Il fusibile è accessibile rimuovendo con un cacciavite il coperchietto situato vicino alle prese...

Page 19: ...G 260 MC 14 51 1 5 TBG 360 MC 12 49 1 5 Allentare la vite 1 Agire sulla vite 2 per posizionare la testa di combustione 3 rife rendosi all indice 4 Regolare la distanza x tra il valore minimo e massimo secondo quanto indicato in tabella ACCENSIONE E REGOLAZIONE Verificare che la tensione della linea elettrica corrisponda a quella richiesta dal costruttore e che tutti i collegamenti elettrici realiz...

Page 20: ... sia contrastata dalla corrente di scarica del trasformatore di accensione le due correnti hanno un percorso in comune sulla massa del bruciatore pertan to il bruciatore si porta in blocco per insufficiente ionizzazione In vertire l alimentazione lato 230V del trasformatore d accensione Altra causa di blocco può essere una insufficiente messa a terra della carcassa del bruciatore REGOLAZIONE DELLA...

Page 21: ...tore d accensione e non si aprono le valvole del gas e di conseguenza il bruciatore si arresta in blocco Sbloccare il bruciatore premendo l apposito pulsante e riportare la regolazione del pressostato ad un valore sufficiente per rilevare una pressione di aria leggermente inferiore alla effettiva pressione rileva ta alla potenza minima di funzionamento Sbloccare il bruciatore e verificare il corre...

Page 22: ...erminali di un microamperometro di scala adeguata e far ripartire il bruciatore Una volta comparsa la fiamma sarà pos sibile misurare il valore della corrente di ionizzazione il cui valore mi nimo per assicurare il funzionamento dell apparecchiatura è riportato nello schema elettrico specifico Terminata la misurazione ripristinare il ponticello in precedenza scollegato ITALIANO 20 34 0006160008_20...

Page 23: ...002934692 1 Elettrodo ionizzazione 2 Elettrodo accensione 3 Disco fiamma 4 Miscelatore 5 Tubo mandata gas Modello A B C TBG 85 MC 5 3 3 TBG 120 MC 5 5 TBG 150 MC 15 5 6 TBG 210 MC 5 5 TBG 260 MC 5 5 TBG 360 MC 5 5 10 ITALIANO 21 34 0006160008_201912 ...

Page 24: ...ondi il pulsante di sblocco un lampeggio veloce di colore rosso indicherà che la funzione è attiva analogamente per disattivare la funzione basterà premere per almeno 3 secondi il pulsante di sblocco la commutazione verrà indicata con luce gialla lampeggiante EK xxxxxxxx xxxxxxxx xxxxxxxx xxxxxxxx xxxxxxxx xxxxxxxx 3 s 7101z03e0305 Posizione di funzionamento interfaccia PC analizzatore diagnostica...

Page 25: ...le combustibile Malfunzionamento rilevatore fiamma Difettosità nella taratura del bruciatore assenza di combustibile Mancata accensione difettosità trasformatore di accensione 3 lampeggi On Malfunzionalità pressostato aria LP Mancanza segnale pressostato dopo T10 Contatto del pressostato LP incollato in posizione di riposo 4 lampeggi On Luce estranea durante la fase di accensione 5 lampeggi On Ass...

Page 26: ...cipale HS Contatto ausiliario relè ION Sonda di Ionizzazione K1 4 Relè Interni KL Fiamma bassa LK Serranda dell Aria LKP Posizione della serranda dell aria LP Pressostato aria LR Modulazione M Motore ventola MS Motore sincrono NL Carico nominale NT Alimentatore elettrico QRA Rivelatore di Fiamma QRC Rivelatore di fiamma blu bl br marrone sw nero R Termostato pressostato di controllo RV Dispositivo...

Page 27: ...II V Camma trasformatore accensione 40 Camma V IV Circa 5 10 1 Perno inserzione ed esclusione accoppiamento motore albero camme 2 Scala di riferimento 3 Indicatore di posizione 4 Camme regolabili Per modificare la regolazione delle camme utilizzate si agisce sui ri spettivi anelli I II III L indice dell anello indica sulla rispettiva scala di riferimento l angolo di rotazione impostato per ogni ca...

Page 28: ...ta di uscita gas rispetto agli elettrodi per evitare che gli stessi si trovino a mas sa con conseguente bloccaggio del bruciatore Occorrerà anche verificare che la scintilla dell elettrodo d accensione avvenga esclu sivamente tra lo stesso ed il disco in lamiera forata vedi schema di regolazione testa di combustione e distanza disco elettrodi per la versione senza pilota Nel caso si renda necessar...

Page 29: ...escritto dopo aver verificato la corretta posizione degli elet trodi di accensione e di ionizzazione CAUTELA AVVERTENZE All atto della chiusura del bruciatore tirare delicatamente verso il quadro elettrico mettendoli in leggera tensione i due cavi di accensione e di ionizzazione quindi sistemarli nelle apposite sedi 29 figura 2 Questo eviterà che i due cavi vengano dan neggiati dalla ventola duran...

Page 30: ...SAGGIO PATTINO E VITI ANNO LEVE TIRANTI SNODI SFERICI CONTROLLO EVENTUALI USURE LUBRIFICAZIONE COMPONENTI ANNO IMPIANTO ELETTRICO VERIFICA CONNESSIONI E SERRAGGIO MORSETTI ANNO INVERTER PULIZIA VENTOLA DI RAFFREDDAMENTO E SERRAGGIO MORSETTI ANNO SONDA CO PULIZIA E CALIBRAZIONE ANNO SONDA O2 PULIZIA E CALIBRAZIONE ANNO KIT ESTRAZIONE TESTA COM BUSTIONE VERIFICA USURA E FUNZIONALITÁ ANNO LINEA COMBU...

Page 31: ...segna o di pagamento sono indipendenti e non fanno riferi mento alla vita attesa di seguito indicata Per condizioni operative normali si intendono applicazioni su caldaie ad acqua e generatori di vapore oppure applicazioni industriali conformi alla norma EN 746 in ambienti con temperature nei limiti previsti dal presente manuale e con grado di inquinamento 2 conformemente all alle gato M della nor...

Page 32: ...enti b Esecuzione impianto del gas propano liquido per assicurare un corretto funzionamento in sicurezza bb La gassificazione naturale da batteria di bombole o serbatoio è utilizzabile solo per impianti di piccola potenza La capacità di erogazione in fase di gas in funzione delle dimensioni del serba toio e della temperatura minima esterna sono esposte solo a titolo indicativo nella seguente tabel...

Page 33: ...ilizzatore Riduttore di 2 salto Uscita 30 hPa mbar Portata il doppio del massimo richiesto dall utilizzatore Filtro a Y Filtro Filtro Presa di pressione Riduttore di 2 salto Uscita 30 hPa mbar Portata il doppio del massimo richiesto dall utilizzatore Filtro a Y Rubinetto a sfera Giunto antivibrante Bruciatore Caldaia a pavimento o murale Raccordo FORNITO DAL COSTRUTTORE A CURA DELL INSTALLATORE IT...

Page 34: ...fogata dall aria caso di prima accensione 3 La pressione del gas è insufficiente o eccessiva 4 Passaggio aria tra disco e testa troppo chiuso RIMEDIO 1 Invertire l alimentazione lato 230V del trasformatore di accensione e verificare con micro amperometro analogico 2 Sostituire il sensore fiamma 3 Correggere la posizione del sensore di fiamma e successivamente verificarne l efficienza inserendo il ...

Page 35: ...SCHEMI ELETTRICI ITALIANO 33 34 0006160008_201912 ...

Page 36: ...CONTAORE PA PRESSOSTATO ARIA Pm PRESSOSTATO DI MINIMA S1 INTERRUTTORE MARCIAARRESTO S2 PULSANTE SBLOCCO S4 SELETTORE AUT MAN S5 COMMUTATORE MIN O MAX SG INTERRUTTORE GENERALE T2 TERMOSTATO 2 STADIO TA TRASFORMATORE D ACCENSIONE TC TERMOSTATO CALDAIA TS TERMOSTATO DI SICUREZZA X1 MORSETTIERA BRUCIATORE X1B S CONNETTORE ALIMENTAZIONE X2B S CONNETTORE 2 STADIO X3 CONNETTORE Pm X4 CONNETTORE YP X8B S ...

Page 37: ...escription 15 VPS 504 valve tightness control if present 16 Air regulation on the combustion head 17 Starting up and regulation 17 Ionisation current measurement 20 Diagram for regulating the electrode disk distance 21 Control and command equipment LME 22 Maintenance 26 maintenance time 28 Expected lifespan 29 Specifications for propane use 30 Block diagram illustrating the principle of L P G pres...

Page 38: ...between 25 C and 55 C The storage time is 3 years GENERAL WARNINGS The equipment production date month year is written on the bur ner identification plate located on the equipment The equipment cannot be used by people including children with reduced physical sensory or mental capacities or lacking experien ce or know how The equipment use is allowed to such people only if they can have access to ...

Page 39: ...e main switch Cut off the fuel supply using the shut off valve and remove the control wheels from their position Render harmless any potentially dangerous parts WARNINGS FOR START UP TEST USE AND MAINTENANCE Start up test and maintenance of the equipment must only be car ried out by qualified technicians in compliance with current regu lations Once the burner is fixed to the heat generator make su...

Page 40: ...move the external insulating seal of the supply pipe necessary for the connection preventing the cable to touch metal parts The use of any electrically fed components entails complying with certain fundamental rules including the following do not touch the equipment with parts of the body that are wet or damp or with damp feet do not pull on electrical cables do not leave the equipment exposed to ...

Page 41: ...hz kW 1 6 2 2 8 Absorbed electrical power 60hz kW 1 6 2 3 2 50 Hz power supply voltage 3N 400V 10 3N 400V 10 3N 400V 10 60 Hz power supply voltage 3N 380V 10 3N 380V 10 3N 380V 10 Protection rating IP54 IP54 IP54 Flame detection IONISATION PROBE IONISATION PROBE IONISATION PROBE Control box LME 22 LME 22 LME 22 Air flow rate regulation MECHANICAL CAM MECHANICAL CAM MECHANICAL CAM Operating ambient...

Page 42: ...Absorbed electrical power 60hz kW 4 2 6 5 10 4 50 Hz power supply voltage 3N 400V 10 3N 400V 10 3N 400V 10 60 Hz power supply voltage 3N 380V 10 3N 380V 10 3N 380V 10 Protection rating IP54 IP54 IP54 Flame detection IONISATION PROBE IONISATION PROBE IONISATION PROBE Control box LME 22 LME 22 LME 22 Air flow rate regulation MECHANICAL CAM MECHANICAL CAM MECHANICAL CAM Operating ambient air temperat...

Page 43: ...d fuel power 7 Gaseous fuel power 8 Gaseous fuel pressure 9 Liquid fuel viscosity 10 Fan motor power 11 Power supply voltage 12 Protection rating 13 Country of origin and numbers of certificate of approval 14 Manufacturing date month year 15 16 Bar code serial number of burner DATA RECORDED DURING FIRST START UP Model Date Time Type of gas Lower Wobbe index Lower calorific power Min gas flow rate ...

Page 44: ... if not the manufactu rers must be consulted The burner shall not operate outside its specific operating range TBG 360 ME MC IMPORTANT The operating ranges are obtained from test boilers corresponding to Standard EN676 and are indicative of the burner boiler combina tion For correct working of the burner the size of the combustion chamber must correspond to current regulations if not the manufactu...

Page 45: ...n connector flange TBG 360 MC 6 Electrical panel 7 Motor 8 Air gas regulation servomotor 9 Burner identification plate 8 7 9 1 3 4 6 2 5 6 1 0002471570N1 10 ELECTRICAL PANEL 1 Control box 2 Air pressure switch 3 Ignition transformer 4 Motor contactor 5 Thermal relay 6 7 pole connector 7 4 pole connector 8 Synoptic panel 9 Electrical panel ENGLISH 9 34 0006160008_201912 ...

Page 46: ...0 170 200 1280 TBG 260 MC 795 375 420 570 400 170 200 1250 TBG 360 MC 820 400 420 610 390 220 200 1250 Model D E Ø F Ø I I1 LØ M N Ø TBG 85 MC 175 400 180 178 280 280 250 325 M12 190 TBG 120 MC 200 450 224 219 320 320 280 370 M12 235 TBG 150 MC 200 450 240 219 320 320 280 370 M12 250 TBG 210 MC 200 450 250 219 320 320 280 370 M12 255 TBG 260 MC 200 450 250 219 320 320 280 370 M12 255 TBG 360 MC 20...

Page 47: ...o ensure optimal functioning of the pressure regulator it should be applied to the horizontal pipe after the filter The gas pressure regulator must be regulated when the burner is working at the maximum flow The delivery pressure must be adjusted to a level slightly below the maximum attainable i e that obtained when the regulation screw is screwed in almost fully GAS TRAIN BLOCK DIAGRAM GAS TRAIN...

Page 48: ...ui table material ASSEMBLING THE GAS TRAIN The gas train can be assembled 8 8a 9 9a in different ways TBG 85 260 MC 260LX MC 8 8a TBG 360 MC LX MC 9 DANGER ATTENTION In case of very large valves e g DN65 or DN80 make sure there is a suitable support to prevent excessive stress on the gas train fitting ASSEMBLY OF VENTILATION SYSTEM Position the half hinge on the burner scroll in line with those on...

Page 49: ...ve 3 mm in accordance with current safety regulations Refer to the wiring diagram for electrical connections line and ther mostats Remove the external insulating seal of the supply pipe necessary for the connection preventing the cable to touch metal parts To carry out the connection of the burner to the power supply line proceed as follows Remove the cover by unscrewing the screws 1 without remov...

Page 50: ... transparent door on the panel properly position the hooks at their hooking points 9 slide the door in the direction indicated by the arrow and tighten the screws again 10 CAUTION WARNINGS Only professionally qualified personnel may open the burner electrical switchboard In case of phase phase 230V electrical grids if these latter are unbalanced the voltage between flame detection electrode and gr...

Page 51: ...event that the control device does not detect the presence of a flame the control box activates a safety lock out 10 within 3 se conds of the opening of the main gas valve In safety lock out mode the valves are immediately closed again To release the equipment from its safety position press the reset button 9 MotReg_002 7 6 8 34 MODULATION OPERATION DESCRIPTION When the burner is ignited at the mi...

Page 52: ...o carry out a check place a pressure gauge correspon ding to the PA pressure plug If the test circuit has a positive result the LC authorisation lamp yel low switches on after a few seconds In order to restart it is necessary to unlock the equipment using the LB light button The fuse can be accessed using a screwdriver to remove the cover that is located near the sockets for electrical connection ...

Page 53: ...14 51 1 5 TBG 260 MC 14 51 1 5 TBG 360 MC 12 49 1 5 Loosen the screw 1 Turn screw 2 to position the combustion head 3 referring to index 4 Adjust the distance x between the minimum and maximum accor ding to the indications in the table STARTING UP AND REGULATION Make sure that the mains voltage corresponds to the manufactu rer s requirements and that all electrical connections made at the installa...

Page 54: ...ion current is disturbed by the dischar ge current of the ignition transformer the two currents have a com mon path on the burner s mass so the burner locks out due to an insufficient ionisation Invert the supply 230V side of the ignition transformer This problem may also be caused by an insufficient ground con nection to the burner s casing ADJUSTING THE MAXIMUM POWER After ignition power adjustm...

Page 55: ...as valves and so the burner locks out To unlock the burner press the special push button and return the pressure switch regulator to a value sufficient for measuring an air pressure slightly below the actual air pressure detected in minimum output operation Release the burner and check that it starts up correctly Adjust the setting of the pressure switch to a level slightly below the actual air pr...

Page 56: ... minals a microammeter having a suitable scale to have the burner re start Once the flame has appeared it will be possible to measure the ionisation current the minimum value of which to ensure the working of the equipment is shown in the specific wiring diagram At the end of the measurement connect the jumper that has been disconnected ENGLISH 20 34 0006160008_201912 ...

Page 57: ...ISTANCE 0002934692 1 Ionisation electrode 2 Ignition electrode 3 Flame disc 4 Mixer 5 Gas delivery pipe Model A B C TBG 85 MC 5 3 3 TBG 120 MC 5 5 TBG 150 MC 15 5 6 TBG 210 MC 5 5 TBG 260 MC 5 5 TBG 360 MC 5 5 10 ENGLISH 21 34 0006160008_201912 ...

Page 58: ...for at least 3 seconds A quick red flashing indicates that the function is active Likewise hold the reset button down for at least 3 seconds to deactivate the function the switching will be indicated with a flashing yellow light EK xxxxxxxx xxxxxxxx xxxxxxxx xxxxxxxx xxxxxxxx xxxxxxxx 3 s 7101z03e0305 Operating position PC interface diagnostic analyser Colour code table Diagnostics Operating posit...

Page 59: ...On No flame at the end of the safe ignition time TSA Fuel valves malfunctioning Flame detector malfunctioning Incorrect burner calibration no fuel No ignition faulty ignition transformer 3 blinks On Faulty LP air pressure switch No pressure switch signal after T10 Contact of the LP pressure switch stuck in standby position 4 blinks On Extraneous light during the ignition phase 5 blinks On No signa...

Page 60: ...S Auxiliary contactor relay ION__tab_Ionisation probe K1 4 Internal Relays KL Low flame LK Air damper LKP Air damper position LP Air pressure switch LR Modulation M Fan motor MS Synchronous motor NL Rated load NT Electric power supply QRA Flame Detection QRC Blue flame detector bl blue br brown sw black R Control thermostat pressure switch RV Gas adjustment device SA SQN Actuator SB Safety limit t...

Page 61: ... air cam 30 IV III V Ignition transformer cam 40 Cam V IV Approx 5 10 1 Motor camshaft coupling On Off pin 2 Reference scale 3 Position indicator 4 Adjustable camshaft Use the corresponding rings to modify the adjustment of the utilized cams I II III The index of the ring indicate on the respective reference scale the rotation angle taken up for each cam ENGLISH 25 34 0006160008_201912 ...

Page 62: ...ffuser with respect to the electrodes making sure that they are not earthed which would result in the locking of the burner Verify also that the ignition electrode spark takes place exclusively between itself and the drilled disk see combustion head and electrode disk distance regulation diagram for the version without pilot If the combustion head needs to be cleaned remove the components followin...

Page 63: ...tions described above after having checked the correct position of ignition and ionisation electrodes CAUTION WARNINGS When closing the burner gently pull towards the electrical pa nel putting the two ignition and ionisation cables slightly in ten sion then arrange them into their housings 29 figure 2 This will ensure that the two cables do not get damaged by the fan during burner operation ENGLIS...

Page 64: ...ECK OF WEAR AND OPERATION GREASING OF SLIDING BLOCK AND SCREWS YEAR LEVERS TIE RODS BALL JOINTS CHECK OF ANY WEAR COMPONENT LUBRICATION YEAR ELECTRICAL SYSTEM CHECK OF CONNECTIONS AND TERMINAL TIGHTENING YEAR INVERTER COOLING FAN CLEANING AND TERMINAL TIGHTENING YEAR CO PROBE CLEANING AND CALIBRATION YEAR O2 PROBE CLEANING AND CALIBRATION YEAR COMBUSTION HEAD EX TRACTION KIT CHECKING WEAR AND OPER...

Page 65: ...n contracts and or delivery or payment notes if necessary are independent and do not refer to the expected lifespan stated below Normal operating conditions means applications on water boilers and steam generators or industrial applications compliant with the standard EN 746 in environments with temperatures within the limits provided for in this manual and with pollution degree 2 in compliance wi...

Page 66: ... walls in compliance with the local exiting rules b Carrying out the propane gas system to ensure correct safe operation bb Natural gasification from sets of cylinders or a tank can be used only in low power systems Gas supply capacity on the basis of tank size and minimum outdoor temperature are shown in the table below as an approximate indication only Minimum tempera ture 15 C 10 C 5 C 0 C 5 C ...

Page 67: ...ired by the user 2nd step reducer Output 30 hPa mbar Flow rate double the maximum required by the user Y filter Filter Filter Pressure intake 2nd step reducer Output 30 hPa mbar Flow rate double the maximum required by the user Y filter Ball cock Vibration proof joint Burner Free standing or wall mounted boiler Pipe fitting SUPPLIED BY THE MANUFACTURER TO BE CARRIED OUT BY THE INSTALLER ENGLISH 31...

Page 68: ...e of first ignition 3 The gas pressure is insufficient or exces sive 4 Air flow between disk and head too nar row REMEDY 1 Invert the ignition transformer power supply 230V side and check using an analogue micro ammeter 2 Replace the flame sensor 3 Correct the position of the flame sensor and then check its efficiency by connecting the analogue micro ammeter 4 Check visually and using the instrume...

Page 69: ...WIRING DIAGRAMS ENGLISH 33 34 0006160008_201912 ...

Page 70: ...AXIMUM PRESSURE SWITCH P1 HOUR METER PA AIR PRESSURE SWITCH Pm MINIMUM PRESSURE SWITCH S1 START STOP SWITCH S2 RELEASE BUTTON S4 AUT MAN SELECTOR S5 MIN O MAX SWITCH SG MAIN SWITCH T2 2ND STAGE THERMOSTAT TA IGNITION TRANSFORMER TC BOILER THERMOSTAT TS SAFETY THERMOSTAT X1 BURNER TERMINAL BOARD X1B S POWER SUPPLY CONNECTOR X2B S 2nd STAGE CONNECTOR X3 Pm CONNECTOR X4 YP CONNECTOR X8B S VPS 504 CON...

Page 71: ......

Page 72: ...t Il presente catalogo riveste carattere puramente indicativo La casa pertanto si riserva ogni possibilità di modifica dei dati tecnici e di quant altro in esso riportato Information contained in this catalogue is not binding The manufacturer reserves the right to change the technical data and any other data it contains ...

Reviews: