background image

ITALIANO

28 / 34

0006160258_201802

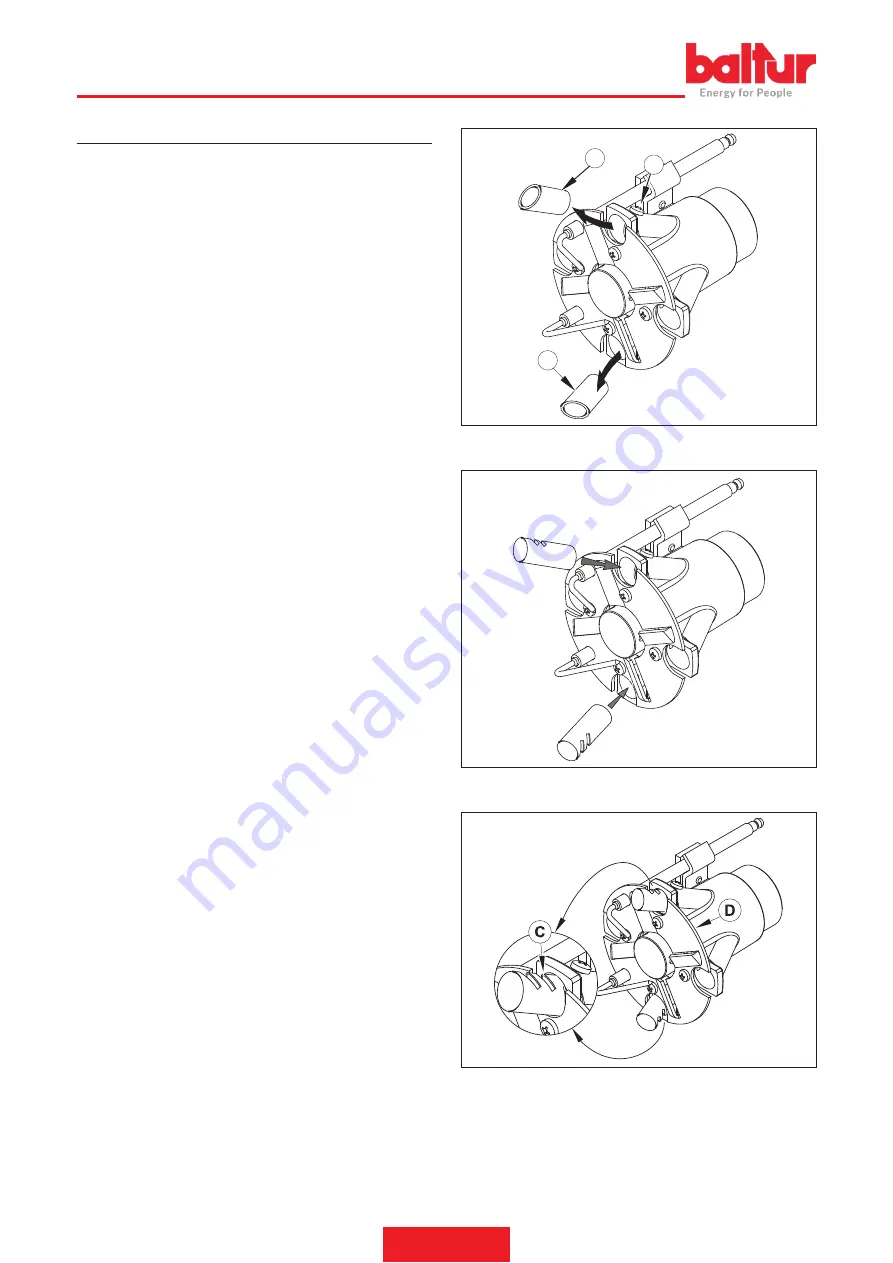
ISTRUZIONI DI MONTAGGIO RIDUZIONI PER GPL

Nel  caso  di  funzionamento  con  combustibile  GPL  inserire  le 

apposite riduzioni fornite a corredo del bruciatore.

Per il montaggio delle riduzioni seguire le seguenti indicazioni.

0002935830a

A

1

A

Dopo aver allentato le viti di fissaggio (1) rimuovere le riduzioni (A) 

dalle rispettive sedi.

0002935830b

Inserire le due riduzioni (B) con le feritoie rivolte verso l'esterno 

del  miscelatore.

0002935830c

Posizionare  le  feritoie  (C)  a  filo  del  disco  fiamma  (D)  come 

rappresentato in figura.

Bloccare in modo adeguato le nuove riduzioni agendo sulle 

rispettive viti.

Summary of Contents for TBG 35P

Page 1: ...WO STAGE GAS BURNERS ITALIANO Manuale istruzioni per l installazione l uso e la manutenzione IT Instruction manual for installation use and maintenance EN TBG 35P ISTRUZIONI ORIGINALI IT ORIGINAL INSTRUCTIONS IT 0006160258_201802 ...

Page 2: ......

Page 3: ...egolazione gas metano 16 Regolazione aria sulla testa di combustione 19 Regolazione aria manuale sulla testa di combustione 19 Corrente di rilevazione fiamma 20 Schema di regolazione testa di combustione e distanza disco elettrodi 20 Apparecchiatura di comando e controllo LME 21 SERVOMOTORI REGOLAZIONE ARIA COMBUSTIBILE 24 Manutenzione 25 tempi di manutenzione 26 Vita attesa 27 Istruzioni di monta...

Page 4: ...i NOx V per inverter FGR per ricircolazione esterna fumi rispettano i requisiti minimi imposti dalle Direttive e Regolamenti europei UE 2016 426 R A G 2014 30 UE C E M 2014 35 UE D B T 2006 42 CE D M e sono conformi alle Norme Europee EN 676 2008 gas e misti lato gas EN 267 2008 misti lato gasolio EN 60335 1 2012 01 EC 2014 01 EN 60335 2 102 EN 60204 1 Cento 15 Marzo 2018 Inizio validità 21 04 201...

Page 5: ...ggio è di 3 anni AVVERTENZE GENERALI La data di produzione dell apparecchio mese anno sono indicati sulla targa identificazione bruciatore presente sull apparecchio L apparecchio non è adatto a essere usato da persone bambini compresi le cui capacità fisiche sensoriali o mentali siano ridotte oppure con mancanza di esperienza o di conoscenza l uso dell apparecchio è consentito a tali persone solo ...

Page 6: ...do dalla loro sede Rendere innocue quelle parti che potrebbero essere potenziali fonti di pericolo AVVERTENZE PER L AVVIAMENTO IL COLLAUDO L USO E LA MANUTENZIONE L avviamento il collaudo e la manutenzione devono essere effettuati esclusivamente da personale professionalmente qualificato in ottemperanza alle disposizioni vigenti Fissato il bruciatore al generatore di calore accertarsi durante il c...

Page 7: ...tori prese multiple e o prolunghe per l alimentazione generale dell apparecchio alla rete elettrica Prevedere un interruttore onnipolare con distanza d apertura dei contatti uguale o superiore a 3 mm per l allacciamento alla rete elettrica come previsto dalle normative di sicurezza vigenti condizione della categoria di sovratensione III Per l alimentazione elettrica del bruciatore utilizzare esclu...

Page 8: ...z kW 0 37 MOTORE VENTOLA 60Hz kW 0 37 POTENZA ELETTRICAASSORBITA 50Hz kW 0 59 POTENZA ELETTRICAASSORBITA 60Hz kW 0 55 TENSIONE DI ALIMENTAZIONE 50 Hz 1N 230V 10 TENSIONE DI ALIMENTAZIONE 60 Hz 1N 220V 10 GRADO DI PROTEZIONE IP 40 RILEVAZIONE FIAMMA SONDA DI IONIZZAZIONE APPARECCHIATURA LME22 REGOLAZIONE PORTATAARIA servomotore elettrico PRESSIONE SONORA dBA 77 POTENZA SONORA dBA 88 PESO CON IMBALL...

Page 9: ...e sociale azienda 3 Codice prodotto 4 Modello bruciatore 5 Matricola 6 Potenza combustibili liquidi 7 Potenza combustibili gassosi 8 Pressione combustibili gassosi 9 Viscosità combustibili liquidi 10 Potenza motore ventilatore 11 Tensione di alimentazione 12 Grado di protezione 13 Paese di costruzione e numeri di certificato di omologazione 14 Data di produzione mese anno 15 16 Codice a barre matr...

Page 10: ... 5 Coperchio chiocciola 6 Flangia attacco rampa gas 7 Quadro elettrico 8 Motore 9 Servomotore regolazione aria 10 Pressostato aria 11 Targa identificazione bruciatore 7 9 8 9a 10 2 3 5 1 4 0002471231N1 6 11 W QUADRO ELETTRICO 12 Trasformatore d accensione 13 Pulsate di sblocco 0 Apparecchiatura 1 Connettore 7 poli 2 Connettore 4 poli 0002936140 5 1 2 3 4 ...

Page 11: ...TANTE I campi di lavoro sono ottenuti su caldaie di prova rispondenti alla norma EN676 e sono orientativi per gli accoppiamenti bruciatore caldaia Per il corretto funzionamento del bruciatore le dimensioni della camera di combustione devono essere rispondenti alla normativa vigente in caso contrario vanno consultati i costruttori Il bruciatore non deve operare al di fuori del campo di lavoro dato ...

Page 12: ... DIMENSIONI DI INGOMBRO ØF B2 D ØE B6 0002471231N2 C B1 B A2 A1 A I M N I L 45 45 W Modello A A1 A2 B B1 B2 B6 C TBG 35P 440 210 230 378 270 108 160 860 Modello D E Ø F Ø IØ I1 LØ M N Ø TBG 35P 140 300 137 133 215 215 200 245 M12 145 ...

Page 13: ...a d aria comburente con serranda a farfalla per la regolazione della portata d aria Flangia d attacco al generatore scorrevole per adattare la sporgenza della testa ai vari tipi di generatori di calore Pressostato aria che assicura la presenza dell aria comburente Rampa gas principale in versione CE composta da valvola di funzionamento e di sicurezza ad azionamento elettromagnetico pressostato di ...

Page 14: ...iatore Per ottenere il miglior funzionamento del regolatore di pressione è opportuno che lo stesso sia applicato su tubazione orizzontale dopo il filtro Il regolatore di pressione del gas deve essere regolato mentre lavoraallamassimaportataeffettivamenteutilizzatadalbruciatore La pressione in uscita deve essere regolata ad un valore leggermente inferiore a quella massima realizzabile APPLICAZIONE ...

Page 15: ... si desidera invertire il lato di ingresso rampa per consentire il montaggio della rampa gas secondo la configurazione 1 seguire la procedura descritta al paragrafo Predisposizione pre attacco rampa verso l alto Scegliere la posizione più idonea in base alla conformazione del locale caldaia e alla posizione di ingresso della tubazione gas 0002936660 1 2 3 16 17 0002936600 15 14 18 8 19 20 00029366...

Page 16: ...o di alimentazione nella misura strettamente necessaria al collegamento evitando così che il filo possa venire a contatto con parti metalliche Per eseguire il collegamento del bruciatore alla linea di alimentazione procedere come segue Inserire il connettore a 7 e 4 poli nelle apposite prese situate al di sotto della basetta di supporto quadro elettrico Per accedere ai componenti del quadro svitar...

Page 17: ...hiusi la tensione raggiunge l apparecchiatura di comando e controllo che avvia il bruciatore Viene così inserito il motore del ventilatore per effettuare la preventilazione della camera di combustione Contemporaneamente si ha la rotazione del servomotore di comando 9 che porta la farfalla del gas e la serranda aria mediante l azione del leveraggio 11 nella posizione di apertura corrispondente al s...

Page 18: ...re un controllo dell apparecchio alla prima messa in funzione dopo ogni revisione e dopo che l impianto è rimasto inattivo per lungo tempo Prima di qualsiasi operazione d accensione verificare che la camera di combustione sia libera da gas effettuando un tentativo di avviamento senza immissione di gas si verifichi un arresto di blocco alla fine del tempo di sicurezza o più ripetizioni di ciclo fin...

Page 19: ...ausilio di chiave e controchiave Può capitare che la corrente di ionizzazione sia contrastata dalla corrente di scarica del trasformatore di accensione le due correnti hanno un percorso in comune sulla massa del bruciatore pertanto il bruciatore si porta in blocco per insufficiente ionizzazione Invertire l alimentazione lato 230V del trasformatore d accensione Altra causa di blocco può essere una ...

Page 20: ... pressostato ad un valore sufficiente per rilevare una pressione di aria esistente durante la fase di preventilazione PRESSOSTATI DI CONTROLLO DELLA PRESSIONE DEL GAS Il pressostato di controllo della pressione minima utilizza il contatto NO normalmente aperto che si trova chiuso quando il pressostato rileva una pressione superiore a quella a cui è regolato La regolazione dei pressostati di minima...

Page 21: ...ustioneinunaposizioneintermedia accendendoilbruciatore per una regolazione orientativa come esposto precedentemente Spostare in avanti o indietro la testa di combustione in modo da avere un flusso d aria adeguato all erogazione Raggiunta l erogazione masssima desiderata si provvede a correggere la posizione del dispositivo che chiude l aria sulla testa di combustione spostandolo in avanti o indiet...

Page 22: ...ualora si voglia misurare la corrente di ionizzazione bisogna collegare un microamperometro in serie al cavetto dell elettrodo di ionizzazione aprendo il connettore C vedi schema elettrico SCHEMA DI REGOLAZIONE TESTA DI COMBUSTIONE E DISTANZA DISCO ELETTRODI 0002935683_TBG35 TBG 35 E 1 Elettrodo ionizzazione 2 Elettrodo accensione 3 Disco fiamma 4 Miscelatore 5 Tubo mandata gas E ATTENZIONE uscita...

Page 23: ...iagnosi premere per almeno 3 secondi il pulsante di sblocco un lampeggio veloce di colore rosso indicherà che la funzione è attiva analogamente per disattivare la funzione basterà premere per almeno 3 secondi il pulsante di sblocco la commutazione verrà indicata con luce gialla lampeggiante EK xxxxxxxx xxxxxxxx xxxxxxxx xxxxxxxx xxxxxxxx xxxxxxxx 3 s 7101z03e0305 Posizione di funzionamento interfa...

Page 24: ...urezza TSA Malfunzionamento valvole combustibile Malfunzionamento rilevatore fiamma Difettosità nella taratura del bruciatore assenza di combustibile Mancata accensione difettosità trasformatore di accensione 3 lampeggi On Malfunzionalità pressostato aria LP Mancanza segnale pressostato dopo T10 Contatto del pressostato LP incollato in posizione di riposo 4 lampeggi On Luce estranea durante la fas...

Page 25: ...essostato gas H Interruttore principale HS Contatto ausiliario relè ION Sonda di Ionizzazione K1 4 Relè Interni KL Fiamma bassa LK Serranda dell Aria LKP Posizione della serranda dell aria LP Pressostato aria LR Modulazione M Motore ventola MS Motore sincrono NL Carico nominale NT Alimentatore elettrico QRA Rivelatore di Fiamma QRC Rivelatore di fiamma blu bl br marrone sw nero R Termostato presso...

Page 26: ... regolazione aria secondo stadio 7 Collegamenti elettrici 8 Indice di riferimento Per modificare la regolazione delle camme agire sulle rispettive viti L indice dell anello rosso indica sulla rispettiva scala di riferimento l angolo di rotazione impostato per ogni camma 5 4 3N23 1 3 9 2 M 6 7 8 0 30 60 30 60 30 60 0 0 30 60 90 120 30 60 90 120 30 60 90 120 8 7 1 6 5 4 3 2 0002936210 ...

Page 27: ... nel seguente modo Svitare le viti di fissaggio 6 e rimuovere il coperchio 11 Assicurarsi che la piastrina mobile 23 sia tenuta bloccata dalla vite 8 Questo consentirà una volta terminate le operazioni di manutenzione dirisistemareilgruppomiscelazionenellastessa posizione a cui era stato precedentemente regolato Svitare la vite 24 che fissa l asta di avanzamento del gruppo alla piastrina mobile Do...

Page 28: ...INETTI ANNO CAMMA MECCANICA VERIFICA USURA E FUNZIONALITÁ INGRASSAGGIO PATTINO E VITI ANNO LEVE TIRANTI SNODI SFERICI CONTROLLO EVENTUALI USURE LUBRIFICAZIONE COMPONENTI ANNO IMPIANTO ELETTRICO VERIFICA CONNESSIONI E SERRAGGIO MORSETTI ANNO INVERTER PULIZIA VENTOLA DI RAFFREDDAMENTO E SERRAGGIO MORSETTI ANNO SONDA CO PULIZIA E CALIBRAZIONE ANNO SONDA O2 PULIZIA E CALIBRAZIONE ANNO LINEA COMBUSTIBI...

Page 29: ...imento alla vita attesa di seguito indicata Per condizioni operative normali si intendono applicazioni su caldaie ad acqua e generatori di vapore oppure applicazioni industriali conformi alla norma EN 746 in ambienti con temperature nei limiti previsti dal presente manuale e con grado di inquinamento 2 conformemente all allegato M della norma EN 60335 1 Componente di sicurezza Vita attesa di proge...

Page 30: ...iduzioni seguire le seguenti indicazioni 0002935830a A 1 A Dopo aver allentato le viti di fissaggio 1 rimuovere le riduzioni A dalle rispettive sedi 0002935830b Inserire le due riduzioni B con le feritoie rivolte verso l esterno del miscelatore 0002935830c Posizionare le feritoie C a filo del disco fiamma D come rappresentato in figura Bloccare in modo adeguato le nuove riduzioni agendo sulle risp...

Page 31: ...ionamento in sicurezza La gassificazione naturale da batteria di bombole o serbatoio è utilizzabile solo per impianti di piccola potenza La capacità di erogazione in fase di gas in funzione delle dimensioni del serbatoio e della temperatura minima esterna sono esposte solo a titolo indicativo nella seguente tabella Temperatura minima 15 C 10 C 5 C 0 C 5 C Serbatoio 990 l 1 6 Kg h 2 5 Kg h 3 5 Kg h...

Page 32: ... del massimo richiesto dall utilizzatore Riduttore di 2 salto Uscita 30 hPa mbar Portata il doppio del massimo richiesto dall utilizzatore Filtro a Y Filtro Filtro Presa di pressione Riduttore di 2 salto Uscita 30 hPa mbar Portata il doppio del massimo richiesto dall utilizzatore Filtro a Y Rubinetto a sfera Giunto antivibrante Bruciatore Caldaia a pavimento o murale Raccordo FORNITO DAL COSTRUTTO...

Page 33: ... gas non è stata adeguatamente sfogata dall aria caso di prima accensione 3 La pressione del gas è insufficiente o eccessiva 4 Passaggio aria tra disco e testa troppo chiuso RIMEDIO 1 Invertire l alimentazione lato 230V del trasformatore di accensione e verificare con micro amperometro analogico 2 Sostituire il sensore fiamma 3 Correggere la posizione del sensore di fiamma e successivamente verifi...

Page 34: ...ITALIANO 32 34 0006160258_201802 ...

Page 35: ...A FUNZIONAMENTO RESISTENZE AUSILIARIE H1 SPIA DI FUNZIONAMENTO MV MOTORE VENTOLA P1 CONTAORE PA PRESSOSTATO ARIA PG PRESSOSTATO GAS TA TRASFORMATORE D ACCENSIONE TC TERMOSTATO CALDAIA TS TERMOSTATO DI SICUREZZA T2 TERMOSTATO 2 STADIO Y1 Y2 ELETTROVALVOLE 1 2 STADIO Y10 SERVOMOTORE ARIA A rchiesta Senza T2 Corrente ionizzazione minima 3 µA L1 L2 L3 Fasi N Neutro Terra ...

Page 36: ...ITALIANO 34 34 0006160258_201802 ...

Page 37: ...gulation 16 Air regulation on the combustion head 19 Manual air regulation on the combustion head 19 Flame detection current 20 Diagram for regulating the combustion head and the electrode disk distance 20 Control and command equipment LME 21 AIR FUEL ADJUSTMENT SERVOMOTORS 24 Maintenance 25 maintenance time 26 Expected lifespan 27 Reducers assembly instructions for LPG 28 Specifications for propa...

Page 38: ...verter FGR for fume external recirculation respect the minimal regulations of the European Directives and Regulations UE 2016 426 R A G 2014 30 UE C E M 2014 35 UE D B T 2006 42 CE D M and have been designed and tested in accordance with the European Standards EN 676 2008 gas and dual fuel gas side EN 267 2008 dual fuel diesel side EN 60335 1 2012 01 EC 2014 01 EN 60335 2 102 EN 60204 1 Cento 15 M...

Page 39: ...rd conditions with temperature between 25 C and 55 C The storage time is 3 years GENERAL WARNINGS The equipment production date month year is written on the burner identification plate located on the equipment The equipment cannot be used by people including children with reduced physical sensory or mental capacities or lacking experience or know how The equipment use is allowed to such people onl...

Page 40: ...necting the power cable from the main switch Cut off the fuel supply using the shut off valve and remove the control wheels from their position Render harmless any potentially dangerous parts WARNINGS FOR START UP TEST USE AND MAINTENANCE Start up test and maintenance of the equipment must only be carried out by qualified technicians in compliance with current regulations Once the burner is fixed ...

Page 41: ... the equipment s power supply For the mains supply connection is required an omnipolar switch with a contact opening gap equal or above 3 mm in accordance with current safety regulations condition of overvoltage category III For burner electricity supply use double insulation cables only with external isolation at least 1 mm thick Removetheexternalinsulatingsealofthesupplypipenecessary for the con...

Page 42: ...NS mg kWh 50Hz FAN MOTOR kW 0 37 60Hz FAN MOTOR kW 0 37 ABSORBED ELECTRICAL POWER 50Hz kW 0 59 ABSORBED ELECTRICAL POWER 60Hz kW 0 55 50 Hz POWER SUPPLY VOLTAGE 1N 230V 10 60 Hz POWER SUPPLY VOLTAGE 1N 220V 10 PROTECTION RATING IP 40 FLAME DETECTION IONISATION PROBE EQUIPMENT LME22 AIR FLOW RATE REGULATION electric servomotor SOUND PRESSURE dBA 77 SOUND POWER dBA 88 WEIGHT WITH PACKING kg 30 WEIGH...

Page 43: ...bru 8 9 10 13 16 15 1 Company logo 2 Company name 3 Product code 4 Burner model 5 Serial number 6 Liquid fuel power 7 Gaseous fuel power 8 Gaseous fuel pressure 9 Liquid fuel viscosity 10 Fan motor power 11 Power supply voltage 12 Protection rating 13 Country of origin and numbers of certificate of approval 14 Manufacturing date month year 15 16 Bar code serial number of burner DATA RECORDED DURIN...

Page 44: ...t device 5 Scroll cover 6 Gas train connector flange 7 Electrical panel 8 Motor 9 Air regulation servomotor 10 Air pressure switch 11 Burner identification plate 7 9 8 9a 10 2 3 5 1 4 0002471231N1 6 11 W ELECTRICAL PANEL 12 Ignition transformer 13 Reset button 0 Control box 1 7 pole connector 2 4 pole connector 0002936140 5 1 2 3 4 ...

Page 45: ...PN TBG 35 MC ME IMPORTANT The operating ranges are obtained from test boilers corresponding to Standard EN676 and are indicative of the burner boiler combination For correct working of the burner the size of the combustion chamber must correspond to current regulations if not the manufacturers must be consulted The burner shall not operate outside its specific operating range ...

Page 46: ...1802 OVERALL DIMENSIONS ØF B2 D ØE B6 0002471231N2 C B1 B A2 A1 A I M N I L 45 45 W Model A A1 A2 B B1 B2 B6 C TBG 35P 440 210 230 378 270 108 160 860 Model D E Ø F Ø IØ I1 LØ M N Ø TBG 35P 140 300 137 133 215 215 200 245 M12 145 ...

Page 47: ...sed by Combustion air intake with throttle gate for the regulation of the air flow rate Mounting flange to the sliding generator to adapt the protuberance of the head to various types of heating generators Air pressure switch to ensure the presence of combustion air Main gas train in EC version consisting of an operating and safety valve with electro magnetic operation minimum pressure switch pres...

Page 48: ...pressure regulator it should be applied to the horizontal pipe after the filter The gas pressure regulator must be adjusted when it is working at the maximum output actually used by the burner The delivery pressure must be adjusted to a level slightly below the maximum obtainable BURNER CONNECTION TO THE BOILER HEAD UNIT ASSEMBLY Position the insulating gasket 13 on the sleeve by inserting the cor...

Page 49: ...ish to invert the direction of train entrance to allow the gas train to be assembled in configuration 1 follow the procedure described in the section entitled Preparation for connection with train turned upward Choose the most rational position for the set up of the boiler room and the position in which the gas pipeline arrives 0002936660 1 2 3 16 17 0002936600 15 14 18 8 19 20 0002936610 ...

Page 50: ...tingsealofthesupplypipenecessary for the connection preventing the cable to touch metal parts To carry out the connection of the burner to the power supply line proceed as follows Insert the two 7 and 4 pole connectors into the appropriate sockets located below the electrical switchboard support base To reach the electrical components loosen the two screws 6 gently pull back the cover to detach th...

Page 51: ...the control box which starts the burner This turns on the fan motor for pre ventilating the combustion chamber At the same time the rotation of the command servomotor 9 occurs which activates the gas throttle and the air damper through the action of leverage 11 in the opening position corresponding to the second stage The pre ventilation phase comes only with the air damper in the second stage pos...

Page 52: ...ction Carry out a check of the equipment before commissioning after each overhaul and after the equipment has been inactive for a long time Verify the combustion chamber does not contain gas before any ignition operation Attempting a start up without introducing gas verify a lock out stop occurs at the end of the safety time or more cycle repetitions up to a maximum of 10 depending on the settings...

Page 53: ...t the ionisation current is disturbed by the discharge current of the ignition transformer the two currents have a common path on the burner s mass Therefore the burner locks out due to an insufficient ionisation Invert the supply 230V side of the ignition transformer Another lock out cause might be caused by an insufficient ground connection to the burner s casing SECOND STAGE POWER REGULATION Af...

Page 54: ... measure the air pressure existing during the pre ventilation phase GAS CONTROL PRESSURE SWITCHES The minimum value pressure switch makes use of the NO normally open contact which is closed when the pressure switch detects a pressure higher than its own setting Adjustment of minimum and maximum pressure values on the pressure switches must be performed when testing the burner on the basis of the p...

Page 55: ...ate position igniting the burner for an indicative regulation as explained above Move the combustion head forward or backward so as to have an air flow suitable for the delivery When the maximum required supply is reached correct the position of the device closing the air on the combustion head by moving it forwards or backwards so as to have a suitable air flow for the supply with suction air adj...

Page 56: ...Should the ionisation current need to be measured a microammeter must be connected in series to the ionisation electrode lead by opening the connector C see wiring diagram DIAGRAM FOR REGULATING THE COMBUSTION HEAD AND THE ELECTRODE DISK DISTANCE 0002935683_TBG35 TBG 35 E 1 Ionisation electrode 2 Ignition electrode 3 Flame disc 4 Mixer 5 Gas delivery pipe E WARNING nozzle hole outlet near the elec...

Page 57: ...ion hold the reset button down for at least 3 seconds A quick red flashing indicates that the function is active Likewise hold the reset button down for at least 3 seconds to deactivate the function the switching will be indicated with a flashing yellow light EK xxxxxxxx xxxxxxxx xxxxxxxx xxxxxxxx xxxxxxxx xxxxxxxx 3 s 7101z03e0305 Operating position PC interface diagnostic analyser Colour code ta...

Page 58: ...nal 10 Possible causes 2 blinks On No flame at the end of the safe ignition time TSA Fuel valves malfunctioning Flame detector malfunctioning Incorrect burner calibration no fuel No ignition faulty ignition transformer 3 blinks On Faulty LP air pressure switch No pressure switch signal after T10 Contact of the LP pressure switch stuck in standby position 4 blinks On Extraneous light during the ign...

Page 59: ...pressure switch H Main switch HS Auxiliary contactor relay ION__tab_Ionisation probe K1 4 Internal Relays KL Low flame LK Air damper LKP Air damper position LP Air pressure switch LR Modulation M Fan motor MS Synchronous motor NL Rated load NT Electric power supply QRA Flame Detection QRC Blue flame detector bl blue br brown sw black R Control thermostat pressure switch RV Gas adjustment device SA...

Page 60: ...tage air regulation cam 7 Electrical connections 8 Reference index To modify the adjustment of the cams operate the respective screws The pointer on the red ring indicates the rotation angle set for each cam on the respective reference scale 5 4 3N23 1 3 9 2 M 6 7 8 0 30 60 30 60 30 60 0 0 30 60 90 120 30 60 90 120 30 60 90 120 8 7 1 6 5 4 3 2 0002936210 ...

Page 61: ...ws 6 and remove the lid 11 Make sure that the mobile plate 23 is fastened by the screw 8 Once the maintenance operations have been completed this will make it possible to return the mixer assembly to the same position it was in last time it was adjusted Loosen the screw 24 which anchors the unit s forward movement rod to the mobile plate After having loosened the nut 9 remove the blocking screw 12...

Page 62: ...LING FAN CLEANING BEARING NOISE CHECK YEAR MECHANICAL CAM CHECK OF WEAR AND OPERATION GREASING OF SLIDING BLOCK AND SCREWS YEAR LEVERS TIE RODS BALL JOINTS CHECK OF ANY WEAR COMPONENT LUBRICATION YEAR ELECTRICAL SYSTEM CHECK OF CONNECTIONS AND TERMINAL TIGHTENING YEAR INVERTER COOLING FAN CLEANING AND TERMINAL TIGHTENING YEAR CO PROBE CLEANING AND CALIBRATION YEAR O2 PROBE CLEANING AND CALIBRATION...

Page 63: ... notes if necessary are independent and do not refer to the expected lifespan stated below Normal operating conditions means applications on water boilers and steam generators or industrial applications compliant with the standard EN 746 in environments with temperatures within the limits provided for in this manual and with pollution degree 2 in compliance with annex M of the standard EN 60335 1 ...

Page 64: ...e reducers follow the instructions below 0002935830a A 1 A After loosening the fastening screws 1 remove the reducers A from their respective seats 0002935830b Insert the two reducers B with the slits facing towards the exterior of the mixer 0002935830c Position the slits C flush with the flame disk D as shown in the figure Lock the new reducers suitably by acting on the corresponding screws ...

Page 65: ... propane gas system to ensure correct safe operation Natural gasification from sets of cylinders or a tank can be used only in low power systems Gas supply capacity on the basis of tank size and minimum outdoor temperature are shown in the table below as an approximate indication only Minimum temperature 15 C 10 C 5 C 0 C 5 C Tank 990 l 1 6 Kg h 2 5 Kg h 3 5 Kg h 8 Kg h 10 Kg h Tank 3000 l 2 5 Kg ...

Page 66: ... rate double the maximum required by the user 2nd step reducer Output 30 hPa mbar Flow rate double the maximum required by the user Y filter Filter Filter Pressure intake 2nd step reducer Output 30 hPa mbar Flow rate double the maximum required by the user Y filter Ball cock Vibration proof joint Burner Free standing or wall mounted boiler Pipe fitting SUPPLIED BY THE MANUFACTURER TO BE CARRIED OU...

Page 67: ...n properly bled of air in the case of first ignition 3 The gas pressure is insufficient or excessive 4 Air flow between disk and head too narrow REMEDY 1 Invert the ignition transformer power supply 230V side and check using an analogue micro ammeter 2 Replace the flame sensor 3 Correct the position of the flame sensor and then check its efficiency by connecting the analogue micro ammeter 4 Check ...

Page 68: ...ENGLISH 32 34 0006160258_201802 ...

Page 69: ... HEATING ELEMENT OPERATION LAMP H1 OPERATION INDICATOR LIGHT MV FAN MOTOR P1 HOUR METER PA AIR PRESSURE SWITCH PG GAS PRESSURE SWITCH TA IGNITION TRANSFORMER TC BOILER THERMOSTAT TS SAFETY THERMOSTAT T2 2ND STAGE THERMOSTAT Y1 Y2 1st 2nd STAGE SOLENOID VALVES Y10 AIR SERVOMOTOR Upon request Without T2 Minimum ionisation current 3 μA L1 L2 L3 Phases N Neutral Ground ...

Page 70: ...ENGLISH 34 34 0006160258_201802 ...

Page 71: ......

Page 72: ...t Il presente catalogo riveste carattere puramente indicativo La casa pertanto si riserva ogni possibilità di modifica dei dati tecnici e di quant altro in esso riportato Information contained in this catalogue is not binding The manufacturer reserves the right to change the technical data and any other data it contains ...

Reviews: