To ensure correct operation of the air pressure switch you must, with
burner on and in 1st stage, increase its regulation value until the burner
triggers and then it immediately “locks-out”.
To unblock the burner, press the special pushbutton and return the
pressure switch regulator to a sufficient value in order to measure the
air pressure existing during the pre-ventilation phase.
The gas pressure control switches (minimum and maximum) prevent
the burner from operating when gas pressure does not lie between the
expected range.
The minimum value pressure switch makes use of the NO (normally
open) contact which is closed when the pressure switch detects a
pressure higher than its own setting.
The maximum pressure switch uses the NC (normally closed) contact
that is closed when the pressure switch detects a pressure lower than
the value it is set to.
Adjustment of minimum and/or maximum pressure values on the
pressure switches must be performed when testing the burner, on the
basis of the pressure measured in each case.
The triggering (opening of the circuit) of any of the pressure switches
when the burner is running (flame on) locks out the burner immediately.
When first switching on with burner lockout, it is essential to check that
they work properly.
Verify the flame detector operation as follows:
•
disconnect the wire coming from the ionisation electrode;
•
start the burner;
•
the equipment will complete the control cycle and after two seconds
will lock out the burner due to the lack of ignition flame;
•
switch off the burner;
• reposition the photocell;
•
This test should also be conducted with the burner already on; when
extracting the photocell from its seat, the apparatus should shut
down immediately.
•
check the efficiency of the thermostats or boiler pressure switches
(they should shut down the burner when triggered)
•
check the efficiency of the temperature probe in the boiler, it should
shut down the burner when triggered.
•
When the burner stops, the post-ventilation function is activated and
remains in operation for 120 sec.
• Check that the compressed air pipe outlet is supplied during
operation.
CAUTION / WARNINGS
Check that the ignition takes place properly. If the mixer is too
far forward, the high air flow can make ignition difficult. If this
happens, the mixer must be gradually shifted back until it is in a
position in which the best ignition is obtained. Fix this position.
We remind you that is preferable, in the case of the small flame,
to limit the quantity of air to the lowest amount possible needed
for safe ignition, even in the most difficult circumstances.
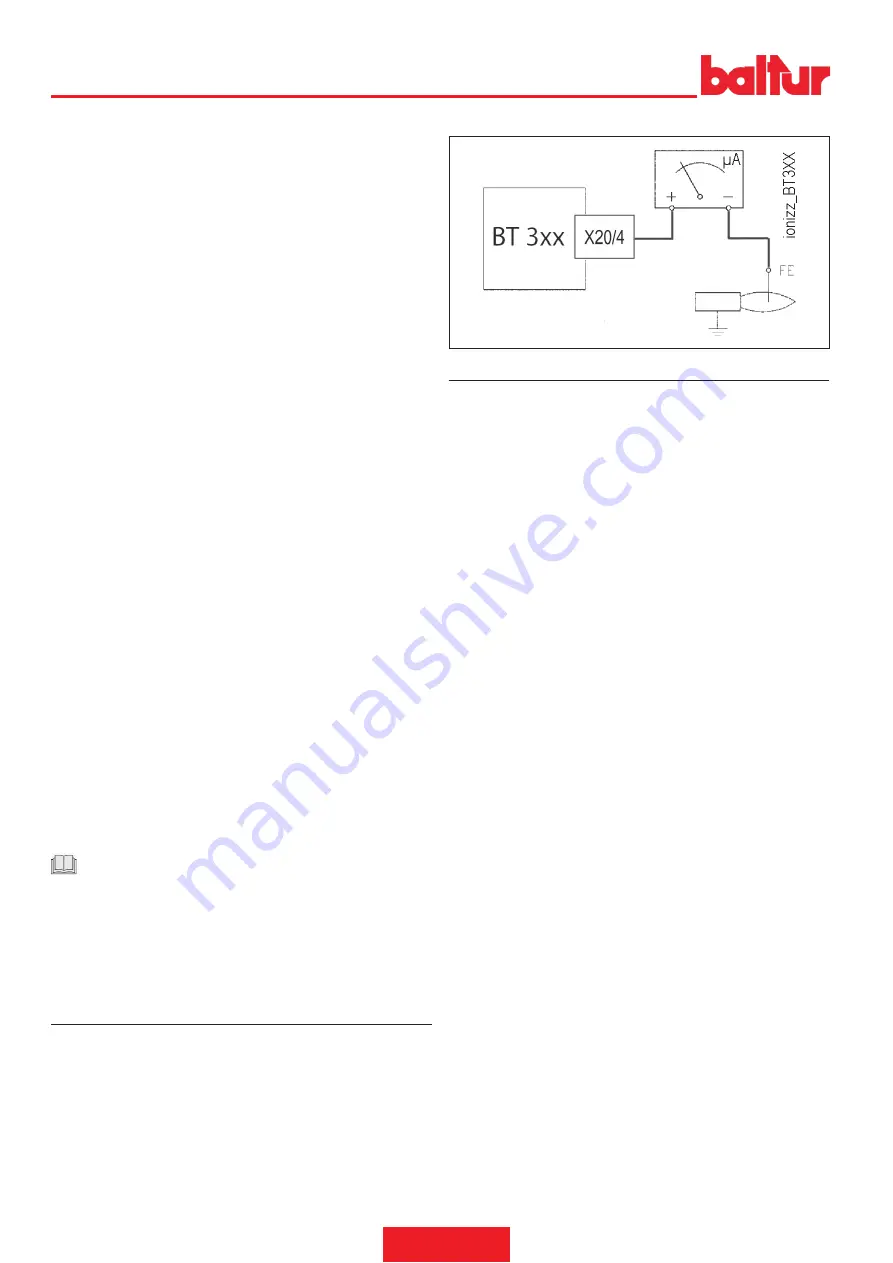
IONISATION CURRENT MEASUREMENT
The maximum ionisation current value required for a correct operation
of the equipment is indicated in the wiring diagram.
The normally detected current is significantly higher than the minimum
value in order to avoid unwanted blockages.
To measure ionisation current, connect a microammeter in series with
the ionisation electrode cable as shown in the figure.
FLAME SENSOR
Verify the flame detector operation as follows:
•
disconnect the wire coming from the ionisation electrode;
•
start the burner;
•
the equipment will complete the control cycle and after two seconds
will lock out the burner due to the lack of ignition flame;
•
switch off the burner;
•
re-connect the wire to the ionisation electrode.
•
This test should also be conducted with the burner already on; the
apparatus should shut down immediately when the wire from the
ionization electrode is disconnected.
20 / 34
0006081328_202202
ENGLISH
Summary of Contents for TBG 80 LX ME
Page 2: ......
Page 32: ...SCHEMI ELETTRICI TBG 80 360LX ME TBG 80 360 ME 30 34 0006081328_202202 ITALIANO...
Page 33: ...TBG 80 360LX ME TBG 80 360 ME 31 34 0006081328_202202 ITALIANO...
Page 34: ...TBG 80 360LX ME TBG 80 360 ME I1 I2 BA I4 I3 32 34 0006081328_202202 ITALIANO...
Page 36: ...34 34 0006081328_202202 ITALIANO...
Page 66: ...WIRING DIAGRAMS TBG 80 360LX ME TBG 80 360 ME 30 34 0006081328_202202 ENGLISH...
Page 67: ...TBG 80 360LX ME TBG 80 360 ME 31 34 0006081328_202202 ENGLISH...
Page 68: ...TBG 80 360LX ME TBG 80 360 ME I1 I2 BA I4 I3 32 34 0006081328_202202 ENGLISH...
Page 70: ...34 34 0006081328_202202 ENGLISH...
Page 71: ......


