21
MANUTENZIONE
MAINTENANCE
D
UM_RLG-CODE MEJ_I-GB_rev. 1.0
D-4 SOSTITUZIONE DEL MOTORE
ELETTRICO
PERICOLO
PERICOLO DI FOLGORAZIONE
ATTENZIONE
AVVERTENZA
RISPETTA L'AMBIENTE
Prima di eseguire qualsiasi intervento di manutenzione,
togliere corrente ed inibire a chiunque l’uso dei comandi
dell’avvolgitore.
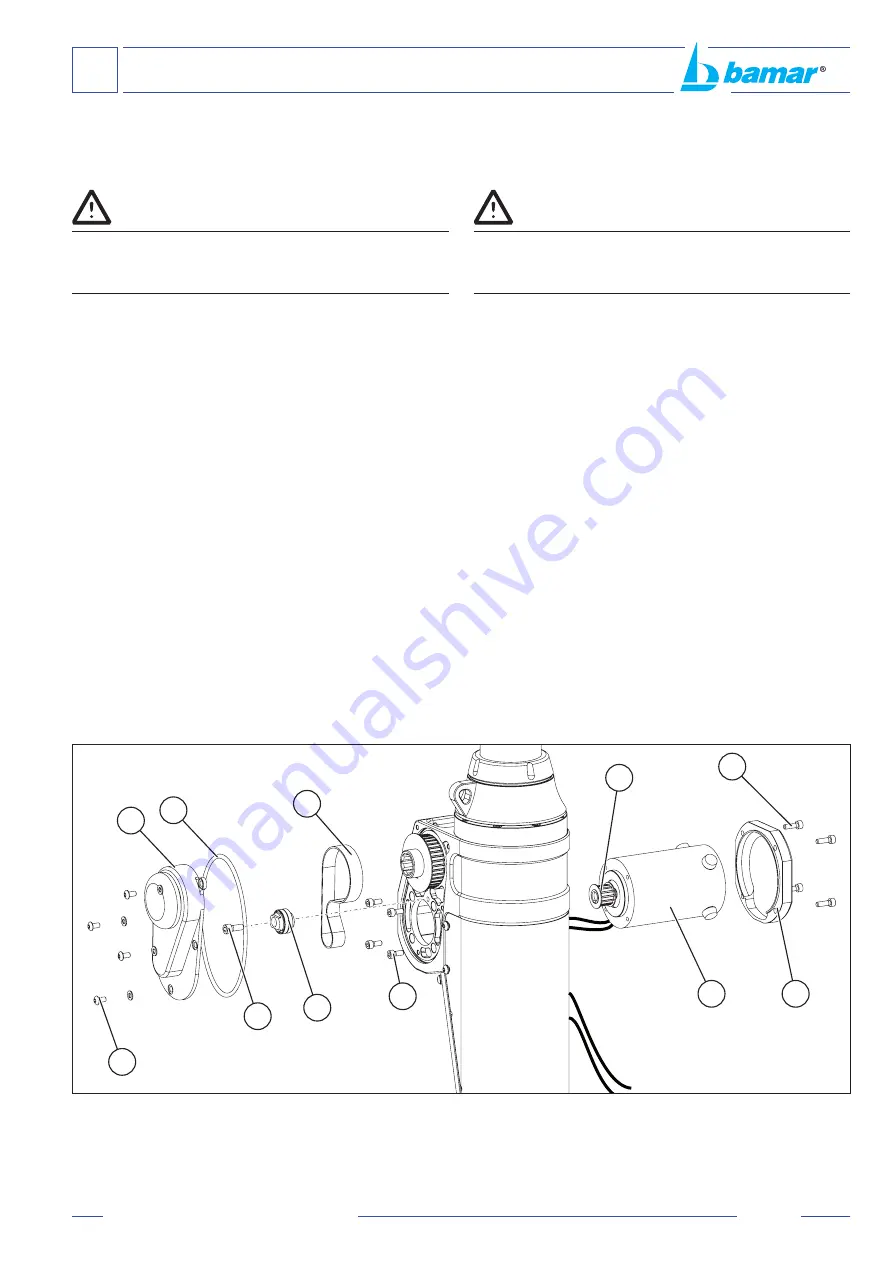
Dovendo sostituire il motore procedere come segue:
• Smontare il coperchio (
B
) lato motore togliendo le
quattro viti (
M
).
• Smontare le viti (
C
) di fissaggio e togliere il coperchio
lato trasmissione (
D
).
• Smontare il galoppino tendicinghia (
E
) svitando la vite
di fissaggio (
G
).
• Smontare la cinghia di trasmissione (
A
).
• Smontare le quattro viti (
I
) di fissaggio del motore (
L
).
• Sfilare il motore (
L
) stando attenti a non strappare i
cavi elettrici.
• Smontare la puleggia conduttrice (
h
).
•
Sostituire il motore elettrico e procedere al rimontaggio
delle parti seguendo la procedura inversa al montaggio.
• Dopo aver montato la cinghia di trasmissione (
A
)
procedere alla regolazione della tensione come
descritto nel capitolo D-2.3.
• Prima di rimontare il coperchio (
D
) assicurarsi che l’OR
(
F
) sia in buono stato altrimenti sostituirlo come descritto
nel capitolo D-3 al punto “
Operazioni finali
”
.
D-4 hOW TO REpLACE ThE ELECTRIC
MOTOR
DANGER
DANGER OF ELECTROCUTION
CAUTION
WARNING
RESPECT THE ENVIRONMENT
Before carrying out any kind of maintenance, cut the
electric supply and prevent anyone from using the furler
commands.
If you need to replace the electric motor you have to
proceed as follows:
•
Take off the cover (
B
) on the motor-side by unscrewing
the 4 screws (
M
).
•
Unscrew the screws (
C
) from the protection cover (
D
)
in order to take it off
•
Take off the eccentric pin (
E
) by unscrewing its locking
screw (
G
).
•
Take off belt (
A
).
•
Unscrew the 4 screws (
I
) which hold the motor (
L
).
•
Take out the motor (
L
) paying attention not to damage
the cables.
•
Take off the drive sheave (
h
) from the motor
•
Replace the motor and start the inverse operation.
• After having fitted the drive belt (
A
) on again, tension it
as explained in section D- 2.3.
•
Before closing the cover (
D
) make sure the OR (
F
) is in
good conditions, otherwise replace is as per instructions
shown in section D-3 “
Final steps
”.
D
F
G
E
C
I
L
B
M
A
h
Summary of Contents for RLG-CODE mEJ
Page 26: ...26 UM_RLG CODE MEJ_I GB_rev 1 0 NOTE NOTE ...
Page 27: ......


