background image

21

Power Drive & Roll-A-Pro

®

  installation instructions

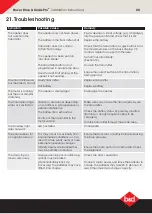
Symptom

Possible cause

Remedy

The SERVICE LED has 

started to flash and 

is beeping numerous 

times

A Fault has been detected. The fault 

will be active each time an attempt 

is made to operate the door.

Record opener function (How many beeps?) 

then press the LIMIT SET button once to reset 

the opener. If the fault continues to be tripped 

contact 1300 769 850  for support.

The Open (Green) 

LED and Close (Red) 

LED are flashing 

alternatively

Opener is overloaded

Check the doors operation by disengaging the 

motor and ensuring the door runs smoothly. If 

necessary make door adjustments or discontinue 

use and contact 1300 769 850 for support.

The Open (Green) 

LED continues to flash

Door obstructed when opening

Clear away any obstructions and test door opens 

correctly. (If door is damaged, contact your door 

professionl).

The Close (Red) LED 

continues to flash

Door obstructed when closing

Limits may be cleared

Clear away any obstructions and test door closes 

correctly. (If door is damaged, contact your door 

professional).
Remove all power sources (including the battery 

backup). Wait till all lights are out (10-15 secs), 

then reconnect power. If Red LED is flashing, limits 

are not set. Reset Limits.

21. Troubleshooting

If You Need a Service Call

If the opener needs a service please call the dealer who installed the garage door opener (their contact 

details are usually on a sticker on the back of your garage door). For product assistance contact 13 62 63 

within Australia.

BEFORE CALLING you should have the following information to assist in providing the appropriate 

service:

1.  Has anything happened since the opener last operated OK, e.g. a storm, a jolt to the door etc.?

2.  What is the current light status on the opener? 

3.  Manually disengage the door (Section 16).  

How easy is it to manually open and close the door?

4.  What model is the opener? (Model no. information is located at the rear of the opener)

5.  Who installed the opener? (Dealer details should be on a sticker on the back of your garage door)

6.  When was it installed? (If known)

Date

Time

Number of Beeps

Summary of Contents for Controll-A-Door RDO-1V4

Page 1: ...Door Opener installation instructions Power Drive Roll A Pro These instructions are intended for professional garage door opener installers All references are taken from inside looking out DOC 161061...

Page 2: ...fications 19 21 Troubleshooting 20 22 After Installation Care 22 22 1 Service Checklist 22 22 2 Battery Replacement 23 22 3 Battery Disposal 23 22 4 Warranty 23 WARNING IMPORTANT SAFETY INSTRUCTIONS F...

Page 3: ...n instructions Fall from ladder Ensure ladder is the correct type for job Ensure ladder is on flat firm ground that will take the weight without the legs sinking Ensure user has 3 points of contact wh...

Page 4: ...or service BATTERY WARNING This product contains a lithium button coin cell battery in the transmitters If a new or used lithium button coin cell battery is swallowed or enters the body it can cause s...

Page 5: ...t Transmitter Roll A ProTM 3 x TB 7 Transmitters 1 x Wall Visor Clip 4 1 x Collar Kit 5 1 x Weight Bar Fastner Bag 6 2 x Nilock Nut 7 2 x 2 x 3 16 x 1 2 flat washers 8 2 x Pan Head Screw M4 x 50 9 2 x...

Page 6: ...s to be fitted at least 135mm to the bracket is required Therefore the recommended sideroom from the edge of the door curtain is 95mm to the inside of the door bracket and 135mm to the wall as per dia...

Page 7: ...then the door may require servicing 5 2 8 5 Door Preparation 5 1 Prepare the Door a Clean the guides if there is any oil or wax present using a suitable white spirit The only lubricant suitable for us...

Page 8: ...the end opposite to where the opener will be fitted check that the U bolt which holds the door axle to the bracket is tightened securely b Open the door completely and tie rope around the door roll D...

Page 9: ...string down to disengage opener Slide opener over door axle c Secure with two 2 Flat washers 12 and two 2 Hex serration head screws 13 d Check the drive gear rotates freely by pulling the string hand...

Page 10: ...S T E P T W O HOLD Press to close door S T E P T H R E E W A R N I N G In setting the close limit position do not force the door into the floor with excessive force as this can interfere with the eas...

Page 11: ...initiate a re profile LIMITS must already be set opener beeps once RELEASE S T E P T H R E E opener beeps once Then refit controls cover 10 3 Controller memory reset S T E P O N E S T E P T W O C O N...

Page 12: ...d not exceed 20 kg CAUTION Take care when completing a safety test Failure to follow this warning can result in serious personal injury and or property damage WARNING If the door is closing and is una...

Page 13: ...80 ma V EB1 0V EB2 0V OSC AUX External device Alarm Door or Gate opener V EB1 0V EB2 0V OSC AUX 12 3 Remote Aerial Some sites cause poor radio reception Particularly problematic areas are those where...

Page 14: ...from remote controllers that have been programmed into its memory Up to 64 remotes 8 for Roll A Pro can be programmed S T E P T H R E E Switch power on Press and release HOLD for 3 sec HOLD for 3 sec...

Page 15: ...imes S T E P F I V E Turn on HOLD for 4 sec RELEASE Turn off Press then try another remote LED will be lit and light flash LED will go out Refit controls cover 14 5 Coding for AUX Output A U X O U T P...

Page 16: ...er ALL stored codes deleted S T E P T W O HOLD for 6 sec RELEASE LED will flash rapidly 14 8 Installing the Wall Mounted Transmitter S T E P T H R E E I N S T A L L I N G W A L L R E M O T E C O N T R...

Page 17: ...e t h e o p e n e r a f t e r t h e d o o r i s c l o s e d T O E N G A G E T H E O P E N E R WA R N I N G P l e a s e t e s t t h e m a n u a l r e l e a s e m e c h a n i s m t o e n s u r e t h a...

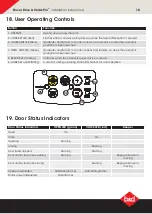
Page 18: ...pted Rapid flashes Button Function 1 OPERATE Opens stops closes the door 2 CODE SET LED Red Flashes when a code is being stored or when the transmitter button is pressed 3 CLOSE LIMIT LED Red Illumina...

Page 19: ...350N Short Term Peak Force 600N 60kg 500N 50kg Nominal force 200N 20kg 200N 20kg Receiver type Multi frequency Multi frequency Receiver code storage capacity 64 x Tri Tran 4 button Transmitters 8 x Tr...

Page 20: ...r The transmitter range varies or is restricted Variations are normal depending on conditions e g temperature or external interference The battery life is exhausted Position of the transmitter in the...

Page 21: ...ared Clear away any obstructions and test door closes correctly If door is damaged contact your door professional Remove all power sources including the battery backup Wait till all lights are out 10...

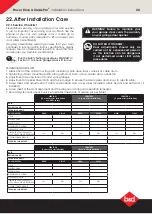
Page 22: ...ening of door mounting points along with door bolts screws cables and connectors 3 Adjustment of spring tension to limit spring fatigue 4 Adjustment of opener travel limits and force margin to ensure...

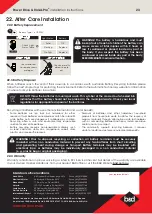
Page 23: ...Battery Disposal 22 2 Battery Replacement Some batteries are less toxic but hazardous for other reasons Lithium batteries can explode or catch fire in landfill while button cells are dangerous if swa...

Reviews: