background image

|  15 

Troubleshooting tips  |  

ZM Series User Manual

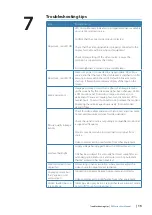
Troubleshooting tips

Issue

Possible Cause

No picture - red LED ON

LED on continuously indicates no (compatible) video is available 
on currently selected source;

Confirm that the correct video input is selected

Check that the video signal cable is properly connected to the 
display. Test cable with ‘known good‘ equipment

Check display settings of the video source - ensure the 
resolution is supported by the display

Ensure brightness is turned up to a suitable level

No picture - red LED OFF

Make sure power is connected to an appropriate  DC voltage 
source, and that the fuse is fitted or breaker is switched on. After 
pressing power button, the red LED should blink as monitor 
starts up, followed by momentary display of the logo on the 
screen. 

Image persistence

Image persistence occurs when a ghost of an image remains 
on the screen after the screen image has been changed. Unlike 
a CRT monitor, an LCD monitor’s image persistence is not 
permanent. To erase an image ghost, turn the monitor off for 
several hours.  To avoid this condition, do not leave the monitor 
displaying the same image unnecessarily, for an extended 
period of time

Picture quality & image 
stability

Check for video cable condition; is shield intact, and does cable 
not exceed maximum distance for video standard

Check the signal source is outputting a compatible resolution at 
a supported frequency

Monitor may be receiving incorrect/bad sync signals from 
source

Video compromised by interference from other equipment

Low level backlight

Supply voltage has dropped below 10V. Will restore at >11V

Unit has been subject to excessively hot direct sunlight for an 
extended period and/or unit enclosure is too hot. Automatic 
thermal protection has been enabled

Slight distortion in text 
or graphics

Not working in native resolution, where possible adjust the 
video source to output correct resolution 

Display is present but 
“bars” appear or roll 
across screen 

Ground loop problem between video source and monitor

Video compromised by interference from other equipment

Vertical shaded bars on 
screen image 

Incoming video may be in 4:3 ratio, either leave in ‘aspect’ mode, 
or set to ‘fill’ to use full screen space. 

7

Summary of Contents for ZM Series

Page 1: ...ENGLISH ZMSeriesMonitors User Manual bandg com...

Page 2: ...r to the brand web site of your display or system www bandg com Compliance Statements The B G series monitors complies with CE under EMC directive 2004 108 EC complies with the requirements of level 2...

Page 3: ...cting touch control 9 Serial connection 9 USB connection 9 Connecting NMEA 2000 10 Typical installation 11 Operating the display 11 First time operation 11 Shortcut functions 11 OSD menu 13 Updating t...

Page 4: ...13 17 16 10 19 20 3 4 5 9 8 6 7 11 15 14 1 Monitor 2 Dash mount brackets x2 3 Washer M4 12mm SS x4 4 Pozi pan head machine screw M4 x 12mm SS x4 5 Plastic spacer x4 6 Wing nut M5 x4 7 Wing head machi...

Page 5: ...ent overheating do not restrict airflow at the rear of the display unit ensure that there is adequate ventilation particularly if the display unit is pod mounted If the space behind the display is air...

Page 6: ...mpre si n impre cisos Si esto no es el origin al o un PDF veri car que las l neas abajo est n a la escal a antes de usar WICH TIG Diese n Vordr uck nicht verwe nden wenn er durch Kopie ren oder Druck...

Page 7: ...rew in place Hold wing screw stationary if it turns while adjusting the wingnut When fitting bezels ensure hook tabs on back of each bezel recess into opposing slots on screen frame Once flush with fr...

Page 8: ...ounted using a Vesa bracket have IPX2 rating and should be mounted in an area sheltered from rain and sea spray Note the monitor should not be tilted forward by more than 15 degrees as this compromise...

Page 9: ...IAL Control input output for touchscreen 7 USB Control input output for touchscreen 8 POWER 12 24 V DC power supply input Note HDMI 1 and DVI 2 inputs do not support HDCP High bandwidth Digital Conten...

Page 10: ...t end of section 6 DC supply Note this display is not intended for use vessels fitted with a positive ground electrical system The power input cable screen drain wire should be connected to a negative...

Page 11: ...end should suit the device being controlled which typically will use the common USB type A male plug Note Where USB is used cable length should not exceed 5m when using regular cables Lengths over 5m...

Page 12: ...ra 5 Zeus2 Processor 6 FLIR IR camera supplying video via Zeus2 Processor 7 Micro C network bus 8 Serial cable communicates touch control to Zeus2 Processor 9 Power cable monitor 10 Micro C network dr...

Page 13: ...ed Shortcut functions Source selection pressing the Enter key will step through the video source options Display brightness pressing the Up Down keys will adjust the screen brightness Note shortcut fu...

Page 14: ...lar PIP as dictated by following settings or 50 50 split pane image scaled to fit PIP Swap Swaps main source with PIP source PIP Size Small Medium Large Controls PIP window size Sets to approximately...

Page 15: ...itor firmware may occasionally become available The updates will typically include improvements to existing functionality or new features and will be made available via the B G website www bandg com C...

Page 16: ...nsional drawings ZM Series User Manual Dimensional drawings ZM16 400mm ZM19 478mm ZM16 260mm ZM19 305mm ZM16 383mm ZM19 461mm MAX 25 4 mm 1 00 8 mm 0 31 66 0 mm 2 60 MAX 88 0 mm 3 46 ZM16 233mm ZM19 2...

Page 17: ...ghost turn the monitor off for several hours To avoid this condition do not leave the monitor displaying the same image unnecessarily for an extended period of time Picture quality image stability Ch...

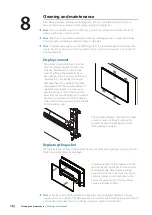
Page 18: ...t keep them from being accidentally disengaged from the mounting flange To release the locking tab it is necessary to gently lever the centre of the bezel trim away from the mounting flange To remove...

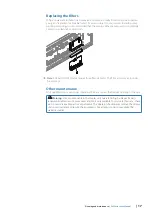
Page 19: ...loth Note ZM16 and ZM19 models require three filter elements The filter accessory kit includes five elements Other maintenance Only qualified service personnel should perform any repairs that require...

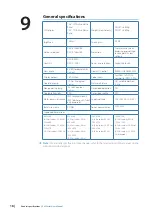
Page 20: ...operating temp 20 to 60 degrees Celsius Auto video detection YES Operable humidity 95 Auto video scaling YES Water ingress resistance IPX2 bracket mount IPX5 dash mount front only exposed Supply volta...

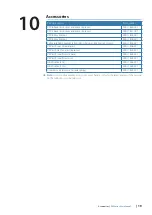
Page 21: ...ion bracket all models includes 4 cable ties screws 000 11614 001 ZM16 19 rear mounting kit 000 11618 001 ZM16 19 dash seal kit 6 pieces 000 11619 001 ZM16 19 inlet filters 5 pack 000 11623 001 ZM16 1...

Page 22: ......

Page 23: ...988 10693 001 0980...

Reviews: