


Bandit 240 PB Installation and User Guide
4
•
Avoid pointing the nozzle to an air circulation point, such as an open window, a
window that may be broken during a burglary, or a large circulation vent; in such
cases the nozzle may eject the fog directly outside of the protected area.
•
Point the nozzle towards a wall to break the ejection pressure and allow the fog to
accumulate into a thick cloud.
•
Avoid positioning the nozzle directly above an exit. This may prevent the intruder or
by-standers from leaving the protected area after an ejection.
•
Avoid positioning the nozzle away from fragile objects; the force of the ejection can
topple or damage unprotected items.
•
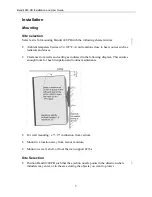
Position the nozzle such that the first surface to block the ejection is 20 feet
(6 meters) away.
•
When installing multiple nozzles, position the nozzles so they expel fog in a manner
that avoids double-clouding of the same area. Suggested points are diagonally
opposite corners of a room.
Site Preparation
•
Heat from Bandit’s fog ejection may trigger PIRs. Replace PIRs with combination
PIR-radar sensors that are triggered by both heat and movement; this reduces the
chances of a false alarm during fog ejection.
•
Mount a motion sensor in a location that assures an intruder is detected before
approaching Bandit.
Required tools
To install Bandit 240 PB you need the following tools:
•
Drill and standard set of drill bits
•
Bandit Allen wrench (included in shipping box)
•
Wire strippers
•
Screwdrivers
•
Voltage testers
•
PC communications link (optional, available from Bandit Solutions, Inc.)
You may need additional hardware depending on how you install Bandit.


