


Bandit 240 PB Installation and User Guide
9
4.
Unscrew the red Allen bolts on the canister assembly and remove the old canister.
5.
Insert the new canister into the canister assembly and tighten Allen bolts.
6.
Insert canister assembly into Bandit 240 PB and tighten Allen bolts.
7.
Replace side hatch.
Periodic maintenance
•
Clean air filter on front with a vacuum cleaner and a soft brush attachment. Clean
every six months or more frequently in dusty environments.
•
Wipe dust from case every six months with a clean, damp cloth. Do not use volatile
fluids such as alcohol, thinner, or gasoline.
•
Ensure no objects, such as boxes or filing cabinets, block the fog ejection path.
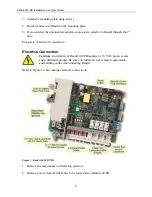
Specifications
Characteristic
Value
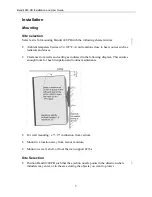
Dimensions
10.6" wide × 14.4" high × 10" deep
Weight
62 pounds
Max. mains supply failure
+ 2 hours
Maximum reaction time
1 second between alarm signal and fog ejection
Fog ejection image
Cone shaped straight ahead
Fog ejection capacity
About 1,000 ft³ per second
Fog ejection pressure
232 lbf/in² (pound force per square inch)
Maximum fog ejection per pulse
18 seconds
Total fog ejection period
50 seconds
Nominal ejected droplet size
0.000001312 ft (full aerosol)
Warm-up time
50 minutes in cold settings
Max environmental temp.
122°F
Min. environmental temp.
32°F
Maximum heat loss
40W per hour
Heat exchange capacity
18,000W per hour
Capacity heating element
750W
Heating
Cartridge resistance (long-life Kanthal)
Temperature sensor
Platinum Pt1000 (stainless - long life)
Over temperature secured
Temperature fuse
Construction material
Stainless and galvanized steel


