Bandit
47
Copyright 12/17
MODELS 2890SP/2900T
DISASSEMBLY INSTRUCTIONS:
ASSEMBLY INSTRUCTIONS:
NOTE:
NOTE:
Allowable Tolerances on mating parts TLK 130 (1-3/4”):
Models: 2250, 2250R, 2550
Shaft Tolerance
Hub Tolerance
1.750” -.002
2.953” +.002
Assembly/Disassembly Screws Torque Ratings
30 ft-lbs (41 Nm)
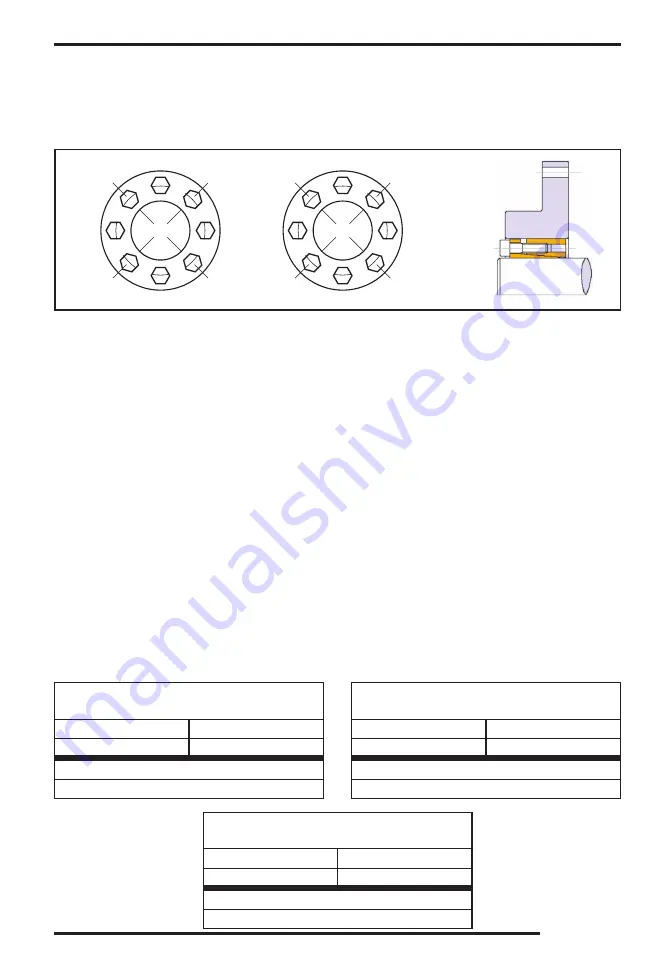
1
6
3
8
4
5
2
7
FIGURE 1
1
2
3
8
7
6
5
4
FIGURE 2
ASSEMBLY & DISASSEMBLY INSTRUCTIONS FOR
CUTTER WHEEL COUPLER
CAUTION:
With assembly and disassembly of the locking assemblies, rigid coupling or shrink disc, it has to
be made sure that the entire drive train is secured and protected against unintentional engagement. Serious
bodily injury may occur from rotating parts.
Allowable Tolerances on mating parts TLK 450 (1-3/4”):
Models: 2600, 2650
Shaft Tolerance
Hub Tolerance
1.750” -.002
2.953” +.002
Assembly/Disassembly Screws Torque Ratings
30 ft-lbs (41 Nm)
Allowable Tolerances on mating parts TLK 450 (2-1/4”):
Models: 2700, 2890, 2900
Shaft Tolerance
Hub Tolerance
2.250” -.002
3.543” +.002
Assembly/Disassembly Screws Torque Ratings
30 ft-lbs (41 Nm)
MAINTENANCE
1. If the element is to be reused, thoroughly clean all the element surfaces lubricate both screws and threads
priortoitsusewithathinfilmoflight-weightoil.
2. Do not use impact wrench to loosen or tighten any of the tightening screws.
1. Loosen the clamping screws gradually in the cross sequence shown in Figure 1.
2. Do not remove the clamping screws completely.
3. Insert the screws into dismantling threads of the front cone or inner ring and tighten gradually in the cross
sequence shown in Figure 1.
4.
Incaseofdifficulties,lightlyhammerthereleasingscrews.Slideoutthebushingfromthehub/shaft.
1.
Do not use any oil with molybdenum bisulphide or high pressure additives and not grease. These
substances notably reduce the coeffi cient of friction.
2. Do not use impact wrench to loosen or tighten any tightening screws.
3. Use torque wrench to verify tightening torque value on each of the screws.
1.
Carefullycleanthehubandshaftcontactsurfacesandapplyathinfilmoflight-weightoil.
2. Slide the clamping unit into the hub bore and on to the shaft.
3. Tighten clamping screws gradually in the cross sequence shown in Figure 1.
4.
Duringthefirstroundoftightening,torqueallclampingscrewsto15ft-lbs(20Nm).
5. Repeat steps 3 & 4, but torque all clamping screws to 30 ft-lbs (41 Nm).
6. Torque all clamping screws to 30 ft-lbs (41 Nm) using the continuous sequence shown in Figure 2. Perform
this step a maximum of two times.


