background image

UNIT OPERATION

The following pages outline the normal day-to-day operation of your Preamplifier Tuner.  The Reference 5 S2
can be controlled either from the supplied IR remote controller, the CK1.2 Keypad or directly from the front
panel buttons.

POWER ON/OFF

The master power switch located on the front panel of your Preamplifier Tuner must be “ON” (pressed in) for
the Preamplifier Tuner to operate. When this switch is OFF (pressed out) all power is removed from your
Preamplifier Tuner. This will prevent turning it back on with the remote control or keypad. For normal day to
day operation, leave the master power switch in the ON position.  Use the ON/STANDBY function for daily
power on and off.  This will allow the Preamplifier Tuner to be turned on and off from the remote control or
keypad. 
Whenever turning on the master power switch, you must wait approximately 10 seconds while your
Preamplifier Tuner restores its internal memory and initialize system parameters. You may want to turn off the
master power switch only when your Preamplifier Tuner will be idle for extended periods of time or during
periods of power line fluctuations. Your Preamplifier Tuner will not lose its memory while the master power
switch is off.

ON/STANDBY

For normal day to day operation, you will put your Preamplifier Tuner in STANDBY when not in use. Standby
mode keeps a bare minimum of functions running in order to allow a remote control or keypad to quickly
power up the unit. Note that the front panel ON/STANDBY button is lit while your Preamplifier Tuner is in
standby and is not lit when your Preamplifier Tuner is operating. The front panel alphanumeric display is off
during standby. Also note that the supplied IR remote's POWER button is a toggle. The remote control or key-
pad additionally has discrete power OFF and ON buttons.

ADJUSTING VOLUME

The front panel “VOLUME” control knob is known as an encoder.  This is because it also has the ability to
control functions other than volume.  Other functions include, BASS, TREBLE, BALANCE, etc.  Normally the
encoder knob will control volume.  Volume can also be adjusted using the remote control or a keypad.  The
volume can be adjusted up or down.

CHOOSING A SOURCE

The Reference 5 S2 has the ability to select any of the eight possible source inputs.  The names of the
sources are default labeled for V1, V2, TV, DVD, CD, FM, AM and TAPE.  These labels can be adjusted and
changed using either the BKcSuite setup software or the Reference 5 S2 front panel.  FM and AM cannot be
changed.  Even though the inputs are specifically labeled for source names, it does not matter what source is
connected to each input.  The label (name) of the input can be changed (See page 13 for label change pro-
cedure).  A source can be selected from the remote control or a keypad if it is connected.  A source can also
be selected from the front panel using the source button. The source button will step through each of the
source inputs.

If a recording device (such as a tape recorder) will be used to record audio material, it should be connected
to the TAPE OUT RCA connectors.  The TAPE OUT will output only the audio source that the user has been
selected to listen to.  This way an analog audio “tape” recording can be made of any device connected to the
Reference 5 S2. 

ADJUSTING BALANCE

The audio balance can be adjusted left to right or visa versa using the BAL (L)  or BAL (R) on the remote
control.  The balance adjustment will adjust the gain per each side (left or right) of the stereo output. 

9

Summary of Contents for 5 Series II

Page 1: ...B K Components Ltd User Manual REFERENCE 5 S2 Stereo Preamplifier Tuner 13742 0804 ...

Page 2: ...tions concerning your Factory Warranty call B K Components Ltd at 716 656 0026 Upgradability B K is one the first manufacturers in the audio video industry to consistently offer software and hardware upgrades to its processing of audio signals Through upgrades B K delivers exceptional value to its customers But what is Upgradability Upgradability is not a guarantee we define it as a philosophy of ...

Page 3: ...OFF 9 ON STANDBY 9 ADJUSTING VOLUME 9 CHOOSING A SOURCE 9 ADJUSTING BALANCE 9 ADJUSTING BASS TREBLE and LOUDNESS 10 TUNER OPERATION 10 HEADPHONE MODE 10 BKcSuite SETUP SOFTWARE 11 PRESETS 11 THE MENU SYSTEM 12 DESCRIPTIONS OF MAIN MENU SELECTIONS 12 FACTORY RESET 13 MAIN SETUP MENU FLOW DIAGRAM 14 ADVANCED MENU 15 TROUBLESHOOTING 16 ADVANCED SETUP MENU FLOW DIAGRAM 17 SPECIFICATIONS Back 1 TABLE O...

Page 4: ...ventilation reduce acoustic feedback and provide protection against scratching the surface the unit is resting on Do not remove them Do not stack anything on top of the preamplifier tuner processor source etc Leave a minimum of 2 clearance from the top of the Preamplifier Tuner to the next shelf or component to insure proper ventilation The Preamplifier Tuner should be located away from other sour...

Page 5: ...ith minimumized signal loss and degradation Presets 40 user presets allow instant recall of any user setting including AM FM or source input Loudness May be used to add clarity to the audio signal for low to moderate listening levels Bass May be adjusted for better room acoustics Treble May be adjusted for better room acoustics Customized Input and Present Names Assign names to presents inputs or ...

Page 6: ...ner requires the master power switch to remain on Use the ON STANDBY button for daily ON and OFF Only turn the Preamplifier Tuner off with the master power switch when not using it for an extended period of time 4 FRONT PANEL DESCRIPTION CD 30 DB MASTER POWER ON STANDBY PRESET ENTER SOURCE LOUDNESS TUNE DOWN TUNE UP LEVEL SAVE S2 B K C O M P O N E N T S L T D S T E R E O P R E A M P L I F I E R R ...

Page 7: ...A output Variable preamp outputs for driving external power amplifiers or pow ered speakers These outputs have been processed through a high pass filter to reduce audio below 80 Hz Use these outputs for small speakers or in a subwoofer satellite system Note these outputs are identical to the full range outputs with the addition of an 80 Hz 12 dB Octave high pass filter 8 FULL RANGE RCA output Vari...

Page 8: ...pand your audio system later keep these ideas in mind as you plan current cable runs To provide the best tuner reception make sure the antenna is at least 6 ft away from the Preamplifier Tuner and any other equipment that may produce high frequency interference such as Personal computers CD players halogen lamps etc SOURCE CONNECTIONS To connect your analog sources to your Preamplifier Tuner take ...

Page 9: ...rence 200 2 S2 Reference 5 S2 L R R L L L V1 V2 TV SOURCE INPUTS DVD CD INPUT OUTPUT TAPE PREAMP OUTPUTS FULL RANGE HIGH PASS SUB MONO L R Audio Video Systems Hand Made in the U S A B K S B IMPLY ETTER R I S K O F E L E C T R I C S H O C K D O N O T O P E N CAUTION ANTENNA AM FM VOLTAGE RS 232 IR OUTPUT BALANCED OUTPUT FULL RANGE LEFT RIGHT SERIAL G R O U N D R S 2 3 2 T R A N S M I T I R D ATA I ...

Page 10: ...GHT SERIAL G R O U N D R S 2 3 2 T R A N S M I T I R D ATA I N P U T C O N T R O L O U T 1 2 V AC LINE 200 mA Max Current 12V Using a EIA T568B Cat 5 Cable RJ 45 termination on one end and bare wire on the other CK1 2 Keypad Connection Plug the male RJ 45 connector into the port on the CK1 2 Keypad Additional keypads in a zone can be run out of the Slave OUT Master IN RJ 45 Reference 5 S2 Connecti...

Page 11: ...ic display is off during standby Also note that the supplied IR remote s POWER button is a toggle The remote control or key pad additionally has discrete power OFF and ON buttons ADJUSTING VOLUME The front panel VOLUME control knob is known as an encoder This is because it also has the ability to control functions other than volume Other functions include BASS TREBLE BALANCE etc Normally the encod...

Page 12: ...steps for directly entering the radio station for 103 3 FM FM 1 0 3 3 Seek Tuning Holding the remote TUNE button will cause the tuner to SEEK tune up or down auto matically stopping on strong stations Once the tuner has started seeking you can release the button In strong signal areas the tuner may stop one step above or below the true frequency Unless you are sure of the station s frequency check...

Page 13: ... come preprogrammed with your Preamplifier Tuner Saving a preset from the remote To save a preset is to take a snapshot of the unit settings To save a preset first set the unit for the input or tuner station bass treble volume and loudness level that is desired to be saved Next press the SAVE button on the remote control or the front panel The front panel will display the two digit preset number a...

Page 14: ...enu selections allow the next level of the menu to be accessed Pressing SELECT or ENTER will activate the next menu level LEFT RIGHT ARROWS remote or Volume Knob front panel To change menu parameters press the LEFT or RIGHT arrows to change the setting There are no LEFT or RIGHT arrows on the front panel Use the Volume Knob when operating the menu from the front panel The volume knob acts as the L...

Page 15: ...selection you are able to adjust how your presets are recalled You have the ability to select preset volume recall and preset auto naming If you desire the volume level to be recalled when a pre set is recalled set this selection to PRESET Otherwise when set to CURRENT the volume will stay at the current level when the preset is recalled When a preset is created auto naming will generate a generic...

Page 16: ... OPTIONS ADVANCED SETUP PERSONAL PRESETS MENU TO EXIT SOURCE LEVELS MADE IN USA PRESET OPERATION HELP PRODUCT INFO SETUP MENU BUTTON HEADPHONE ON 0 TV 40 YES 0 TV 40 YES V1 1 V V1 1 V V1 V1 0DB PRESET VOLUME AUTO NAMING YES DISPLAY BRIGHT BACKUP MEMORY SEE ADVANCED MENU STRUCTURE ON PAGE 15 SEE ADVANCED MENU STRUCTURE ON PAGE 15 RESTORE MEMORY CURRENT VOLUME CURRENT VOLUME AUTO NAMING NO REFERENCE...

Page 17: ...code set operation is required For more information on code sets see the B K CT610 310 600 Mulit Zone Receiver User Manual Power On Titles When the Reference 5 S2 powers up it will flash two lines of power on titles These lines can be customized for your own preferences Each line for power on titles contains 16 customizable characters Control Setup 12VDC trigger The single 12VDC control trigger ca...

Page 18: ...OSSIBLE CAUSE POSSIBLE SOLUTION No sound Display will not light 1 Power cord not plugged in 2 Power off at AC source 3 AC power inlet fuse blown or faulty Power switch in off position out 4 Blown line fuse 1 Reconnect power cord 2 Check AC switch or fuse 3 Push in power switch 4 Replace line fuse with 5A 250V Fast Blow fuse No sound Display on 1 Preamplifier is in mute 2 Volume control to a minimu...

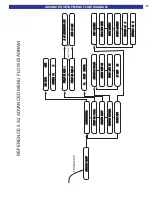
Page 19: ...P MAX LEVEL 8DB MAX LEVEL 8DB PRODUCT ID 2 PRODUCT ID 2 PORT ENABLED B K COMPONENTS LTD B K COMPONENTS LTD MADE IN USA MISCELLANEOUS POWER ON TITLES CONTROL SETUP SECURITY OPTIONS RS232 PORT FROM SETUP SELECT TO ACCESS POWER ON LINE 1 POWER ON LINE 1 POWER ON LINE 2 C1 TUNER PHONES REFERENCE 5 S2 ADVANCED MENU FLOW DIAGRAM ADVANCED SETUP MENU FLOW DIAGRAM ...

Page 20: ...dB Antenna Input Impedance 75 Ω 300 Ω IHF Usable Sensitivity 12dBf 28 dBf Capture Ratio 2 dB Mono Stereo Sensitivity 15 35 dBf User Presets 40 High Pass Low Pass Crossover RCA output 80 Hz non adjustable Full Range output RCA Yes Keypad or IR sensor connections Yes Unbalanced RCA audio inputs 6 Balanced XLR outputs 1 full range pair Tape loop output 1 RS 232 Controllable Yes IR output pass through...

Reviews: