background image

MENU

For best results, perform the following set up procedure when you initially install your Preamplifier Tuner and
anytime you change or add sources, speakers, etc. or when you rearrange your listening area

THE MENU SYSTEM

Setup of your Preamplifier Tuner will require you to navigate through the menu system via the front panel or
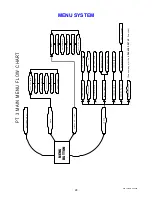
remote. A complete guide to the menu system is included at the back of this manual. We recommend that you
become familiar with your Preamplifier Tuner’s menu guide. The following are general instructions for using the
menu system.

MENU - If you are not already in the menu system, the MENU button on the remote controller will activate the
menu system (or, simultaneously pressing PRESET and ENTER from the front panel). Once you are in the menu
system, the MENU button will return you to the next higher level menu or, if you are already at the highest level, it
will exit from the menu system.

UP/DOWN ARROWS - Once you are in the menu system, use the TUNE+ / TUNE- ARROWS to move to the
desired menu selection.

SELECT (remote) or ENTER  (remote or front panel) - Some menu selections cause another menu to be
activated. Use the TUNE+ / TUNE- ARROWS to move to the desired menu line. Pressing SELECT or ENTER will
activate the next menu.

LEFT/RIGHT ARROWS (remote) or VOLUME KNOB (front panel) - Some menu selections allow you to change
one of the Preamplifier Tuner settings. Use the TUNE+ / TUNE- ARROWS to move to the desired menu line.
Pressing the LEFT/RIGHT ARROWS will change the setting. There are no LEFT/RIGHT ARROWS on the front
panel. While in the menu system, the VOLUME KNOB acts as the LEFT/RIGHT ARROWS. This means that you
will not be able to adjust the volume from the front panel while in the menu system. The remote control volume will
work in most menus.

TEXT EDITING - Some menu selections will require you to edit text. Use the TUNE+ / TUNE- ARROWS to
change the current (blinking) character. Use the LEFT/RIGHT ARROWS (or VOLUME KNOB) to move to another
character position.

17

P/N 13010 REV 0005

Summary of Contents for PT 3 series II

Page 1: ...PT 3 series II Preamplifier Tuner Owner s Manual P N 13010 REV 0005...

Page 2: ...P N 13010 REV 0005...

Page 3: ...Volume 21 Preset Operation Setup 20 Source Levels Setup 20 Source Names Setup 19 Favorite Preset Setup 19 Setup 18 Product Info 18 Help 18 Headphone ON 17 Menu 16 Presets 15 Tuner Operation 14 Loudnes...

Page 4: ...ventilation reduce acoustic feedback and provide protection against scratching the surface the unit is resting on We advise against removing or altering feet Do not stack anything on top of the Pream...

Page 5: ...derate listening levels Bass may be used to adjust room equalization Treble may be used to adjust room equalization Customized input and Preset names assign names to presets inputs or the turn on mess...

Page 6: ...gnal for increased clarity and intelligibility at low listening levels Sources your Preamplifier Tuner can directly provide audio from its built in AM FM tuner Typically you will want to connect a num...

Page 7: ...3 Display The Preamplifier Tuner display is a 16 character alphanumeric fluorescent display Displays current status of the Preamplifier Tuner and any changes being performed 4 Volume control For cont...

Page 8: ...dio above 80 Hz to source the SUB output 7 HIGH PASS outputs Variable level outputs for driving external power amplifiers or powered speakers These outputs have been processed through a high pass filt...

Page 9: ...ner includes an IR remote control 6 P N 13010 REV 0005 SEL 2 3 5 6 8 0 9 E 1 BAND ST M 4 7 10 MENU MODE A TV DVD SAT V2 MUTE ON VOL C D V1 TAPE TUNER BAL L BAL R TUNE BASS TREBLE B K REMOTE CONTROLLER...

Page 10: ...o reprogram the source name that will appear on your Preamplifier Tuner s front panel See SETUP SOURCE NAMES y Also note the length of the cable for each component s connection and describe how it sho...

Page 11: ...te deck or other recorder to TAPE Attach one end of the audio interconnect cable to the left audio output on the TAPE recorder then attach the other end to the left white TAPE audio input on the Pream...

Page 12: ...amplifier you will need to purchase an external B K or other power amplifier Connect the Preamplifier Tuner s SUB output to the audio input of the external amplifier Connect the external amplifier s s...

Page 13: ...chase an external B K or other power amplifier Connect the Preamplifier Tuner s SUB output to the audio input of the external amplifier Connect the external amplifier s speaker output to your subwoofe...

Page 14: ...or powered sub woofers in an audio zone Note The control outputs can output a maximum of 50 mA Check to see that the source you are connecting to the control out requires 50 mA or less current WARNING...

Page 15: ...t in use Sleep mode keeps a bare minimum of functions running in order to allow remote control operation and fast start up Note that the front panel SLEEP button is lit while your Preamplifier Tuner i...

Page 16: ...ds while Preamplifier Tuner analyzes selected source select desired source or TUNER source will appear on TAPE output SOURCE step to source desired source Action From Front Panel From Remote HEADPHONE...

Page 17: ...12 dB 66 adjust bass up or down LEVEL step to BASS then use VOLUME KNOB BASS or BASS Action From Front Panel From Remote ADJUSTING TREBLE Treble increase or decrease the high frequency content in 2 d...

Page 18: ...better one step above or below the frequency that SEEK has found In weak signal areas the tuner may continue to seek all the way to the end of the band To stop this simply press the opposite TUNE butt...

Page 19: ...presets are not limited to Tuner stations You can save custom settings for any source A convenient set of 10 presets come preprogrammed with your Preamplifier Tuner Recalling a Preset FG GE 5 1 35 6...

Page 20: ...om the menu system UP DOWN ARROWS Once you are in the menu system use the TUNE TUNE ARROWS to move to the desired menu selection SELECT remote or ENTER remote or front panel Some menu selections cause...

Page 21: ...he basic menu operations described herein The guide will automatically scroll through each line 3 exit menu system PRESET and ENTER MENU 5 return to main menu PRESET and ENTER MENU 4 display help guid...

Page 22: ...feature allows for skipping selected presets when pressing the remote Preset buttons or front panel preset button When you save a preset it will be automatically added to the favorite preset list ret...

Page 23: ...etup menu TUNE or TUNE From setup menu or 1 Action From Front Panel From Remote Source Levels Setup This setup allows you to match the levels of your sources so that there are no large changes in volu...

Page 24: ...preset volume From preset operation menu TUNE or TUNE From preset operation menu or 1 Action From Front Panel From Remote Preset Naming Your Preamplifier Tuner can automatically generate a preset name...

Page 25: ...7 216 83 0 025 6 72 21 50 return to normal operation PRESET and ENTER MENU 8 return to main menu PRESET and ENTER MENU 7 return to setup menu PRESET and ENTER MENU 6 confirm selected memory operation...

Page 26: ...e TAPE input since it allows a full tape monitor capability Tape monitor allows you to listen to what is actually on the tape as you are recording it The Loudness control does not work at high volume...

Page 27: ...f you are using speakers or amplifiers that can t handle the output level from your Preamplifier Tuner or if you simply wish to limit the volume that can be achieved using normal front panel or remote...

Page 28: ...nges to presets and system setup settings Note Locking Memory will also remove SETUP as a selection from the Preamplifier Tuner s MENU SLEEP TUNE and TUNE buttons pressed simultaneously will always al...

Page 29: ...ion in interconnect cables 2 Poor ground in main AC supply 3 Poor ground on cable box 4 Cables running across back of TV Loud hum or buzz on one or more channels 1 Unmute Preamplifier Tuner 2 Increase...

Page 30: ...s FM Section Tuner Specifications RS232 software Upgrade 80 Hz 12 dB per octave Low Pass Crossover 80 Hz 12 dB per octave High Pass Crossover 4 Audio Analog Outputs 5 years preamplifier 1 year remote...

Page 31: ...7 216 35 6 7 23 5 7 21 35 6 7 23 5 7 21 83 0 025 83 0 025 6 72 21 50 6 72 21 50 6 783 6 783 3 3 0 18 21 0 18 21 83 1 52 7 7 83 1 52 7 7 92 1 92 1 6 72 6 7 6 72 6 7 17 5 72 6 7 17 5 72 6 7 0 18 72 7 0...

Page 32: ...6 1 286 32 5 21 7 7 6 32 5 21 7 7 6 0 9 0 9 352 8 7 352 8 7 32 5 21 1 32 5 21 1 32 5 21 1 32 5 21 1 781 5 3 21 6 781 5 3 21 6 9 3 21 6 9 3 21 6 9 3 21 6 9 3 21 6 79 3 21 6 79 3 21 6 9 3 21 6 9 3 21 6...

Page 33: ...O T O P E N www bkcomp com V1 V2 TV SOURCE INPUTS DVD CD INPUT OUTPUT TAPE PREAMP OUTPUTS MONO L R CONTROL OUT SUB IR INPUT ACCESSORY CONNECTION 12VDC 50mA COMPLIES WITH THE LIMITS FOR A CLASS B COMP...

Page 34: ...NOTES 31 P N 13010 REV 0005...

Page 35: ...of the unit during the terms of this warranty or thereafter Some States do not allow the exclusion or limitation of incidental or consequential damages and the foregoing exclusions may not apply to yo...

Page 36: ...33 P N 13010 REV 0005...

Reviews: