Page 10
13006 rev 0005
Note: When turning equipment ‘off’, the amplifier should always be turned off
first,
then
the preamplifier. When turning equipment ‘on’, the preamplifier should always be turned
on
first,
then the amplifier.
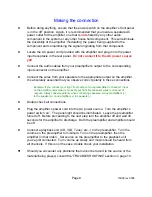
Before turning anything on, ensure the preamplifier is at a
low volume level.
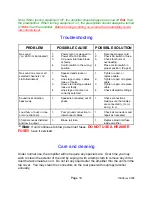
Troubleshooting
PROBLEM
POSSIBLE CAUSE
POSSIBLE SOLUTION
No sound
(‘on’ LED not illuminated)
1.
Power cord not plugged in.
2.
Power off at AC source.
3.
AC power inlet fuse blown
or faulty.
4.
Control switch in the wrong
position.
1.
Reconnect power cord.
2.
Check AC switch or fuse.
3.
Check for shorts or
overloading.
4.
Place control switch in
proper position. (Page 5)
No sound on some or all
selected channels (‘on’
LED illuminated)
1.
Speaker leads loose or
faulty.
2.
Line stage to amp. cables
loose. or faulty.
3.
Source to line stage cables
loose or faulty.
4.
Line stage or source not
correctly selected.
1.
Tighten, repair, or
replace cable.
2.
Tighten, repair or replace
cable.
3.
Tighten, repair or replace
cable.
4.
Check all switch settings.
Sound lacks direction,
bass weak
1.
Speakers connected out of
phase.
1.
Check connections
making sure that cables
are connected (+) to (+)
and (-) to (-).
Loud hum or buzz on one
or more channels
1.
Poor ground connection in
interconnect cables.
1.
Check all connectors and
repair as necessary.
Channel sounds distorted
and low in output
1.
Blown rail fuse.
1.
Replace blown rail fuse
inside amplifier.
** Note:
If unit continues to blow power inlet fuses,
DO NOT USE A HEAVIER
FUSE!!,
have it serviced
.
Care and cleaning
Under normal use, the amplifier will not require any special care. Over time you may
wish to clean the exterior of the unit by wiping it with a damp cloth to remove any dirt or
dust that accumulates on it. Do not let any liquid enter the amplifier thru the vents in the
top cover. You may clean the connectors on the rear panel with isopropyl alcohol
annually.


