19
OPTIFORMA Frame Heater 2872 01/22
6
Assembly and setting up
6.1 Requirements for the assembly site
• The assembly surface must be level and horizontal.
• The instrument must not be exposed to splashing or flowing water
or other fluids.
• The instrument must not be exposed to heat or direct sunlight.
• The instrument must not be able to fall from the workbench.
6.2 Installing the instrument in a worktop
This frame heater can also be installed in worktops with a thickness of up to 28
mm. For this purpose the instrument is supplied with an installation template.
The installation depth is 145 mm.
NOTICE
NOTICE!
Damage to the frame heater due to overheating!
Blocking the ventilation slots above the base plate can
result in damage due to heat accumulation.
• Ensure there is sufficient room immediately around the
installed instrument.
• Ensure there is sufficient ventilation of the built-in
cupboard.
• Ensure the power supply has been correctly installed.
• Do not hang cloths or other materials in the air intake
area.
Personnel: Specialized personnel
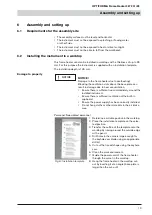
1. Determine a suitable position in the worktop.
2. Place the installation template on the selec-
ted position.
3. Transfer the outline of the template onto the
worktop by tracing around the outside edge
with a pencil.
4. Drill holes in the corners large enough for
the keyhole saw blade using an appropriate
drill bit.
5. Cut out the traced shape using the keyhole
saw.
6. Clean the work environment.
7. Guide the power cord of the frame heater
through the cutout in the worktop.
8. Hang the frame heater in the worktop cut-
out by inserting it at an angle (base plate is
larger than the cut-out).
Fig. 6: Installation template
Damage to property
Assembly and setting up


