Adjustments 3.5
Final check after repair
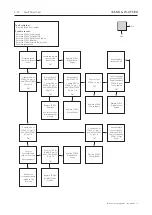
The final check after repair describes the activities that are needed to ensure the
product will be returned in perfect condition to the customer. Follow the
procedures below:
Insulation test
The product must be insulation tested after having been dismantled. Make the
test when the product has been reassembled and is ready to be returned to the
customer.
Flashover must not occur during the test
.
Make the insulation test as follows:
- Short-circuit the two pins of the mains plug and connect them to one of the
terminals of the insulation tester.
- Connect the other terminal to ground on the Power Link socket.
! NOTE
To avoid damaging the product it is essential that both terminals of the insulation
tester have good contact.
During the test the current must not exceed 5 mA.
Slowly increase the voltage on the insulation tester until a voltage of 2.5 kV (ac) is
obtained. Maintain the voltage level for one second, then slowly decrease the
voltage to 0 V (ac).
Restore setup
Before the product is handed over to the customer ensure that:
- The position switch (FREE / WALL / CORNER) is in correct position.
- The wired/wireless switch (WIRED / WIRELESS) is in correct position.
- The phase switch (0 / 180) is in correct position.
- The lp filter switch (ON / OFF) is in correct position.
Software update
It is very important that the product is updated to the latest software version
before it is returned to the customer. This is to ensure the customer receives the
best possible experience. Follow the procedure on page 3.4.
Check sound
Ensure that the speaker play correct in both a wired and a wireless setup.
Test that all speaker units in the product play and sound correctly. This can be
done by a sound test with ServiceTool. Follow the procedure on page 2.5.
Clean the product
Wipe dust off the surfaces using a dry, soft cloth. If necessary, remove stains or dirt
with a soft, slighty damp cloth and a solution of water and mild detergent such as
washing-up liquid.
! Never use alcohol or other solvents to clean any parts of the product.
Summary of Contents for BeoLab 19
Page 6: ...1 4...
Page 20: ...2 14 2 14 2 14...
Page 26: ...3 6...
Page 42: ...4 16...
Page 46: ...6 2 6 2 6 2...
Page 55: ......
Page 56: ...Bang Olufsen DK 7600 Struer Denmark 3538208 13 11 353820813110000...


