background image

LIVING

COLLECTION

HANDLEIDING

MANUAL

MODE D’EMPLOI

GEBRAUCHSANLEITUN

RELAX

LULU

BNBO012

Conform aux exigences de sécurité

Conform all security regulations

Summary of Contents for RELAX LULU

Page 1: ...LIVING COLLECTION HANDLEIDING MANUAL MODE D EMPLOI GEBRAUCHSANLEITUN RELAX LULU BNBO012 Conform aux exigences de s curit Conform all security regulations...

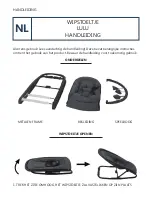
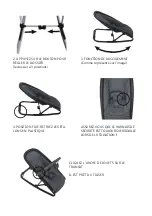
Page 2: ...htig de handleiding Deze bevat belangrijke instructies omtrent het gebruik van het product Bewaar de handleiding voor toekomstig gebruik ONDERDELEN METALEN FRAME 1 TREK HET ZITJE OMHOOG HET WIPSTOELTJ...

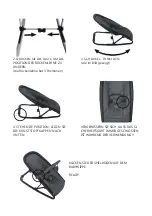
Page 3: ...ugleuning heeft 3 posities 4 STAANDE POSITIE PLAATS DE STAANDERTJES NAAR BENEDEN ZORG ERVOOR DAT HET VEILIGHEIDS HARNAS ALTIJD IS VASTGEKLIKT TIJDENS GEBRUIK KLIK DE SPEELBOOG VAST OP HET WIPSTOELTJE...

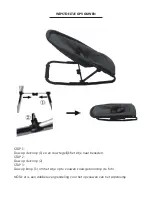
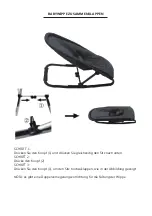
Page 4: ...uw op de knop 1 en en duw tegelijk het zitje naar beneden STAP 2 Duw op de knop 2 STAP 3 Duw op knop 1 om het zitje op te vouwen zoals getoond op de foto NOTA er is een dubbele vergrendeling voor het...

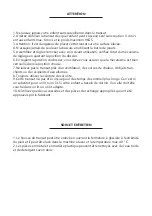
Page 5: ...Zorg ervoor dat de rugleuning steeds goed is vastgeklikt wanneer je de positie aan past 7 Plaats het wipstoeltje nooit in de buurt van een ventilator warmtebronnen scherpe objecten of water 8 Gebruik...

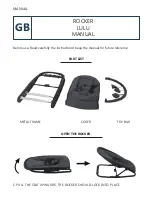
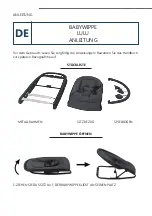
Page 6: ...ROCKER LULU MANUAL Before use Read carefully the instructions Keep the manual for future reference PART LIST METAL FRAME 1 PULL THE SEAT UPWARDS THE ROCKER SHOULD LOCK INTO PLACE COVER TOY BAR OPEN T...

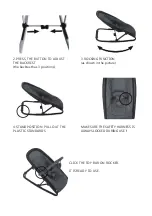
Page 7: ...BACKREST the backrest has 3 positions 4 STAND POSITION PULL OUT THE PLASTIC STANDARDS MAKE SURE THE SAFETY HARNESS IS ALWAYS LOCKED DURING USE CLICK THE TOY BAR ON ROCKER IT IS READY TO USE 3 ROCKING...

Page 8: ...FOLD THE ROCKER STEP 1 Press the button 1 push the seat downward STEP 2 Press button 2 STEP 3 Press button 1 to fold the seat as shown NOTE there is a double lock here...

Page 9: ...krest you must be sure that the mechanism are well locked in the chosen position 7 Don t leave the rocker near a switched on fan heat sources sharp objects and water containers 8 Always use the safety...

Page 10: ...vant utilisation Lisez attentivement les instructions Conservez le manuel pour r f rence future LISTE DES PI CES CADRE EN ALUMINUM 1 TIREZ LE SI GE VERS LE HAUT LE TRANSAT DEVRAIT SE VERROUILLER EN PL...

Page 11: ...3 positions 4 POSITION FIXE RETIREZ LES TA LONS EN PLASTIQUE ASSUREZ VOUS QUE LE HARNAIS DE S CURIT EST TOUJOURS VERROUILL LORS DE L UTILISATION CLIQUEZ L ARCHE DE JOUETS SUR LE TRANSAT IL EST PR T UT...

Page 12: ...ER LE TRANSAT TAPE 1 Appuyer sur le bouton 1 pousser le si ge vers le bas TAPE 2 Appuyez sur le bouton 2 TAPE 3 Appuyez sur le bouton 1 pour plier le si ge comme indiqu NOTE il y a une double serrure...

Page 13: ...est bien verrouill dans la position choisie 7 Ne laissez pas le transat pr s d un ventilateur de sources de chaleur d objets tran chants ou de r cipients d eau allum s 8 Toujours utiliser la ceinture...

Page 14: ...NG Vor dem Gebrauch Lesen Sie sorgf ltig die Anweisungen Bewahren Sie das Handbuch zur sp teren Bezugnahme auf ST CKLISTE METALLRAHMEN 1 ZIEHEN SIE DAS SITZ AUF DER BABYWIPPE KLICKT AN SEINEN PLATZ SI...

Page 15: ...kenlehne hat 3 Positionen 4 STEHENDE POSITION LEGEN SIE DIE KUNSTSTOFFKAPPEN NACH UNTEN VERGEWISSERN SIE SICH DASS DAS SI CHERHEITSGURT IMMER GESCHLOSSEN IST W HREND DER VERWENDUNG KLICKEN SIE DER SPI...

Page 16: ...Knopf 1 und dr cken Sie gleichzeitig den Sitz nach unten SCHRITT 2 Dr cke den Knopf 2 SCHRITT 3 Dr cken Sie den Knopf 1 um den Sitz hochzuklappen wie in der Abbildung gezeigt NOTA es gibt eine Doppel...

Page 17: ...ie sicher dass die R ckenlehne immer richtig geschlossen ist wenn Sie die Position einstellen 7 Stellen Sie den Bouncer niemals in die N he von L ftern W rmequellen scharfen Gegenst nden oder Wasser 8...

Page 18: ...IMPORTED BY IMPORT PAR BANINNI VOORTSTRAAT 12 2490 BALEN BELGIUM www baninni com info baninni be...

Reviews: