background image

WARNING

CARE AND MAINTENANCE

1. Never leave your child unattended in the rocker.

2. Stop using the rocker as soon as the child can sit up alone without support. It is 

suitable for children max. 6 months and weight max 9KGS.

3. Warning: It is dangerous to put this rocker on an elevated surface.

4. Never attempt to lift the rocker by using the toy bar .

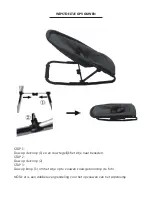
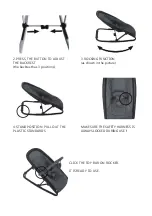
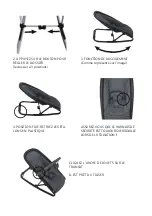
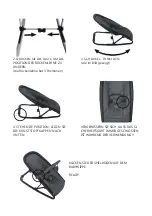
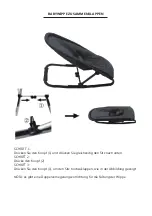
5. Assemble and adjust the rocker with care. Before using, check the condition of the 

regulating mechanism adjusting the position of the backrest.

6. On adjusting the position of the backrest you must be sure that the mechanism are 

well locked in the chosen position.

7.Don’t leave the rocker near a switched on fan, heat sources, sharp objects and water 

containers.

8. Always use the safety belt.

9. This rocker has not been designed for longer sleeping times. It is neither a substitute 

for a cot nor a bed. If your child needs to sleep, he or she should be laid in a suitable 

cot or bed.

10. Only use accessories and appropriate spare parts which have been approved by the 

manufacturer.

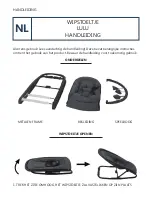
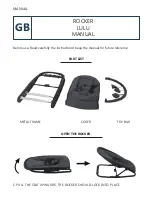
1. The cover of the rocker can be removed by opening the zipper at the foot end and it 

can be washed in washing machine and temperature max. 40°C.

2. The metal and plastic parts can be cleaned with lukewarm water and mild soap 

detergent.

Summary of Contents for RELAX LULU

Page 1: ...LIVING COLLECTION HANDLEIDING MANUAL MODE D EMPLOI GEBRAUCHSANLEITUN RELAX LULU BNBO012 Conform aux exigences de s curit Conform all security regulations...

Page 2: ...htig de handleiding Deze bevat belangrijke instructies omtrent het gebruik van het product Bewaar de handleiding voor toekomstig gebruik ONDERDELEN METALEN FRAME 1 TREK HET ZITJE OMHOOG HET WIPSTOELTJ...

Page 3: ...ugleuning heeft 3 posities 4 STAANDE POSITIE PLAATS DE STAANDERTJES NAAR BENEDEN ZORG ERVOOR DAT HET VEILIGHEIDS HARNAS ALTIJD IS VASTGEKLIKT TIJDENS GEBRUIK KLIK DE SPEELBOOG VAST OP HET WIPSTOELTJE...

Page 4: ...uw op de knop 1 en en duw tegelijk het zitje naar beneden STAP 2 Duw op de knop 2 STAP 3 Duw op knop 1 om het zitje op te vouwen zoals getoond op de foto NOTA er is een dubbele vergrendeling voor het...

Page 5: ...Zorg ervoor dat de rugleuning steeds goed is vastgeklikt wanneer je de positie aan past 7 Plaats het wipstoeltje nooit in de buurt van een ventilator warmtebronnen scherpe objecten of water 8 Gebruik...

Page 6: ...ROCKER LULU MANUAL Before use Read carefully the instructions Keep the manual for future reference PART LIST METAL FRAME 1 PULL THE SEAT UPWARDS THE ROCKER SHOULD LOCK INTO PLACE COVER TOY BAR OPEN T...

Page 7: ...BACKREST the backrest has 3 positions 4 STAND POSITION PULL OUT THE PLASTIC STANDARDS MAKE SURE THE SAFETY HARNESS IS ALWAYS LOCKED DURING USE CLICK THE TOY BAR ON ROCKER IT IS READY TO USE 3 ROCKING...

Page 8: ...FOLD THE ROCKER STEP 1 Press the button 1 push the seat downward STEP 2 Press button 2 STEP 3 Press button 1 to fold the seat as shown NOTE there is a double lock here...

Page 9: ...krest you must be sure that the mechanism are well locked in the chosen position 7 Don t leave the rocker near a switched on fan heat sources sharp objects and water containers 8 Always use the safety...

Page 10: ...vant utilisation Lisez attentivement les instructions Conservez le manuel pour r f rence future LISTE DES PI CES CADRE EN ALUMINUM 1 TIREZ LE SI GE VERS LE HAUT LE TRANSAT DEVRAIT SE VERROUILLER EN PL...

Page 11: ...3 positions 4 POSITION FIXE RETIREZ LES TA LONS EN PLASTIQUE ASSUREZ VOUS QUE LE HARNAIS DE S CURIT EST TOUJOURS VERROUILL LORS DE L UTILISATION CLIQUEZ L ARCHE DE JOUETS SUR LE TRANSAT IL EST PR T UT...

Page 12: ...ER LE TRANSAT TAPE 1 Appuyer sur le bouton 1 pousser le si ge vers le bas TAPE 2 Appuyez sur le bouton 2 TAPE 3 Appuyez sur le bouton 1 pour plier le si ge comme indiqu NOTE il y a une double serrure...

Page 13: ...est bien verrouill dans la position choisie 7 Ne laissez pas le transat pr s d un ventilateur de sources de chaleur d objets tran chants ou de r cipients d eau allum s 8 Toujours utiliser la ceinture...

Page 14: ...NG Vor dem Gebrauch Lesen Sie sorgf ltig die Anweisungen Bewahren Sie das Handbuch zur sp teren Bezugnahme auf ST CKLISTE METALLRAHMEN 1 ZIEHEN SIE DAS SITZ AUF DER BABYWIPPE KLICKT AN SEINEN PLATZ SI...

Page 15: ...kenlehne hat 3 Positionen 4 STEHENDE POSITION LEGEN SIE DIE KUNSTSTOFFKAPPEN NACH UNTEN VERGEWISSERN SIE SICH DASS DAS SI CHERHEITSGURT IMMER GESCHLOSSEN IST W HREND DER VERWENDUNG KLICKEN SIE DER SPI...

Page 16: ...Knopf 1 und dr cken Sie gleichzeitig den Sitz nach unten SCHRITT 2 Dr cke den Knopf 2 SCHRITT 3 Dr cken Sie den Knopf 1 um den Sitz hochzuklappen wie in der Abbildung gezeigt NOTA es gibt eine Doppel...

Page 17: ...ie sicher dass die R ckenlehne immer richtig geschlossen ist wenn Sie die Position einstellen 7 Stellen Sie den Bouncer niemals in die N he von L ftern W rmequellen scharfen Gegenst nden oder Wasser 8...

Page 18: ...IMPORTED BY IMPORT PAR BANINNI VOORTSTRAAT 12 2490 BALEN BELGIUM www baninni com info baninni be...

Reviews: