background image

Sensor positions 

threshold midway 

between taught conditions

Darkest

(no signal)

Most Light

(saturated

signal)

Output OFF

Output ON

Darkest Taught

Condition

Lightest Taught

Condition

Position

adjusted by

Manual Adjust

Figure 3. Dynamic TEACH (Light Operate shown)

The output ON and OFF conditions can be reversed using the LO/DO switch (see LO/DO Switch in 

Top Panel Interface 

on

page 4).

Dynamic TEACH and Manual Adjust
Moves switching threshold value up or down to make adjustments

Slide Mode switch to ADJ to enter Adjust mode

Press "+" to increase; press "-" to decrease

GREEN display shows the switching threshold value

2 seconds after adjustment, GREEN display will flash 3 times to confirm

Slide Mode switch to RUN to complete operation

Remember: Manual adjustments are disabled when Auto Thresholds are ON

Follow these steps to perform a Dynamic TEACH:

NOTE: TEACH Selection must be programmed to dYn tcH (see 

Program Mode 

on page 6 )

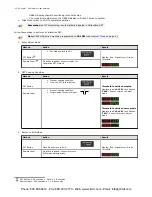
1. Enter Adjust Mode.

Method

Action

Result

SET Button 5

Set Mode switch to ADJ

Display: Red - Signal Level; Green -

Threshold

Remote Input 6

No action required; sensor is ready for

Dynamic TEACH method

2. Enter Dynamic TEACH.

Method

Action

Result

SET Button

Click the SET rocker button

Display: Flashes "dYn tch" then holds

on "1234 dYn"

Remote Input

Single-pulse remote input

T

3. Present ON and OFF Conditions.

5 SET Button: 0.04 seconds 

 "Click" 

 0.8 seconds

6 Remote Input: 0.04 seconds 

 T 

 0.8 seconds

DF-G1 Expert

 Dual Display Fiber Amplifier

Phone: 800.894.0412 - Fax: 888.723.4773 - Web: www.clrwtr.com - Email: info@clrwtr.com

Summary of Contents for DF-G1-NS-2M

Page 1: ...n energized or de energized sensor output condition Models Model Outputs Connector1 DF G1 NS 2M Single NPN 2 m 6 5 ft cable 4 wire DF G1 PS 2M Single PNP DF G1 KS 2M Dual outputs 1 push pull IO Link a...

Page 2: ...ve from a DIN rail 1 Push the DF G1 up on the DIN rail 1 2 Pivot the DF G1 away from the DIN rail and remove it 2 Installing the Fibers Follow these steps to install glass or plastic fibers 1 Open the...

Page 3: ...er needed When connecting coaxial type fiber assemblies to the amplifier install the solid core fiber to the LED emitting port and the multi core fiber to the PD receiving port for most reliable detec...

Page 4: ...en the sensing condition is below the threshold for Window SET the output is ON when the sensing condition is outside the window SET Rocker Button The SET rocker button is a 3 way button The positions...

Page 5: ...vents unintentional programming changes The SET rocker button is disabled during RUN mode except when using Window SET see Window SET on page 10 DF G1 Expert Dual Display Fiber Amplifier Phone 800 894...

Page 6: ...wo Point TEACH Response Speed Standard 500 s Offset Percent 10 Auto Thresholds OFF OFF Delay 0 Disabled OFF One Shot 0 Disabled ON Delay 0 Disabled ON One Shot 0 Disabled Display Readout Numeric ECO d...

Page 7: ...using the LO DO Light Operate Dark Operate switch see LO DO Switch in Top Panel Interface on page 4 Two Point TEACH and Manual Adjust Moves switching threshold value up or down to make adjustments Sl...

Page 8: ...hod Action Result SET Button Move the Mode switch to RUN Display Red Signal Level Green Threshold Remote Input No action is required sensor returns to RUN mode automatically Dynamic TEACH Teaches on t...

Page 9: ...times to confirm Slide Mode switch to RUN to complete operation Remember Manual adjustments are disabled when Auto Thresholds are ON Follow these steps to perform a Dynamic TEACH NOTE TEACH Selection...

Page 10: ...condition All other conditions lighter or darker cause the output to change state Sensing window center can be adjusted using and rocker button Manual Adjust Recommended for applications where a produ...

Page 11: ...play shows the sensing window center value 2 seconds after adjustment the GREEN display will flash 3 times to confirm Slide Mode switch to RUN to complete operation Remember Manual adjustments are dis...

Page 12: ...ht SET Sets a threshold a programmable offset below the presented condition Changes output state on any condition darker than the threshold condition Threshold can be adjusted using and rocker button...

Page 13: ...GREEN display will flash 3 times to confirm Slide Mode switch to RUN to complete operation Remember Manual adjustments are disabled when Auto Thresholds are ON Follow these steps to perform a Light SE...

Page 14: ...ition causes the output to change state Threshold can be adjusted using and rocker button Manual Adjust Recommended for applications where only one condition is known for example a stable dark backgro...

Page 15: ...e GREEN display will flash 3 times to confirm Slide Mode switch to RUN to complete operation Remember Manual adjustments are disabled when Auto Thresholds are ON Follow these steps to perform a Dark S...

Page 16: ...djust A single sensing condition is presented and the sensor positions a threshold exactly at the presented condition When a condition lighter than the threshold is sensed the output either turns ON o...

Page 17: ...Sensing Condition Method Action Result SET Button Present sensing condition Click the SET rocker button Threshold Condition Accepted Displays read cAL SEt then flashes PASS Sensor returns to Adjust mo...

Page 18: ...fset after SET The Window Dark and Light SET methods will flash a offset on the displays after a PASS or FAIL SET Result Offset Meaning PASS with Offset Displays the offset used for the SET method FAI...

Page 19: ...IODD files Provide all programming options of top panel interface plus additional functionality see the DF G1 Manual P N 161999 Certifications Ind Cont Eq 3TJJ Banner Engineering Corp Limited Warrant...

Reviews: