background image

Measurement and Calibration


Measurement 

An accurate turbidity measurement depends on good measurement techniques. Factors such as clean sample vials, positioning of vial in the   
measurement chamber, covering the vial with the light shield lid, meter calibration, removal of bubbles, etc. For more information, please refer to 
page 7 

Measurement and Calibration Hints


Single measurement - low turbidity samples (< 200 NTU) 

For the low turbidity samples, we recommend using the same vial to perform the measurement and calibration. 
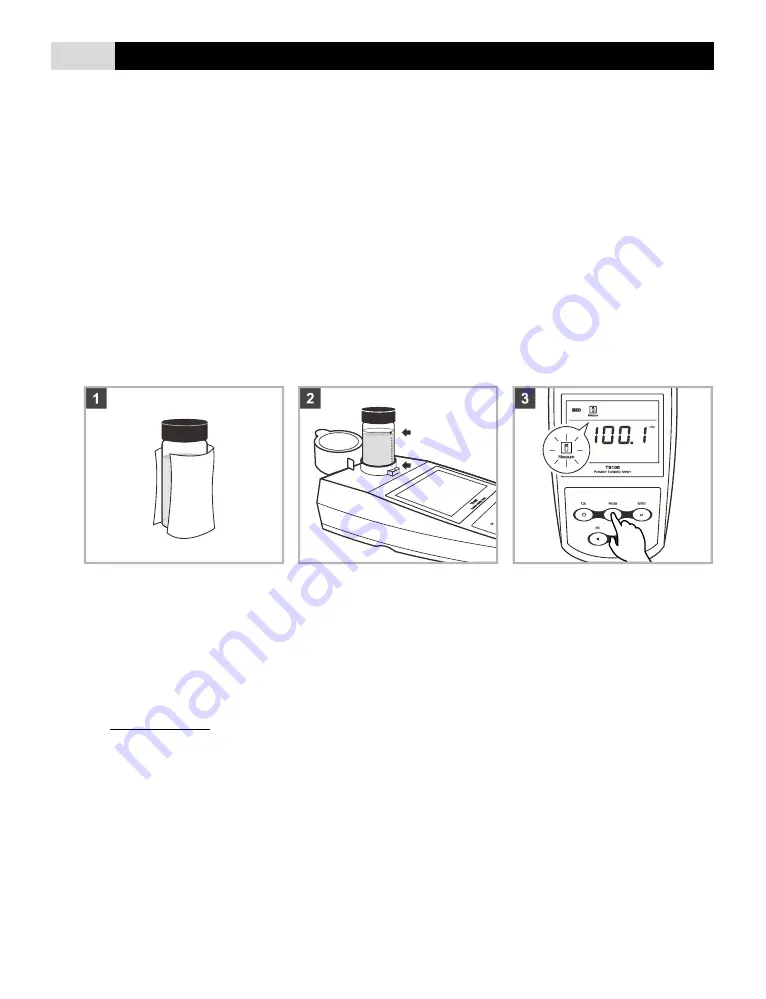
1.1.  Rinse the vial with approximately 10ml of the sample, capping the vial with the screw cap and gently inverting it several times. Discard 
 

the used sample and repeat the rinsing procedure two more times. 

1.2.  Fill the vial with the sample. Cap the vial. 
1.3      Wipe the vial with the lint-free cloth to remove waterdrops and fingerprints. Ensure that the outside of vial is dry and clean. 
1.4  Place the vial in the measurement chamber. Align the mark on the vial with the arrow on the meter. 
1.5  Close the light shield lid. Press the 

Meas

 key, the Measure icon begins flashing. 

1.6  Wait for the reading to stabilize, the Measure icon will stop flashing. 
 

  Press the 

Meas

 key, the meter will take a measurement again. 


Single measurement - high turbidity samples (>1100 NTU) 

For the high turbidity samples, the solution must be diluted prior to measurement. The dilution water can be obtained by filtering deionized water 
through a < 0.45µ m filter membrane. 
2.1  Repeat steps 1.1 through 1.5 above and record the measured value. 
2.2  Calculate the true turbidity of the original sample using the following formula. 


T =   


Continuous measurements 

3.1  Ensure that the meter is in the continuous measurement mode (Refer to page 8 

Selecting the measurement mode

). 

3.2  Fill the vial with the sample. Cap the vial. 
3.3  Gently invert the vial several times to mix the sample. 
3.4      Wipe the vial with the lint-free cloth to remove waterdrops and fingerprints. 
3.5  Place the vial in the measurement chamber. Align the mark on the vial with the arrow on the meter. 
3.6  Close the light shield lid. Press the 

Meas

 key, the Measure icon begins flashing, the meter continuously measures the sample. 


  To stop the measurement, press the 

Meas

 key again. 


T

d

 (V

s

 + V

d

V

s


Where:


T


= Ture turbidity of the original sample 


  T

d

 = Measured value 


  V

s

 = Volume of the original sample (ml) 


  V

d

 = Volume of the dilution water (ml) 


Summary of Contents for TB100

Page 1: ...TB100 Portable Turbidity Meter Instruction Manual Bante Instruments Inc...

Page 2: ...ber of calibration points 7 Calibrating the meter 8 Turbidity measurement 8 Selecting the measurement mode 8 Single measurement low turbidity samples 200 NTU 9 Single measurement high turbidity sample...

Page 3: ...of meter After the unpacking please check all components are complete If any are damaged or missing please contact the supplier The sample vial in the measurement chamber has been indexed with the 0...

Page 4: ...ment mode Starts calibration Enters the setup menu Press and hold the key for 3 seconds Stores current reading to memory Increase value or scroll up through the menu item Views the data log Decrease v...

Page 5: ...meter is in the calibration mode Calibration icon Indicates the meter is calibrating Installing the Batteries 1 Remove the battery compartment cover from the backside of meter 2 Insert the three AA ba...

Page 6: ...fault turbidity unit NTU Nephelometric turbidity unit NTU FNU Formazin nephelometric unit EBC Turbidity unit of the European Brewery Commission ASBC Turbidity unit of the American Society of Brewing C...

Page 7: ...e factory settings The Factory Reset option is used to restore the meter back to default settings If enabled all of the calibration data and selected options will be lost or reset the meter must be re...

Page 8: ...eaned thoroughly with deionised water after each measurement Any residues can cause inaccurate readings Turbidity Calibration The TB100 portable turbidity meter is calibrated with Formazin Standards a...

Page 9: ...ext calibration point 2 7 If necessary press the key to select an applicable calibration point 2 8 Repeat steps 2 2 through 2 5 until the meter shows Calibration is completed To exit the calibration m...

Page 10: ...flashing 1 6 Wait for the reading to stabilize the Measure icon will stop flashing Press the Meas key the meter will take a measurement again Single measurement high turbidity samples 1100 NTU For the...

Page 11: ...e key the display shows the date and time of measurement Format mm dd hh mm 3 Press the key the display shows the stored data 4 Press the key again the display shows the next data set 5 Press the Meas...

Page 12: ...computer 2 Click the OK button the application starts If your computer can not find a communication port please click the file CP210xVCPInstaller_x64 exe or CP210xVCPInstaller_x86 exe to update the d...

Page 13: ...f these vials measuring value and mark it Preparing the formazin standards Preparation of turbidity free water The turbidity free water is used for preparation of turbidity standards and is prepared b...

Page 14: ...Detector Silicon photodiode Stray Light 0 02 NTU Sample Vial 60 H 25 Dia mm Memory Stores up to 100 data sets Output USB communication interface Display Segmented LCD 60 L 40 W mm Operating Temperatu...

Page 15: ...r suggestions on how to speed up these efforts Warranty The warranty period for meter is two years from the date of shipment Above warranty does not cover the calibration standards Out of warranty pro...

Reviews: