background image

page 4

1. Before You Start

For best cleaner performance, you will need to follow the following steps of the installation.
1.1 Following manufacturer’s instructions, clean the filter and empty the skimmer and the pump strainer basket.
1.2 If your main drain is connected to the skimmer box, block off access.
1.3 Manually vacuum the pool.
1.4 Ensure circulation system is operating at maximum water flow, or you will need to re-adjust when it comes to 

clean the filter baskets.

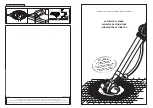
1.5 Adjust water flow, from all return inlets: 
 

a)  Downward and toward each other OR


b)  Downward and toward the centre of the pool.
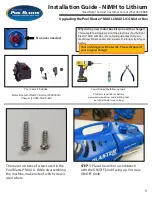
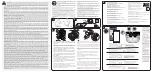
Installation

90 Degree Elbow

Speed Regulator

1

5

3

2

6

7

4

8

If return inlet directional fittings can’t be directed far enough 

down to prevent water flow affecting the natural movement 

of the hose, you will need to install return line diverters.  

2. AD Flow Valve

The AD Flow valve works by regulating the flow through the pool cleaner 

to the pump. As the filter collects debris, the valve will automatically 

maintain the correct flow.
The installation of the AD Flow valve will depend upon the type of 

skimmer box and Vac plate you have. It is either installed straight in from 

the top of the Vac plate or from the bottom of the Vac plate. 
See the 4 different cases below.

1st case:

 with Waterco

®

 Skimmer Box/Vac Plate

Screw in the AD Flow valve connector into the top of the Vac plate 

2nd case

: with Poolrite Skimmer Box/Vac Plate

Screw in the AD Flow valve connector into the bottom of the Vac plate. 

3rd case:

 with Speed Regulator/Skimtrol Vac Plate

Simply connect the 90 Degree Elbow into the top of  

the Vac Plate. 

Summary of Contents for tracker

Page 1: ...Owner s Manual H0532000 REV A...

Page 2: ...r basis thereafter Always disconnect the cleaner from the pool wall or skimmer before cleaning or backwashing the pool filter After cleaning or backwashing let the filtration system run for at least f...

Page 3: ...ion Like most mechanical devices the Tracker requires periodic adjustments routine maintenance and the replacement of certain hardworking parts Always insist on genuine Baracuda replacement parts Non...

Page 4: ...e directed far enough down to prevent water flow affecting the natural movement of the hose you will need to install return line diverters 2 AD Flow Valve The AD Flow valve works by regulating the flo...

Page 5: ...roblem occurs 3 Assemble the hose sections Start to connect one of the standard hose to the skimmer box Vac plate Then continue adding lengths of standard hose sections until you reach the furthest po...

Page 6: ...se to skimmer box then turn pool filter pump back on 6 Check Cleaner Flow 6 1 Watch the orange wheel marker use a stopwatch to time ten 10 wheel rotations 7 Adjust Flow if Necessary using the AD Flow...

Page 7: ...is most important to disconnect the head of the cleaner from the leader hose section when you take the cleaner out of the pool Backwashing the Pool Filter Always disconnect the Tracker from the pool...

Page 8: ...until it clicks into an upward position 3 Look into engine and remove debris that is present 4 If needed slowly push engine paddles forward and or backwards to move stuck debris to an accessible posi...

Page 9: ...ssary Make sure hose is not kinked or coiled Lay in sun to straighten if necessary Verify correct hose float positioning on the leader hose Observe the cleaner for more than five 5 minutes and ensure...

Page 10: ...ev A Baracuda is a registered trademark of Zodiac Group Australia Pty Ltd ABN 87 002 641 965 219 Woodpark Rd Smithfield NSW 2164 Australia Tel 1800 688 552 www zodiac com au Copyright Zodiac Australia...

Reviews: